소개
Step by step instruction to remove the back cover on the Microsoft Surface tablet. In order to complete this task you will need a Soft flat headed prying tool to remove panels, T5 Torx Screwdriver, and the Microsoft Surface device itself. If you do not have these tools, you may purchase them by choosing the links from down below. It is important to wear safety glasses when performing this task to prevent any harm. This process can be performed by anybody in a clear working area with appropriate lighting. The process for removing the back cover involves the removal of several small screws and panel covers around the camera.
필요한 것
-
-
-
Next, remove the ten 5.92mm T5 torx screws located underneath the kickstand.
-
Remove the seven 5.87mm T5 torx screws located under the camera casing. There is a sticker covering the second screw from the left.
-
Disconnect the rear cover from the main shell of the system by loosening it with a spudger where the gaps exist.
-
Continue working your way around to each corner and loosen the snap-ons on each side until the rear cover comes off.
-
-
-
Rotate the device 180 degrees so that the bottom of the device is facing you.
-
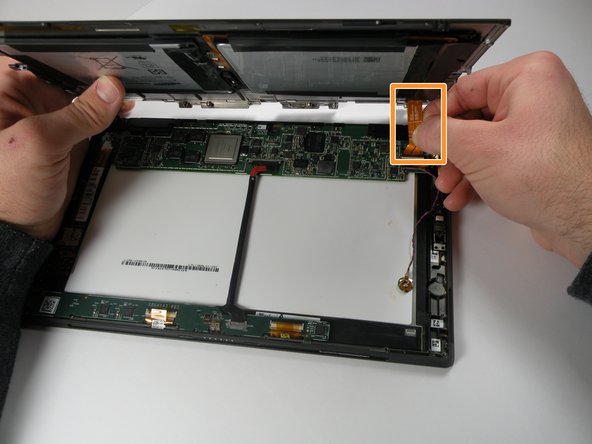
A ribbon connects the battery on the rear cover, to the motherboard. Slowly lift the bottom of the rear cover up until you can see the ribbon.
-
Use a spudger to push the ribbon away from the motherboard and parallel to the motherboard in order to remove the ribbon.
-
Separate the rear cover by lifting it up away from the main system.
-


To reassemble your device, follow the instructions in reverse order. Make sure to not over tighten screws to prevent stripping. Also, make sure that all panels are firmly seated back in place.
To reassemble your device, follow the instructions in reverse order. Make sure to not over tighten screws to prevent stripping. Also, make sure that all panels are firmly seated back in place.
다른 14명이 해당 안내서를 완성하였습니다.
팀

Cal Poly, Team 17-23, Forte Winter 2013 Cal Poly, Team 17-23, Forte Winter 2013 회원
CPSU-FORTE-W13S17G23
5 회원들
안내서 17개 작성하였습니다
댓글 2개
Can anyone tell me where to order the back cover? :-(
I ended up using a T6 Torx screwdriver, as my T5 was too small. I will note that I do NOT own the iFixit screwdriver - perhaps that one works just fine.
Chue Xiong - 답글