주요 콘텐츠로 건너뛰기

Minolta Dimage Xt Flash Capacitor Replacement

필요한 것

  1. Minolta Dimage Xt Flash Capacitor Replacement, Casing: 1 단계, 이미지 3개 중 1개 Minolta Dimage Xt Flash Capacitor Replacement, Casing: 1 단계, 이미지 3개 중 2개 Minolta Dimage Xt Flash Capacitor Replacement, Casing: 1 단계, 이미지 3개 중 3개
    • Locate and remove the silver screws on each side of the camera.

    • Use the Phillips #00 Screwdriver to unscrew all 2.0mm (4 instances) and 4.0mm (2 instances) screws.

  2. Minolta Dimage Xt Flash Capacitor Replacement: 2 단계, 이미지 3개 중 1개 Minolta Dimage Xt Flash Capacitor Replacement: 2 단계, 이미지 3개 중 2개 Minolta Dimage Xt Flash Capacitor Replacement: 2 단계, 이미지 3개 중 3개
    • Then, carefully pry apart the front and back outer casing away from the internal components.

    • Be aware of the ribbon wire that will disconnect when the casing is detached.

  3. Minolta Dimage Xt Flash Capacitor Replacement, Flash Capacitor: 3 단계, 이미지 2개 중 1개 Minolta Dimage Xt Flash Capacitor Replacement, Flash Capacitor: 3 단계, 이미지 2개 중 2개
    • Caution: Touching the capacitor leads may cause serious injury. Use a capacitor discharge probe to safely rid the capacitors of dangerous charges.

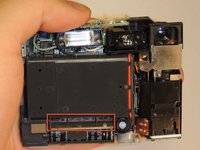
    • On the front side of the camera, locate the flash battery holder.

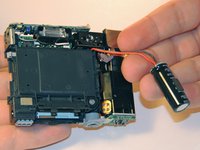
    • Lift the housing and remove the battery.

    • After removing the battery, clip the wires and solder the replacement battery.

결론

To reassemble your device, follow these instructions in reverse order.

다른 한 분이 해당 안내서를 완성하였습니다.

작성자

4다른 기여자 명과 함께

Qqq

회원 가입일: 03/11/13

19 평판

안내서 1개를 작성함

1가이드 댓글

Its a cap not a battery :D

Eigirdas Gedgaudas - 답글

댓글 쓰기

조회 통계:

지난 24시간: 0

지난 7일: 6

지난 30일: 24

전체 시간: 1,249