주요 콘텐츠로 건너뛰기

Motorola Moto E4 (XT1762) Charging Board Replacement

필요한 것

  1. Motorola Moto E4 (XT1762) Charging Board Replacement, Back Cover: 1 단계, 이미지 1/3 Motorola Moto E4 (XT1762) Charging Board Replacement, Back Cover: 1 단계, 이미지 2/3 Motorola Moto E4 (XT1762) Charging Board Replacement, Back Cover: 1 단계, 이미지 3/3
    • Power off your phone before beginning disassembly.

    • Insert a fingernail, or spudger, into the notch on the bottom right corner to start separating the phone unit from the back cover.

    • Move to the bottom left corner to pry the phone out of the back cover.

  2. Motorola Moto E4 (XT1762) Charging Board Replacement: 2 단계, 이미지 1/2 Motorola Moto E4 (XT1762) Charging Board Replacement: 2 단계, 이미지 2/2
    • Lift the phone out of the back cover.

  3. Motorola Moto E4 (XT1762) Charging Board Replacement, Battery: 3 단계, 이미지 1/3 Motorola Moto E4 (XT1762) Charging Board Replacement, Battery: 3 단계, 이미지 2/3 Motorola Moto E4 (XT1762) Charging Board Replacement, Battery: 3 단계, 이미지 3/3
    • Use a fingernail or spudger to pry at the notch at the bottom end of the battery.

    • Lever the battery out of its recess and remove it.

  4. Motorola Moto E4 (XT1762) Charging Board Replacement, Loudspeaker: 4 단계, 이미지 1/1
    • Remove the six 3.3 mm long Phillips #00 screws.

  5. Motorola Moto E4 (XT1762) Charging Board Replacement: 5 단계, 이미지 1/2 Motorola Moto E4 (XT1762) Charging Board Replacement: 5 단계, 이미지 2/2
    • Insert an opening pick between the loudspeaker and the frame to pry it up by twisting the opening pick.

    • Remove the loudspeaker unit.

  6. Motorola Moto E4 (XT1762) Charging Board Replacement, Charging Board: 6 단계, 이미지 1/2 Motorola Moto E4 (XT1762) Charging Board Replacement, Charging Board: 6 단계, 이미지 2/2
    이 단계에 사용된 도구:
    Tweezers
    $4.99
    구매
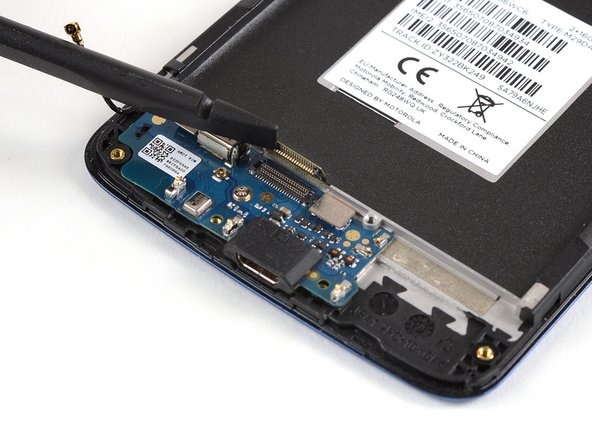
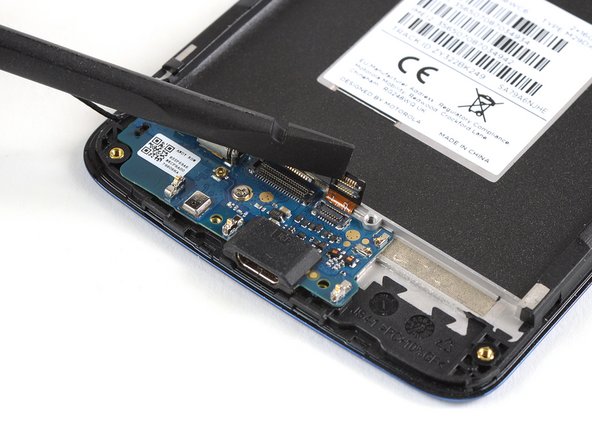
    • Use a pair of tweezers to pry up and disconnect the antenna cable.

  7. Motorola Moto E4 (XT1762) Charging Board Replacement: 7 단계, 이미지 1/2 Motorola Moto E4 (XT1762) Charging Board Replacement: 7 단계, 이미지 2/2
    • Use the edge of a spudger to pry up and disconnect the interconnect flex cable.

  8. Motorola Moto E4 (XT1762) Charging Board Replacement: 8 단계, 이미지 1/2 Motorola Moto E4 (XT1762) Charging Board Replacement: 8 단계, 이미지 2/2
    • Use the edge of a spudger to pry up and disconnect the fingerprint sensor flex cable.

  9. Motorola Moto E4 (XT1762) Charging Board Replacement: 9 단계, 이미지 1/1
    • Remove the 2.9 mm long Phillips #00 screw securing the daughterboard.

  10. Motorola Moto E4 (XT1762) Charging Board Replacement: 10 단계, 이미지 1/2 Motorola Moto E4 (XT1762) Charging Board Replacement: 10 단계, 이미지 2/2
    • Pry under the bottom end of the charging board and lift it upwards.

    • Remove the charging board.

결론

Before reassembly check your new part for any components that might need to be transferred from the old one (e.g. microphone rubber gasket).

To reassemble your device, follow these instructions in reverse order.

Take your e-waste to an R2 or e-Stewards certified recycler.

Repair didn’t go as planned? Check out our Answers community for troubleshooting help.

다른 3명이 해당 안내서를 완성하였습니다.

Dominik Schnabelrauch

회원 가입일: 11/23/16

204,989 평판

안내서 682개 작성하였습니다

iFixit iFixit 회원

Staff

136 회원들

안내서 17,430개 작성하였습니다

댓글 0개

댓글 쓰기

조회 통계:

24 시간 전: 0

7일 전: 0

30일 전: 9

전체 시간: 1,637