소개
This guide will teach you how to remove and replace the battery in the Moto G, in the event that your current battery is no longer holding charge. Fortunately, all you'll need is a Torx T5 screwdriver, a plastic opening tool, and some spare time.
Before you begin, download the Rescue and Smart Assistant app to backup your device and diagnose whether your problem is software or hardware related.
If your battery is swollen, take appropriate precautions.
필요한 것
-
-
Starting at the USB port on the bottom, remove the rear cover by prying it off with your finger.
-
Work your way down the sides to avoid cracking the rear cover.
-
-
-
Remove the eight 4.2 mm screws at the top and bottom of the phone using a T5 Torx screwdriver.
-
Using the same screwdriver, remove the six 3.2 mm screws on the sides.
-
Remove the next layer of the phone by prying it off with your fingers.
On mine, they’re all Torx T5
You neglected to mention that the two buttons might fall out when you remove this part.
-
-
-
이 단계에 사용된 도구:Tweezers$4.99
-
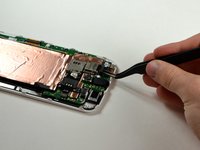
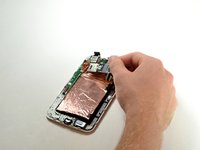
Using a plastic opening tool or tweezers, disconnect the SIM/SD card reader at the top of the phone.
-
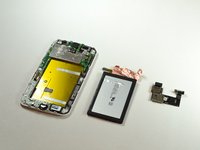
Disconnect the battery connector by prying it off of the motherboard.
-
Disconnect the vibration motor by prying its connector off of the motherboard.
There's no need to remove the battery or motherboard to get to the speakers - they are accessible as soon as the back cover is removed. Skip this step and jump straight to step 10
In fact it is not necessary to remove the simcard rack. I managed to remove battery with the rack on. It is possible to remove the foil startingfrom the bottom of the battery and once peeled off the battery can be removed. You only need to disconnect the battery from the mother board.
-
-
-
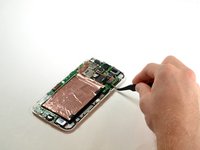
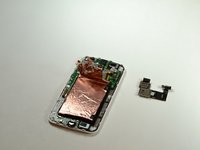
Using a plastic opening tool, carefully pry off the entire SIM/SD card reader component.
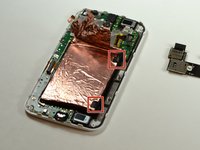
As mentioned in a comment on the previous step, you don’t actually need to remove the SIM/SD card reader at all.
If you peel back the copper foil from the opposite end of the device, you can sneak the battery out (and the new battery in) by just sliding the battery ribbon cable out from under the SIM/SD card reader.
Thx for the idea. I’ll let you know if it was working - I’ll my battery soon. regards!
ausssiefan - 답글
Perfect as mentioned - just slide the cable foil under the sim rack - no need to remove the rack. Works flawlessly, quick repair.
-
-
-
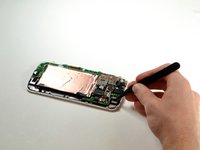
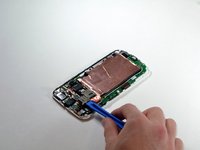
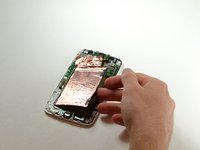
Peel off the two black stickers on the right side of the battery using your fingers.
-
Remove the battery by pulling the right side of it upwards.
If the copper foil is damaged beyond repair, what can be used to replace it?
-


To reassemble your device, follow these instructions in reverse order.
To reassemble your device, follow these instructions in reverse order.
다른 50명이 해당 안내서를 완성하였습니다.
팀

Cal Poly, Team 1-19, Maness Fall 2015 Cal Poly, Team 1-19, Maness Fall 2015 회원
CPSU-MANESS-F15S1G19
4 회원들
안내서 15개를 작성함
댓글 14개
It might be worth mentioning that when you remove the 'next layer' of the phone, the power and volume buttons are likely to fall out (I maybe panicked a little when the power button first fell out and I didn't immediately know what part of the phone it was). Especially since they're a pain to put back into place afterwards.
Good guide and pictures, thank you, helped me complete the task. Worth reiterating comments above re power and volume buttons, be careful not to lose them and take note of which way up they go. Also note two different screw lengths, when reassembling be sure to put the correct length screws in the holes.
Should also mention that when reassembling, the 3.2mm screws down the sides need to be tightened very gently, otherwise the screw tips will press on the back of the LCD. If you're lucky this will cause a spot on the LCD and loosening the screw slightly will fix it. If you're unlucky the LCD will be destroyed.
The instructions were just fine and I was able to replace the battery. HOWEVER, when I plugged the phone in to charge the replacement battery, the notification light came on steady and the phone didn't do anything else. I then replaced the purchased battery with the old one and the phone works again. I did buy the battery about 6 months ago and just installed it today. I'm not sure if the battery was bad from the start, if it deteriorates over time without being installed in a phone or what happened. All I know is the replacement battery didn't work and the old one does.
After this exercise, I certainly know how to replace the battery in a Moto G2!
Replaced the power connector using these illustrations. No need to remove the battery or the battery connectors, but 3 PCB screw have to be removed along with the screen ribbon cable, which is removed like any other ribbon cable.
Not too bad of a job but you need hot air to R&R that surface-mounted power connector. I had a surface mount soldering station to do it and I wouldn’t recommend replacing the power connector without one.
This guide should mention that you should remove your SIM card and SD card from the reader before changing the battery.
Because I was following the instructions exactly I didn’t remove them first, and in removing the SIM/SD card reader I broke the SD card it contained :(. So be sure to remove SIM and SD card before starting this tutorial!
Hi Willem,
Sorry to hear that! The guide does mention SIM card removal in the first step. I will modify it so it stands out more.
Hi Arthur, yeah, I added that info to the guide after I discovered the missing info. It wasn’t there before.
Willem -
Sorry about the misunderstanding and thanks for adding that into the guide!
Thanks very much. This was a great guide. I just replaced the battery. Without your guide, I might have damaged something. The switches did fall out, The little switch tabs go on the up side (with the screen down).
Just one comment, when removing the SIM card connector. You need to pry it off the motherboard, I made the mistake of thinking it was plugged in, and tried to pull it out rather than pry it out. Otherwise worked out OK.
JohnB
The battery shown works in earlier G2 models. I have an XT1072, which uses a battery with a twisted wire and narrow 2-pin slide connector much like the G3 batteries. Vendors have yet to confirm whether I can use say an FT40 (2200 mAh) that also fits Motorola E2 phones. My suspicion is Motorola/Google simply upgraded the battery midway through the series. But don’t buy the flat-pin connector style you see here until you’re sure.
Simply peel back the copper foil …
In the case where the foil is unuseable is it absolutely necessary to replace it, and if so, can anyone suggest a suitable material/supplier please?
Thanks.
Important - remove SIM cards before opening the phone.
Wojciech Dyba - 답글