주요 콘텐츠로 건너뛰기

Motorola RAZR2 v9m Battery Replacement

  1. Motorola RAZR2 v9m Battery Replacement, Battery: 1 단계, 이미지 1/2 Motorola RAZR2 v9m Battery Replacement, Battery: 1 단계, 이미지 2/2
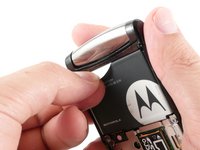
    • Push the rear cover toward the hinge of the RAZR2. The panel will slide about 3 mm.

  2. Motorola RAZR2 v9m Battery Replacement: 2 단계, 이미지 1/3 Motorola RAZR2 v9m Battery Replacement: 2 단계, 이미지 2/3 Motorola RAZR2 v9m Battery Replacement: 2 단계, 이미지 3/3
    • Pinch the top and bottom edges of the panel and pull it away from the RAZR2.

    • The rear panel uses four small hooks to hold it in place. If the panel will not easily pull away, slide the panel more toward the hinge.

  3. Motorola RAZR2 v9m Battery Replacement: 3 단계, 이미지 1/2 Motorola RAZR2 v9m Battery Replacement: 3 단계, 이미지 2/2
    • Gently pull the white plastic tab to lift the battery away from the RAZR2.

    • The white plastic tab is attached to the phone. Only pull it enough to expose the edges of the battery.

  4. Motorola RAZR2 v9m Battery Replacement: 4 단계, 이미지 1/2 Motorola RAZR2 v9m Battery Replacement: 4 단계, 이미지 2/2
    • To remove the battery, grasp its edges pull away from the phone.

    • When installing a new battery, be sure the metal contacts on the phone line up with the ones on the battery.

결론

To reassemble your device, follow these instructions in reverse order.

다른 4명이 해당 안내서를 완성하였습니다.

John T Roller

회원 가입일: 06/04/13

800 평판

안내서 6개 작성하였습니다

댓글 0개

댓글 쓰기

조회 통계:

24 시간 전: 1

7일 전: 4

30일 전: 11

전체 시간: 1,816