주요 콘텐츠로 건너뛰기

Motorola V276 Main LCD Screen Replacement

필요한 것

  1. Motorola V276 Main LCD Screen Replacement, Front panel/ Screen Logic Board: 1 단계, 이미지 1/1
    • Using the plastic opening tool, pry off the top faceplate.

    • Place the tool in the small crack that runs along the side of the phone and pry.

  2. Motorola V276 Main LCD Screen Replacement: 2 단계, 이미지 1/1
    • Using the T6 Torx Screwdriver remove all 4 small screws.

  3. Motorola V276 Main LCD Screen Replacement: 3 단계, 이미지 1/1
    • Remove silver plate from phone.

  4. Motorola V276 Main LCD Screen Replacement: 4 단계, 이미지 1/1
    • Using the spudger remove the plastic camera casing

  5. Motorola V276 Main LCD Screen Replacement: 5 단계, 이미지 1/1
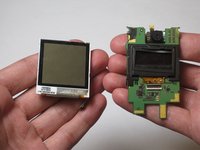
    • Using the iPod Opening Tool remove the yellow flex cable from the green logic board.

  6. Motorola V276 Main LCD Screen Replacement: 6 단계, 이미지 1/1
    • Use Spudger or hands to detach flex cable from front screen logic board

  7. Motorola V276 Main LCD Screen Replacement, Main LCD Screen: 7 단계, 이미지 1/2 Motorola V276 Main LCD Screen Replacement, Main LCD Screen: 7 단계, 이미지 2/2
    • Using spudger remove the LCD screen from the green logic board.

결론

To reassemble your device, follow these instructions in reverse order.

Cecilia

회원 가입일: 04/11/10

1 평판

안내서 3개 작성하였습니다

Cal Poly, Team 27-96, Amido Spring 2010 Cal Poly, Team 27-96, Amido Spring 2010 회원

CPSU-AMIDO-S10S27G96

4 회원들

안내서 15개 작성하였습니다

댓글 0개

댓글 쓰기

조회 통계:

24 시간 전: 1

7일 전: 1

30일 전: 1

전체 시간: 1,318