주요 콘텐츠로 건너뛰기

Mr. Coffee TF6 Dust Cover Replacement

필요한 것

  1. Mr. Coffee TF6 Dust Cover Replacement, Dust Cover: 1 단계, 이미지 1/2 Mr. Coffee TF6 Dust Cover Replacement, Dust Cover: 1 단계, 이미지 2/2
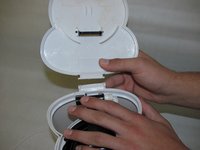
    • Facing the front of the TF6, gently lift the dust cover along its hinge until it reaches its designed stopping point.

  2. Mr. Coffee TF6 Dust Cover Replacement: 2 단계, 이미지 1/2 Mr. Coffee TF6 Dust Cover Replacement: 2 단계, 이미지 2/2
    • Orient the retaining bracket upwards (away from the main body of unit).

    • Do not push the retaining bracket beyond its designed range of motion. It may snap if too much force is applied outside its limit.

  3. Mr. Coffee TF6 Dust Cover Replacement: 3 단계, 이미지 1/1
    • With the retaining clip in its released position, pull the spout down towards the filter basket.

  4. Mr. Coffee TF6 Dust Cover Replacement: 4 단계, 이미지 1/2 Mr. Coffee TF6 Dust Cover Replacement: 4 단계, 이미지 2/2
    • Carefully detach the dust cover by disengaging the locking pins, starting at one side.

    • Extra force may be required to disengage the dust cover's locking pins. Refrain from applying excessive upward force on the dust cover, as dong so may cause the pins to snap under pressure.

결론

Follow these steps in reverse order with a new Dust Cover.

Jordan

회원 가입일: 01/31/14

204 평판

안내서 2개 작성하였습니다

Cal Poly, Team 13-18, Regan Winter 2014 Cal Poly, Team 13-18, Regan Winter 2014 회원

CPSU-REGAN-W14S13G18

4 회원들

안내서 5개 작성하였습니다

댓글 0개

댓글 쓰기

조회 통계:

24 시간 전: 0

7일 전: 1

30일 전: 3

전체 시간: 381