주요 콘텐츠로 건너뛰기

NABI XD Screen Replacement

필요한 것

  1. NABI XD Screen Replacement, Rear panel: 1 단계, 이미지 2개 중 1개 NABI XD Screen Replacement, Rear panel: 1 단계, 이미지 2개 중 2개
    • Use the plastic opening tool at the top left corner seam, then pry the corner apart.

  2. NABI XD Screen Replacement: 2 단계, 이미지 1개 중 1개
    • Next slide the plastic opening tool across the sides of the Nabi. It will slowly open.

    • There are small plastic clips that need to be release. Gently apply outwards pressure until the clips give.

    • Go around the NABI XD and separate the rear panel from the device.

  3. NABI XD Screen Replacement, Battery: 3 단계, 이미지 2개 중 1개 NABI XD Screen Replacement, Battery: 3 단계, 이미지 2개 중 2개
    • Place your fingernails on both sides of the connector and pull it straight back away from the holder.

  4. NABI XD Screen Replacement: 4 단계, 이미지 1개 중 1개
    • Battery is glued to the base, lift carefully.

    • To remove battery, lift the battery up from the motherboard.

  5. NABI XD Screen Replacement, Charging port: 5 단계, 이미지 2개 중 1개 NABI XD Screen Replacement, Charging port: 5 단계, 이미지 2개 중 2개
    이 단계에 사용된 도구:
    Tweezers
    $4.99
    • Remove the two 4mm Phillips screws with the PH#0 screwdriver.

    • Disconnect the left (L) speaker wire from the charging port by grabbing it on both sides with the tweezers and pulling straight back.

  6. NABI XD Screen Replacement: 6 단계, 이미지 1개 중 1개
    • Use your fingernails or a spudger to flip up the small retaining flap, then pull the ribbon straight back to remove

    • Lift the charging port from the NABI XD.

  7. NABI XD Screen Replacement, Motherboard: 7 단계, 이미지 3개 중 1개 NABI XD Screen Replacement, Motherboard: 7 단계, 이미지 3개 중 2개 NABI XD Screen Replacement, Motherboard: 7 단계, 이미지 3개 중 3개
    이 단계에 사용된 도구:
    Tweezers
    $4.99
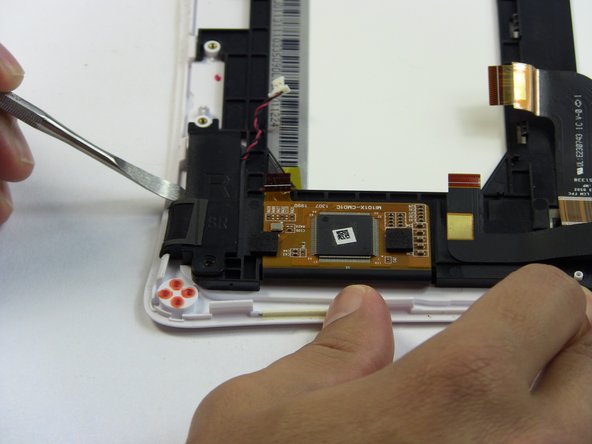
    • To remove the marked ribbons, use your fingernails or a spudger to lift up small tab

    • Use the Precision Tweezers to gently pull the ribbons straight out of the connectors.

    • You need to remove 4 ribbons

  8. NABI XD Screen Replacement: 8 단계, 이미지 3개 중 1개 NABI XD Screen Replacement: 8 단계, 이미지 3개 중 2개 NABI XD Screen Replacement: 8 단계, 이미지 3개 중 3개
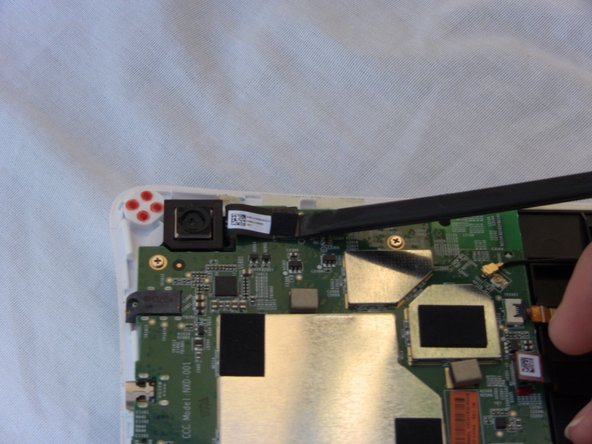
    • Disconnect the camera by lifting the ribbon straight up. Also disconnect the remaining ribbon by lifting up gently.

    • To disconnect antenna wire, use the tweezers to pry connector straight from the board.

  9. NABI XD Screen Replacement: 9 단계, 이미지 2개 중 1개 NABI XD Screen Replacement: 9 단계, 이미지 2개 중 2개
    • Disconnect the Right speaker by grabbing the wire head by its sides and pulling it back from the connector.

  10. NABI XD Screen Replacement: 10 단계, 이미지 2개 중 1개 NABI XD Screen Replacement: 10 단계, 이미지 2개 중 2개
    • Remove the four 4mm Phillips screws with the PH#0 screwdriver.

  11. NABI XD Screen Replacement: 11 단계, 이미지 1개 중 1개
    • Lift the motherboard up away from the Nabi XD.

  12. NABI XD Screen Replacement, Speakers: 12 단계, 이미지 3개 중 1개 NABI XD Screen Replacement, Speakers: 12 단계, 이미지 3개 중 2개 NABI XD Screen Replacement, Speakers: 12 단계, 이미지 3개 중 3개
    • Right (R) speaker removal:

    • Remove one 4mm Phillips screw.

    • Use the metal spudger to separate the speaker from the frame.

    • The speaker is glued to the Nabi XD it will require some force to separate them.

  13. NABI XD Screen Replacement: 13 단계, 이미지 2개 중 1개 NABI XD Screen Replacement: 13 단계, 이미지 2개 중 2개
    • Remove the left (L) speaker wire from the frame by pulling it to the side and up.

    • The wire in this step, is connected to the charging port. Removing it, is shown in detail on step 6.

  14. NABI XD Screen Replacement: 14 단계, 이미지 3개 중 1개 NABI XD Screen Replacement: 14 단계, 이미지 3개 중 2개 NABI XD Screen Replacement: 14 단계, 이미지 3개 중 3개
    • Left (L) speaker removal:

    • Remove two 4mm Phillips screws.

    • Use the metal spudger to separate the speaker from the frame.

  15. NABI XD Screen Replacement, Screen: 15 단계, 이미지 3개 중 1개 NABI XD Screen Replacement, Screen: 15 단계, 이미지 3개 중 2개 NABI XD Screen Replacement, Screen: 15 단계, 이미지 3개 중 3개
    • The ribbons are glued to the frame so gently lift them up without ripping them.

    • Lightly lift the marked wires and ribbons from the frame by gently pulling them in the direction of the arrows and up.

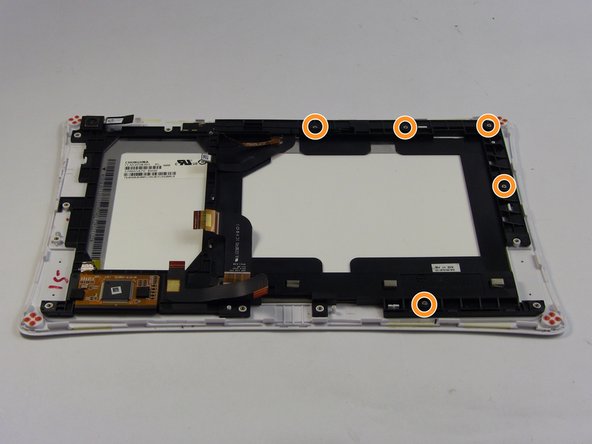
    • Remove five 4mm Phillips screws from the frame.

  16. NABI XD Screen Replacement: 16 단계, 이미지 2개 중 1개 NABI XD Screen Replacement: 16 단계, 이미지 2개 중 2개
    • Use the Plastic Opening tools to lift the frame up.

    • The ribbons need to be detangled from the frame while you are lifting it up.

    • Do not yank the frame away from the Nabi XD it is connect to it by a ribbon. Gently lift.

  17. NABI XD Screen Replacement: 17 단계, 이미지 2개 중 1개 NABI XD Screen Replacement: 17 단계, 이미지 2개 중 2개
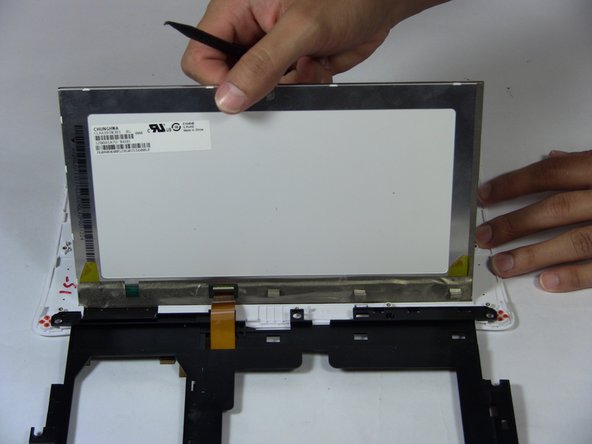
    • Lift the screen up with the black spudger.

    • Lift the frame up slowly and place it to the side.

결론

To reassemble your device, follow these instructions in reverse order.

다른 한 분이 해당 안내서를 완성하였습니다.

작성자

1다른 기여자 명과 함께

Marissa Schiereck

회원 가입일: 09/15/16

638 평판

안내서 6개를 작성함

USF Tampa, Team 17-2, Blackwell Fall 2016 USF Tampa, Team 17-2, Blackwell Fall 2016 회원

USFT-BLACKWELL-F16S17G2

3 회원들

안내서 12개를 작성함

1가이드 댓글

Will the screen from an A or C model work with a B model?

Kevin Fifer - 답글

댓글 쓰기

조회 통계:

지난 24시간: 3

지난 7일: 5

지난 30일: 18

전체 시간: 815