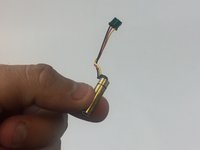
주요 콘텐츠로 건너뛰기

Neato Botvac 80 Laser Replacement

필요한 것

  1. Neato Botvac 80 Laser Replacement, Rear Bumper: 1 단계, 이미지 1/1
    • Grab the rear bumper with both hands on either side.

  2. Neato Botvac 80 Laser Replacement: 2 단계, 이미지 1/1
    • Pull the left and right sides away from the machine to unclip the bumper. This requires that you bend the plastic a little bit. Unclip one side a little bit and allow the prong to rest on the side of the machine. Then unclip the other side and pull off the bumper parallel to both sides

  3. Neato Botvac 80 Laser Replacement, Top Face Panel: 3 단계, 이미지 1/2 Neato Botvac 80 Laser Replacement, Top Face Panel: 3 단계, 이미지 2/2
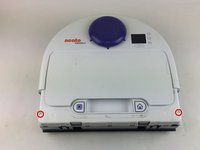
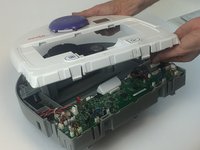
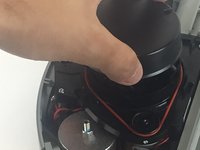
    • Looking from above, remove the two 11mm screws with a torx T10 screwdriver.

  4. Neato Botvac 80 Laser Replacement: 4 단계, 이미지 1/1
    • Begin by placing the robot on it's back and removing the six 11m screws using a Torx T10 screwdriver.

  5. Neato Botvac 80 Laser Replacement: 5 단계, 이미지 1/3 Neato Botvac 80 Laser Replacement: 5 단계, 이미지 2/3 Neato Botvac 80 Laser Replacement: 5 단계, 이미지 3/3
    • To remove the top, you must press in both of the clamps at the same time and push upwards.

    • When removing the top, before you can completely take it off you must unplug the LCD power cable from the motherboard.

  6. Neato Botvac 80 Laser Replacement, Laser: 6 단계, 이미지 1/3 Neato Botvac 80 Laser Replacement, Laser: 6 단계, 이미지 2/3 Neato Botvac 80 Laser Replacement, Laser: 6 단계, 이미지 3/3
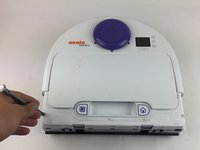
    • Lift gently upon the top panel.

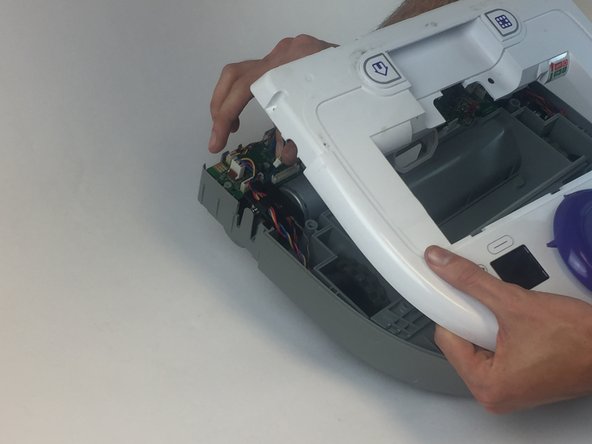
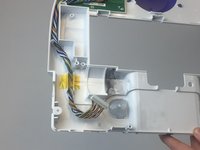
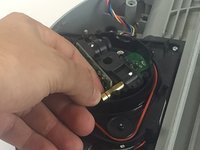
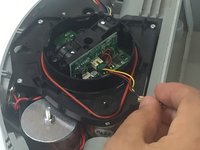
    • Unplug the clip located on the right side before completely removing.

  7. Neato Botvac 80 Laser Replacement: 7 단계, 이미지 1/3 Neato Botvac 80 Laser Replacement: 7 단계, 이미지 2/3 Neato Botvac 80 Laser Replacement: 7 단계, 이미지 3/3
    • This black cap spins so may need a hand when unscrewing the screws.

    • Locate and unscrew the four 12 mm screws located in the black cap with the phillips #00 screwdriver.

    • Lift the black cap to reveal the laser.

  8. Neato Botvac 80 Laser Replacement: 8 단계, 이미지 1/3 Neato Botvac 80 Laser Replacement: 8 단계, 이미지 2/3 Neato Botvac 80 Laser Replacement: 8 단계, 이미지 3/3
    • There are two loosely secured black blinders on both the laser and sensor.

    • Gently pull back on the gold laser to remove it from the socket.

    • Unplug the mini LCU clip by gently pulling up and remove the laser.

결론

To reassemble your device, follow these instructions in reverse order.

다른 4명이 해당 안내서를 완성하였습니다.

Brandon Blank

회원 가입일: 02/02/17

675 평판

안내서 5개 작성하였습니다

USF Tampa, Team 17-5, Blackwell Spring 2017 USF Tampa, Team 17-5, Blackwell Spring 2017 회원

USFT-BLACKWELL-S17S17G5

3 회원들

안내서 12개 작성하였습니다

댓글 9개

lol. You don’t need to open it to replace the laser. The top is a clip on. Just pull it and remove 4 screws.

Evgany Vorona - 답글

where do you buy the replacement laser?

Nancy Butler - 답글

I too would like to know where he got a replacement laser.

Anthony Mainini -

where do I buy a replacement laser?

bjurgensen79@gmail.com

Beverly Jurgensen

Beverly Jurgensen - 답글

Where do I buy a replacement laser?

Beverly Jurgensen

Beverly Jurgensen - 답글

댓글 쓰기

조회 통계:

24 시간 전: 1

7일 전: 3

30일 전: 22

전체 시간: 8,988