소개
This guide is used to remove and replace the motherboard of the Nexus 6 phone. It can be used if your phone's power supply continues to freeze or crash. Also, if your phone fails to recognize connectors that it previously recognized, you may need to replace the motherboard. Motherboard replacement should be treated with care.
필요한 것
-
-
With a SIM card eject tool (a paperclip will work as well), push down on the hole at the top of the phone until the SIM card holder releases. This should not take much pressure.
-
Remove the SIM card and the SIM card holder.
-
-
-
Lay out a soft cloth on your workspace to prevent scratching the screen in this and future steps.
-
Pry open the back casing using the soft plastic opening pick.
-
Carefully pull the back casing apart from the rest of the phone with your hands. Because the casing is glued to the rest of the phone, this step may require some force. Don't be alarmed if the casing flexes a bit.
Dave Lee on YouTube has a much more helpful note on removing the back cover. That video is available at: https://youtu.be/Yk1CGk0TZAw?t=1m20s
the adhesive is actually quite strong (mild is the wrong term here), even after lots of heat I still struggled to remove the back cover easily. BE CAREFUL of the volume/power flex cable at the side and top left, it is completely exposed when you attempt to pry the back plate off. I got lucky.
I would recommend using a utility kniofe (make sure you have a new blade) to pry open the back case just a bit, and then slide in a playing card, fingers, pick tool or whatever else you have.
The YouTube video note about sticking a needle through a hole in the SIM slot would have worked fine if I had a needle...
I second the method of getting the back off by inserting an appropriate shaft through the hole just inside the sim slot. I had zero success using suction cups or trying to get something into the edge at the bottom, but very easily pushed on the back from the sim slot hole enough to get a plastic spreader in. The YouTube video by David Lee shows this.
-
-
-
Remove the twenty-two 2.3 mm T3 Torx screws with the T3 Torx Screwdriver.
Thanks for the heads up. about to start the surgery on the old baby. Turns out that on my phone its T3. Makes me wonder if they varied the screws from batch to batch at the factory, certainly looks like it
mrdamnslow - 답글
If you're using iFixit's tools then T3 should be the correct size, but T4 may work as well. There's probably a bit of variance in the sizes and manufacturing tolerances depending on who made your tools. Bottom line, try a T3 and if that doesn't feel right, move up a size (which is a good rule of thumb for any screw you encounter).
I got this kit: https://www.lowes.com/pd/Kobalt-73-Piece... as I thought I had bits small enough already, so didn’t order them with the battery. Rather than wait for shipping after finding out I was mistaken, I just ran out and grabbed this since it had T3 and T4 (nothing else I found in store or online for Lowes or Walmart did).
The T3 bit fit all my screws snuggly; the T4 bit was too big. So clearly, this is a “YMMV” based on the screws either being different depending on manuf. batch, or based on different tolerances between bits. Hence why I linked the exact one I used (Item #856840 @ Lowes).
Tim Fisher - 답글
After you take out the screw by the buttons, the retainer bar and buttons can fall out. I recommend you just explicitly remove the button retained and buttons, so they don’t fall out unexpectedly.
I tried T3, and then T4. Both of them stripped most of the screws. The screw quality is garbage. Just a heads up for anyone looking to try this. If your phone has over-tightened screws like mine, you’re SOL. I managed to get 5 screws out from the 22 total.
Really wish these comments were made more apparent when going through this guide, had 18 screws come free with T3 just fine, ended up with 5 that stripped the instant I turned my driver once with T3, T4 wasn’t enough to fill the gap, now they’re stuck and I’m out $75 from buying a new display for a device I can’t fix without last resort trying to Dremel a slot into the heads of these teeny tiny screws
-
-
-
With tweezers, remove the rubber protector on the lower part of the phone.
-
Disconnect the battery connector by gently prying it straight up with a spudger, on the side opposite the cable.
-
Completely separate the battery side from the motherboard side by gently pulling the sides apart with your hands.
This step MUST also include a note to disconnect the power and volume ribbon cable and cover at the top left of the device.
Hi Taylor. I just completed this guide and it was not required to disconnect the power and volume ribbon at this step. Both connected ribbon are part of the mid frame.
Gaetan -
Hi Gaetan, Taylor is right, you need to document that the power switch & volume connector (left top under the rubber) is to be disconnected from the motherboard when you disassemble. - Worse if you do not comment on it, this becomes an serious issue when you assembly the phone again! Most people will ignore the fact, they have to connect the cable again. Otherwise the power switch will not work. People will get mad, because they don't identify the root cause, why the phone does not start again), as the rubber does not show, the disconnected cable. It took my a least an hour before I worked through all connectors, after I already tried to run through all the 'Nexus 6 does not start' comments on the Internet, which aren't the root cause here.
Yes, I realised this after I’d put the phone back together and the power and volume ribbon cable had been disconnected in the process without me realising it. My Nexus 6 is nearly 4 years old now but the phone is back to new! Thanks for the advice guys.
The bottom right cable is not a ZIF (Zero Insertion Force) connector, it does not have a latch, the connectors are little copper clips and the connector needs to be pulled with some force upwards to disconnect.
This is definitely not a ZIF connector. Not only does it require a fair amount of force (relative to the connector size) to push on, it can be extremely stubborn to remove--especially with nearly two years of age on the fragile plastic available for pulling. There is a pull tab (of sorts) on the connector, but mine snapped right off. Luckily, the parts that are likely to break are all part of the battery assembly. The new battery comes with a new cable.
To separate the battery section and motherboard sides you don't pull up the black swiss cheese plastic cover, just run your fingernail along the side in between the blue metal and the black edge of the screen.
thanks a lot kevin you saved me. This guide should be a bit more precise...
guyom -
As Taylor said, by the camera lens there is another rubber peice, take that out and disconnect that cable, and make sure to reconnect it afterwards. That cable connects your buttons to the mobo.
Nick Myers - 답글
I did exactly everything described in this guide and my Nexus 6 front camera still does not correspond with the camera app. Is there something I am missing and is there anyone else with a similar problem to mine. I am thinking of cleaning the connector with rubbing alcohol or something similar.
ajqwerty93 - 답글
-
-
-
-
Use a spudger to gently detach the front facing camera connector.
-
Remove the front facing camera using the tweezers.
-
-
-
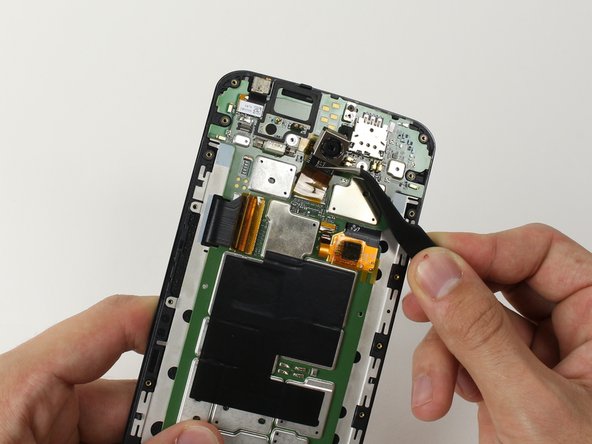
Use the spudger to release the rear facing camera connector.
-
Use tweezers to gently remove the rear facing camera.
-
-
-
With a spudger, unlatch the ZIF connector for the smallest ribbon cable in the center. See instructions for detatching ZIF connectors here
-
Use tweezers to release the ribbon cable.
It would be instructive to add that one needs to remove the whole ribbon assembly by lifting the whole thing from its semi-fixed position on the motherboard. I did so using the blunt end of a spudger to lift the two small flaps along the right edge of the motherboard and lifting the whole complex off the motherboard with tweezers.
-
-
-
With a spudger, unlatch the ZIF connector of the big ribbon cable on the side of the phone. See instructions for detatching ZIF connectors here.
-
Use tweezers to release the ribbon cable completely.
This ZIF connector is covered in amber anti-static tape, which needs to be released from the connector side before the ribbon can safely be pulled free.
The white/cream colored ZIF connector completely snapped off when I tried to close the connector after reinserting the cable. Be careful! Maybe I wasn’t gentle enough.
-
-
-
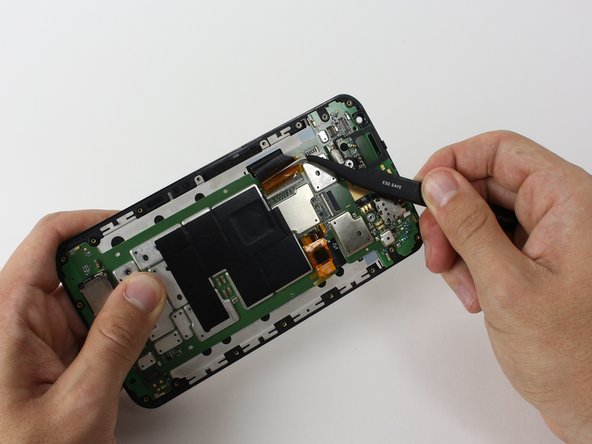
Remove the 2.3 mm T3 Torx screw on the top of the phone.
The aluminum bracket fell off freely from my phone. You will notice the photo in Step 10 doesn’t show the bracket.
-


To reassemble your device, follow these instructions in reverse order.
To reassemble your device, follow these instructions in reverse order.
다른 13명이 해당 안내서를 완성하였습니다.
팀

Cal Poly, Team 70-3, Forte Winter 2015 Cal Poly, Team 70-3, Forte Winter 2015 회원
CPSU-FORTE-W15S70G3
4 회원들
안내서 30개 작성하였습니다