주요 콘텐츠로 건너뛰기
수리 커뮤니티 가입 - 계정 만들기

Nikon COOLPIX S610c LCD Replacement

필요한 것

    1. Nikon COOLPIX S610c LCD Replacement, Battery: 1 단계, 이미지 1개 중 1개
      • On the bottom right of the camera, locate the battery flap switch.

      댓글 쓰기

    2. Nikon COOLPIX S610c LCD Replacement: 2 단계, 이미지 1개 중 1개
      • Move this switch to the right so the battery flap can flip open.

      댓글 쓰기

    3. Nikon COOLPIX S610c LCD Replacement: 3 단계, 이미지 1개 중 1개
      • Slide the orange switch to the right as shown. Now the battery can be pulled out. Reverse these steps to re-install.

      댓글 쓰기

    1. Nikon COOLPIX S610c LCD Replacement, Rear Casing: 4 단계, 이미지 1개 중 1개
      • Remove the three 3x3mm screws attached to the rear casing.

      댓글 쓰기

    2. Nikon COOLPIX S610c LCD Replacement: 5 단계, 이미지 1개 중 1개
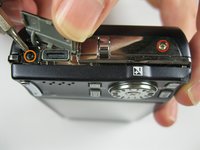
      • The panel can be identified by the wifi logo on its upper half on the camera's side.

      • Remove the 5x3mm screw holding down the panel on the side closest to the lens.

      댓글 쓰기

    3. Nikon COOLPIX S610c LCD Replacement: 6 단계, 이미지 1개 중 1개
      • Pry the panel off from the bottom using your fingernail.

      댓글 쓰기

    4. Nikon COOLPIX S610c LCD Replacement: 7 단계, 이미지 1개 중 1개
      • Remove the 3x2mm screw underneath the panel near the top of the camera.

      댓글 쓰기

    5. Nikon COOLPIX S610c LCD Replacement: 8 단계, 이미지 2개 중 1개 Nikon COOLPIX S610c LCD Replacement: 8 단계, 이미지 2개 중 2개
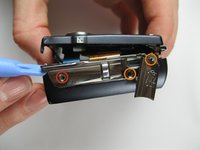
      • Remove the 4x3mm on the opposite side near the selector wheel.

      • Remove the 2x2mm and 3x2mm screws underneath the a/v flap.

      댓글 쓰기

    6. Nikon COOLPIX S610c LCD Replacement: 9 단계, 이미지 2개 중 1개 Nikon COOLPIX S610c LCD Replacement: 9 단계, 이미지 2개 중 2개
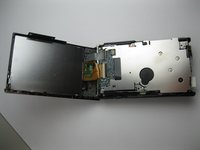
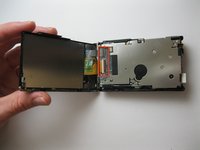
      • Pry the back panel away from the body of the camera, using the space you just opened up.

      • Be careful not to damage the ribbon cable on the opposite end of the camera.

      • A small piece of the frame of the camera may fall off, but it can be easily put back into place during reassembly.

      댓글 쓰기

    7. Nikon COOLPIX S610c LCD Replacement: 10 단계, 이미지 2개 중 1개 Nikon COOLPIX S610c LCD Replacement: 10 단계, 이미지 2개 중 2개
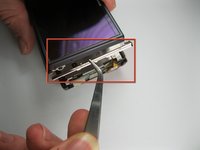
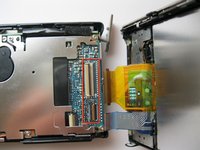
      • Pry up the plastic ribbon connectors on the body of the camera to release the ribbon cables.

      • The center connector is detached by flipping the black latch up and away from the center of the camera.

      • The smaller connector is detached by flipping the tan latch up and away from the edge of the camera.

      댓글 쓰기

    1. Nikon COOLPIX S610c LCD Replacement, LCD: 11 단계, 이미지 2개 중 1개 Nikon COOLPIX S610c LCD Replacement, LCD: 11 단계, 이미지 2개 중 2개
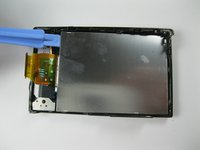
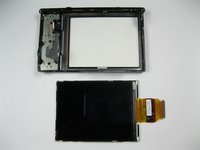
      • Pry the display from the rear casing using a spudger.

      댓글 쓰기

결론

To reassemble your device, follow these instructions in reverse order.

취소: 해당 안내서를 완성하지 않았습니다.

작성자

3다른 기여자 명과 함께

Kevin Backers

회원 가입일: 01/26/12

304 평판

안내서 4개를 작성함

Cal Poly, Team 9-5, Regan Winter 2012 Cal Poly, Team 9-5, Regan Winter 2012 회원

CPSU-REGAN-W12S9G5

5 회원들

안내서 12개를 작성함

0가이드 댓글

댓글 쓰기

조회 통계:

지난 24시간: 1

지난 7일: 7

지난 30일: 36

전체 시간: 1,030