주요 콘텐츠로 건너뛰기

Nintendo DS Back Panel Replacement

필요한 것

  1. Nintendo DS Back Panel Replacement, Battery: 1 단계, 이미지 3개 중 1개 Nintendo DS Back Panel Replacement, Battery: 1 단계, 이미지 3개 중 2개 Nintendo DS Back Panel Replacement, Battery: 1 단계, 이미지 3개 중 3개
    • Remove the cartridge from the console.

    • Use a Phillips #00 Screwdriver to remove the screw securing the battery door to the rear case.

    • Remove the battery door.

    • In the images, it shows that the fixer is using a flathead screwdriver. This flathead screwdriver will work just like the Phillips #00 Screwdriver.

  2. Nintendo DS Back Panel Replacement: 2 단계, 이미지 1개 중 1개
    • Use a plastic opening tool or spudger to pry out the battery from the bottom. If a plastic opening tool or spudger isn't available, your fingernails may work.

  3. Nintendo DS Back Panel Replacement: 3 단계, 이미지 1개 중 1개
    • Remove the battery from the Nintendo DS.

  4. Nintendo DS Back Panel Replacement, Back Panel: 4 단계, 이미지 1개 중 1개
    • Remove the seven 6.4mm Y00 screws located on the back.

    • If your DS has a lanyard attached to it, you can remove it to make the process of opening the top-left screw easier.

  5. Nintendo DS Back Panel Replacement: 5 단계, 이미지 3개 중 1개 Nintendo DS Back Panel Replacement: 5 단계, 이미지 3개 중 2개 Nintendo DS Back Panel Replacement: 5 단계, 이미지 3개 중 3개
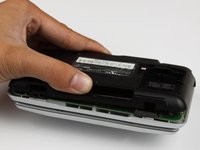
    • With your hands, pry the back panel off the main case.

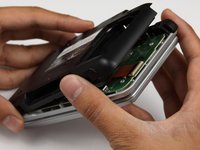
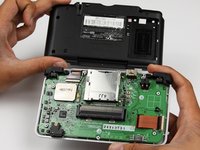
    • Separate the back from the front, and set it aside.

결론

To reassemble your device, follow these instructions in reverse order.

다른 18명이 해당 안내서를 완성하였습니다.

작성자

15다른 기여자 명과 함께

dnguye26

회원 가입일: 10/28/09

710 평판

안내서 4개를 작성함

Cal Poly, Team 18-3, Maness Fall 2009 Cal Poly, Team 18-3, Maness Fall 2009 회원

CPSU-MANESS-F09S18G3

4 회원들

안내서 31개를 작성함

댓글 2개

Where do I get a nintendo DS gamepak?

Kayla Maison - 답글

Kayla Maison , a gamepak is simply a GBA game.

Bob - 답글

댓글 쓰기

조회 통계:

지난 24시간: 2

지난 7일: 37

지난 30일: 137

전체 시간: 18,756