이 버전에는 잘못된 편집 사항이 있을 수 있습니다. 최신 확인된 스냅샷으로 전환하십시오.
필요한 것
-
-
Joy Con 컨트롤러 후면의 작은 동그란 버튼을 누르고 있으세요.
-
버튼을 누른 상태에서, 컨트롤러를 위를 향해서 미세요.
-
-
-
Y00 스크루드라이버를 사용하여 후면 패널을 고정하는 6.3mm-길이 나사 네 개를 풀어주세요.
-
-
-
JIS 000 드라이버 혹은 iFixit PH 000 드라이버를 사용하여 후면 패널을 고정하는 다음 나사들을 풀어주세요:
-
기기 상단 가장자리에 있는 2.5mm-길이 나사 한 개
-
기기 하단 가장자리에 있는 2.5mm-길이 나사 두 개
-
-
-
-
JIS 000 드라이버 혹은 iFixit PH 000 드라이버를 사용하여 microSD 카드 리더를 기기에 고정하는 3.1mm 나사를 풀어주세요.
-
-
-
JIS 000 드라이버 혹은 iFixit PH 000 드라이버를 사용하여 실드 플레이트를 기기에 고정하는 3mm 나사 여섯 개를 풀어주세요.
-
-
-
기기의 가장자리를 따라서 실드 플레이트 아랫면에 spudger/스퍼저를 끼우세요
-
실드 플레이트를 들어올려 기기에서 분리하세요.
-
신중을 기하면 이 써멀 컴파운드를 재사용할 수 있습니다. 컴파운드가 더럽혀지지 않도록 하고 재조립시 방열판과 실드 플레이트 사이에 완전하게 접하는지 확인하세요.
-
써멀 컴파운드를 교체해야 한다면, 재조립시 써멀 페이스트 안내서를 참조하여 기존 써멀 컴파운드를 제거하고 K5 Pro 같은 적절한 컴파운드로 교체하세요.
-
-
이 단계는 번역되지 않았습니다. 번역을 도와주십시오
-
Use an opening tool, spudger, or your fingernail to flip up the small, hinged locking flap on the Joy Con rail data cable's ZIF connector.
-
-
이 단계는 번역되지 않았습니다. 번역을 도와주십시오
-
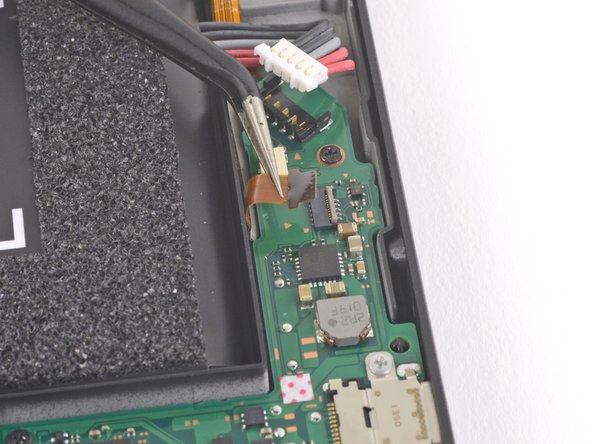
Use a pair of tweezers to slide the Joy Con rail data cable out of its connector on the motherboard.
-
-
이 단계는 번역되지 않았습니다. 번역을 도와주십시오
-
Use your fingers or a pair of tweezers to lift the battery connector up and out of the way of the Joy Con rail's data cable.
-
-
이 단계는 번역되지 않았습니다. 번역을 도와주십시오
-
Use your fingers or a pair of tweezers to lift the battery connector up and out of the way of the Joy Con rail's data cable.
-
-
이 단계는 번역되지 않았습니다. 번역을 도와주십시오
-
Use a JIS 000 screwdriver or an official iFixit PH 000 driver to remove the four 3.7 mm screws securing the left Joy Con rail to the frame of the device.
-


다른 58명이 해당 안내서를 완성하였습니다.

댓글 7개
If this was a neon Switch, this would be the rail that gets attached with the blue or the red joy con?
it would be the Blue joy con
I completed this guide, but the left joy con is still not being detected after the sensor rail was replaced with a sensor rail purchased on this site. The joy con in question will attach and sync with another console, so that leads me to believe it is a fault with the switch console itself. Is there something else that I can replace that would fix this issue?
Depending on where you get your replacement rail, it may not have the silver on the ribbon cable. No worries, as I did this repair 3 months ago (Jan) and had no issues at all.
To get the ribbon cable in place, I recommend first getting the battery wires out of the way, then slightly bending it and sliding it under that section of the Motherboard. If you do it right, the end of the ribbon cable will pop up and that can be slid into place. Took some fiddling but I eventually got it to work!
No matter what, never crease your ribbon cables!