주요 콘텐츠로 건너뛰기
수리 커뮤니티 가입 - 계정 만들기

Nokia 2630b Screen / Front Case Replacement

필요한 것

  1. Nokia 2630b Screen / Front Case Replacement, Battery Case: 1 단계, 이미지 2개 중 1개 Nokia 2630b Screen / Front Case Replacement, Battery Case: 1 단계, 이미지 2개 중 2개
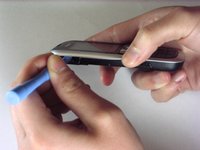
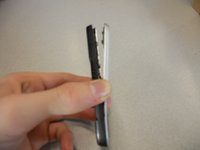
    • Press and the release button on both sides of the battery cover. While holding down the release buttons pull the battery cover away from the phone

  2. Nokia 2630b Screen / Front Case Replacement: 2 단계, 이미지 1개 중 1개
    • Pull out the battery by holding the top of the battery and tilting out.

  3. Nokia 2630b Screen / Front Case Replacement, Screen / Front Case: 3 단계, 이미지 1개 중 1개
    • Remove the two screws on either side of the battery case using a T5 Torx screwdriver.

  4. Nokia 2630b Screen / Front Case Replacement: 4 단계, 이미지 3개 중 1개 Nokia 2630b Screen / Front Case Replacement: 4 단계, 이미지 3개 중 2개 Nokia 2630b Screen / Front Case Replacement: 4 단계, 이미지 3개 중 3개
    • Separate the front case from the back case using the iPod opener.

    • The keypad is a loose piece and may fall out.

  5. Nokia 2630b Screen / Front Case Replacement: 5 단계, 이미지 1개 중 1개
    • Remove screws using the T5 Torx screwdriver to release the computer chip from the case.

  6. Nokia 2630b Screen / Front Case Replacement: 6 단계, 이미지 1개 중 1개
    • Carefully lift the black frame off the screen with your fingers.

  7. Nokia 2630b Screen / Front Case Replacement: 7 단계, 이미지 1개 중 1개
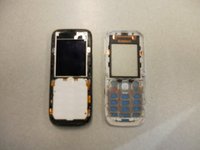
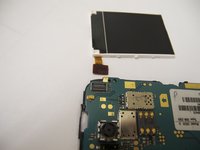
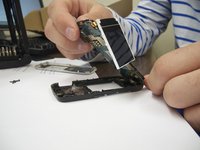
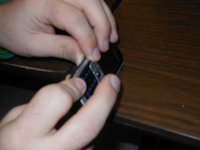
    • Carefully remove the computer chip and screen out of the black case with your fingers.

  8. Nokia 2630b Screen / Front Case Replacement: 8 단계, 이미지 2개 중 1개 Nokia 2630b Screen / Front Case Replacement: 8 단계, 이미지 2개 중 2개
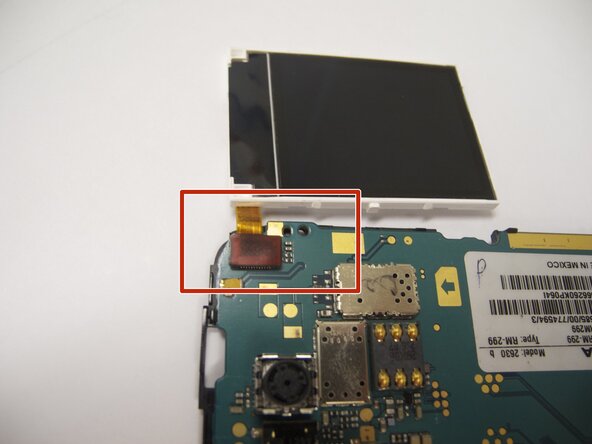
    • The screen is attached to the motherboard by an orange ribbon.

    • Carefully detach the ribbon from the motherboard using your fingers.

  9. Nokia 2630b Screen / Front Case Replacement: 9 단계, 이미지 1개 중 1개
    • Reattach new screen by connecting the orange ribbon to the computer chip.

  10. Nokia 2630b Screen / Front Case Replacement: 10 단계, 이미지 2개 중 1개 Nokia 2630b Screen / Front Case Replacement: 10 단계, 이미지 2개 중 2개
    • Place computer chip and screen back into black case.

  11. Nokia 2630b Screen / Front Case Replacement: 11 단계, 이미지 1개 중 1개
    • Place black frame back over screen.

  12. Nokia 2630b Screen / Front Case Replacement: 12 단계, 이미지 2개 중 1개 Nokia 2630b Screen / Front Case Replacement: 12 단계, 이미지 2개 중 2개
    • Carefully place keypad back in place.

  13. Nokia 2630b Screen / Front Case Replacement: 13 단계, 이미지 2개 중 1개 Nokia 2630b Screen / Front Case Replacement: 13 단계, 이미지 2개 중 2개
    • Snap the front case back in place with the bottom case with your fingers.

  14. Nokia 2630b Screen / Front Case Replacement: 14 단계, 이미지 1개 중 1개
    • Reassemble screws with microscrewdriver.

  15. Nokia 2630b Screen / Front Case Replacement: 15 단계, 이미지 1개 중 1개
    • Slide battery back into place.

  16. Nokia 2630b Screen / Front Case Replacement: 16 단계, 이미지 1개 중 1개
    • Snap battery cover back into place.

결론

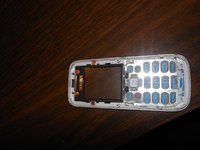
To reassemble your device, follow these instructions in reverse order. Make sure to snap the new screen / front case securely into place.

작성자

16다른 기여자 명과 함께

Eric

회원 가입일: 04/07/11

57 평판

안내서 4개를 작성함

Cal Poly, Team 9-61, Walters Spring 2011 Cal Poly, Team 9-61, Walters Spring 2011 회원

CPSU-WALTERS-S11S9G61

5 회원들

안내서 6개를 작성함

2가이드 댓글

Great guide :-) I have a Nokia 2630 too and people can no longer hear me on calls, even though I can hear them. Do you know what could be wrong? Do you think this is something I could fix myself? Thanks!

jfg - 답글 공유

You could try getting a neodymium magnet and run it across the earpiece grill. In my father's case, a lot of metal powder was in there, pressing in the speaker membrane; the alternative is cleaning it (which does require opening the phone using Eric's very nice guide). The alternative to those is ordering an earpiece online - but usually those are really bad quality, so trying to fix the original one would be advisable

Darie H - 공유

댓글 쓰기

조회 통계:

지난 24시간: 3

지난 7일: 12

지난 30일: 54

전체 시간: 4,096