주요 콘텐츠로 건너뛰기
수리 커뮤니티 가입 - 계정 만들기

Nokia 3300B Screen Replacement

필요한 것

  1. Nokia 3300B Screen Replacement, Battery: 1 단계, 이미지 2개 중 1개 Nokia 3300B Screen Replacement, Battery: 1 단계, 이미지 2개 중 2개
    • Flip the Nokia 3300B over with the back-side facing towards you.

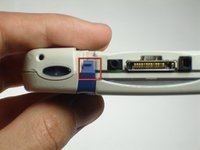
    • Gently press the button on the back of the battery cover to release the cover and slide up.

  2. Nokia 3300B Screen Replacement: 2 단계, 이미지 2개 중 1개 Nokia 3300B Screen Replacement: 2 단계, 이미지 2개 중 2개
    • Lift the battery out of the back of the phone.

    • It is easiest to lift the battery out of the phone from the right-hand side, as seen in the picture.

  3. Nokia 3300B Screen Replacement, Screen: 3 단계, 이미지 3개 중 1개 Nokia 3300B Screen Replacement, Screen: 3 단계, 이미지 3개 중 2개 Nokia 3300B Screen Replacement, Screen: 3 단계, 이미지 3개 중 3개
    이 단계에 사용된 도구:
    Tweezers
    $4.99
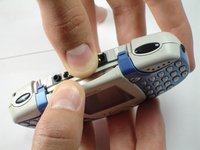
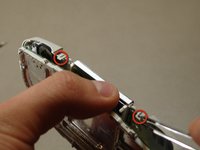
    • Gently push the blue tabs on the top of the phone out of their slots.

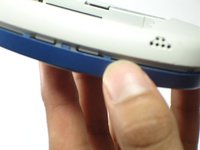
    • With the phone facing up, pop the blue faceplate off by using your fingernail (or some tweezers) and working your way around the phone.

    • Note: If the blue cover does not detach easily use your finger nails to try and split it open, as seen in the picture.

  4. Nokia 3300B Screen Replacement: 4 단계, 이미지 1개 중 1개
    • With the screen still facing you, remove the blue faceplate.

  5. Nokia 3300B Screen Replacement: 5 단계, 이미지 2개 중 1개 Nokia 3300B Screen Replacement: 5 단계, 이미지 2개 중 2개
    • Grab the sides of the keypad and lift it up vertically.

    • If you encounter resistance while removing the keypad, be sure to lift up evenly on both sides, so the button's pin don't snap.

  6. Nokia 3300B Screen Replacement: 6 단계, 이미지 3개 중 1개 Nokia 3300B Screen Replacement: 6 단계, 이미지 3개 중 2개 Nokia 3300B Screen Replacement: 6 단계, 이미지 3개 중 3개
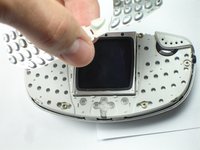
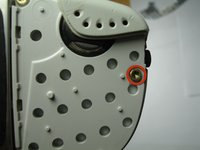
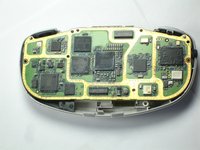
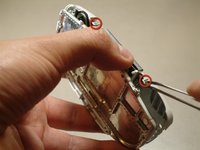
    • Using the Torx T6 bit of a Phillips precision screwdriver, remove the six screws on the phone's inner protective case, as seen in the picture.

    • NOTE: Be sure to save these screws so the phone can be reassembled later.

  7. Nokia 3300B Screen Replacement: 7 단계, 이미지 2개 중 1개 Nokia 3300B Screen Replacement: 7 단계, 이미지 2개 중 2개
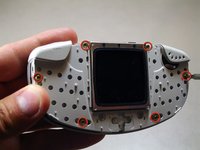
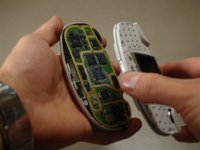
    • Holding the phone with the screen facing you, remove the top half of the phone from the circuit board.

  8. Nokia 3300B Screen Replacement: 8 단계, 이미지 3개 중 1개 Nokia 3300B Screen Replacement: 8 단계, 이미지 3개 중 2개 Nokia 3300B Screen Replacement: 8 단계, 이미지 3개 중 3개
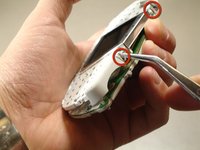
    • Hold the top half of the phone with the screen facing you.

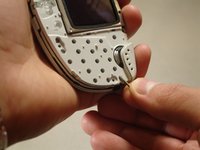
    • Using a pair of tweezers, release the tabs holding the two distinct cases together.

    • The tabs are very fragile. Be gentle when releasing the tabs.

  9. Nokia 3300B Screen Replacement: 9 단계, 이미지 1개 중 1개
    • Be sure to remove both casings so that the screen is facing down. This will ensure that the screen does not fall out of its case.

    • NOTE: The screen's part identification sticker is on the top back side of the screen. The screen will need to be replaced with the same orientation.

  10. Nokia 3300B Screen Replacement: 10 단계, 이미지 1개 중 1개
    • Tilt the casing back and the screen should fall out smoothly.

    • Replace the old screen with the new screen.

결론

To reassemble your device, follow these instructions in reverse order.

다른 2명이 해당 안내서를 완성하였습니다.

작성자

5다른 기여자 명과 함께

Chris Colwell

회원 가입일: 04/13/10

116 평판

안내서 2개를 작성함

Cal Poly, Team 18-65, Johann Spring 2010 Cal Poly, Team 18-65, Johann Spring 2010 회원

CPSU-JOHANN-S10S18G65

4 회원들

안내서 9개를 작성함

0가이드 댓글

댓글 쓰기

조회 통계:

지난 24시간: 1

지난 7일: 3

지난 30일: 8

전체 시간: 3,326