주요 콘텐츠로 건너뛰기
수리 커뮤니티 가입 - 계정 만들기

Nokia 6560 Logic Board Replacement

필요한 것

  1. Nokia 6560 Logic Board  Replacement, Battery: 1 단계, 이미지 2개 중 1개 Nokia 6560 Logic Board  Replacement, Battery: 1 단계, 이미지 2개 중 2개
    • Remove the back cover of your cell phone by pushing the small slider with your fingernail towards the top of the phone.

    • Lift off your cell phone's back cover.

  2. Nokia 6560 Logic Board  Replacement: 2 단계, 이미지 2개 중 1개 Nokia 6560 Logic Board  Replacement: 2 단계, 이미지 2개 중 2개
    • Use your index finger to first push down and then lift up the battery as shown.

    • Remove the battery from your cell phone.

  3. Nokia 6560 Logic Board  Replacement, Keypad: 3 단계, 이미지 2개 중 1개 Nokia 6560 Logic Board  Replacement, Keypad: 3 단계, 이미지 2개 중 2개
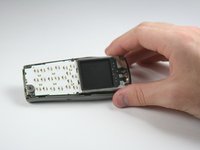
    • Open the front cover of your cell phone with the plastic opening tool or finger nail.

    • Lift the cover upwards, starting from the bottom below the keypad.

  4. Nokia 6560 Logic Board  Replacement: 4 단계, 이미지 2개 중 1개 Nokia 6560 Logic Board  Replacement: 4 단계, 이미지 2개 중 2개
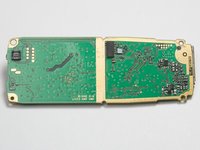
    • Lift the keypad off of the keyboard as it is not attached to the phone anymore.

    • If you want to clean your keyboard do not use chemical cleaners or too much water, instead, use a damp cloth.

    • It may be tricky to get the keypad in the right position while closing the front cover for the reassembly. Ensure they are aligned properly before closing the front cover!

  5. Nokia 6560 Logic Board  Replacement, Logic Board : 5 단계, 이미지 1개 중 1개
    • Remove six Torx 6 screws with the screwdriver.

  6. Nokia 6560 Logic Board  Replacement: 6 단계, 이미지 1개 중 1개
    • Remove the frame that holds the keyboard and the display.

  7. Nokia 6560 Logic Board  Replacement: 7 단계, 이미지 1개 중 1개
    • Lift the logic board of out the rear case of the phone.

  8. Nokia 6560 Logic Board  Replacement: 8 단계, 이미지 2개 중 1개 Nokia 6560 Logic Board  Replacement: 8 단계, 이미지 2개 중 2개
    • This is the logic board of your cell phone.

    • Make sure that you get the right logic board to replace your old one by comparing the serial numbers on it.

결론

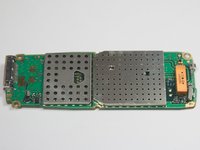
To reassemble your device, follow these instructions in reverse order.

작성자

5다른 기여자 명과 함께

Tim Bergmann

회원 가입일: 01/18/10

35 평판

안내서 4개를 작성함

Cal Poly, Team 3-17, Maness Winter 2010 Cal Poly, Team 3-17, Maness Winter 2010 회원

CPSU-MANESS-W10S3G17

4 회원들

안내서 12개를 작성함

0가이드 댓글

댓글 쓰기

조회 통계:

지난 24시간: 2

지난 7일: 7

지난 30일: 23

전체 시간: 2,300