소개
If your Oontz Angle 3 ULTRA speaker is playing faulty audio, you may need to replace your speaker’s drivers. This replacement guide will walk you through replacing the drivers of your Oontz Angle 3 ULTRA Bluetooth speaker. For this guide, you will need a plastic opening tool, a Phillips #0 Screwdriver, a Soldering Iron with Solder Wick or a Solder Sucker, and a Jimmy. Follow this guide to learn how to solder and de-solder connections. 연결부 납땜 및 납제거 방법
You will need to match the resistance of the speaker’s default drivers with your replacements, or else your Oontz Angle 3 ULTRA will not function properly with the replacement drivers.
필요한 것
-
이 단계에 사용된 도구:Tweezers$4.99
-
Remove the two black rubber sheaths around the edges of the speaker.
-
Under the symbol-marked sheath there is a white rubber covering for the buttons. Peel this away to reveal the panel underneath.
-
On two corners of its triangular face there is a small divot, which allows you to use your fingernails or a pair of tweezers to grip and peel away the covering.
-
-
-
-
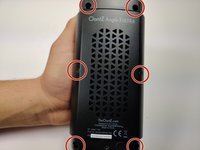
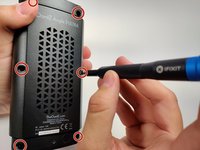
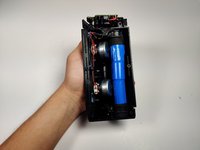
Using a JIS #0 screwdriver, remove the 6 screws holding the backplate in.
-
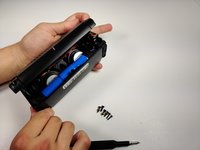
Remove the back panel off of the device.
Where can I get the mother board and other parts to buy for the Oontz angel 3 please
-
-
-
Insert the Jimmy into the gap between the speaker's grill and the plastic enclosure.
-
Work the Jimmy around the gap to free it from the speaker enclosure.
-
-
이 단계에 사용된 도구:Desoldering Pump$3.99
-
Locate the wires connecting to the driver. There will be a red wire connected to the driver’s positive terminal, and a black wire connected to the driver’s negative terminal.
-
With your soldering iron and solder sucker, remove the solder connecting the wires to each terminal, and then gently pull the wires away from the terminals to free them.
-
For more information on soldering and desoldering connections, please read the How to Solder and Desolder Connections Guide.
-
-
-
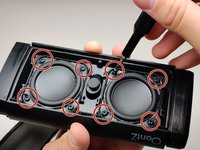
Remove the eight screws with the Phillips #0 screwdriver.
-
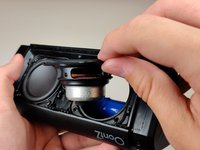
Gently push the driver from the rear out of the enclosure to remove it.
i own two angle 3 ultra's, these were good sounding portable speakers until one day. One of the speakers sounded horrible creating distorted sounds which is unbearable and later found out that its bass radiator where torn creating sound distortion while playing. These bass radiators inside this devices are poor in quality cuz the other one followed the same fate. Can't find a replacement part
-


To reassemble your device, follow these instructions in reverse order.
To reassemble your device, follow these instructions in reverse order.
다른 한 분이 해당 안내서를 완성하였습니다.
팀

Embry-Riddle Aeronautical University, Team S6-G9, Rauch Spring 2020 Embry-Riddle Aeronautical University, Team S6-G9, Rauch Spring 2020 회원
ERAU-RAUCH-S20S6G9
3 회원들
안내서 6개를 작성함
댓글 3개
Where can i purchase replacement speaker
reference of speakers of Oontz Angle 3 ULTRA U12A pls to replacement speaker
any luck on replacement speakers?