주요 콘텐츠로 건너뛰기
수리 커뮤니티 가입 - 계정 만들기

Optoma HD20 Fan Replacement

필요한 것

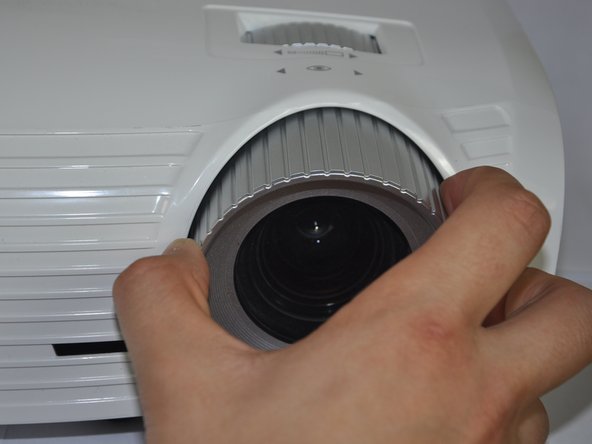
    1. Optoma HD20 Fan Replacement, Disassembling Optoma HD20 Cover: 1 단계, 이미지 2개 중 1개 Optoma HD20 Fan Replacement, Disassembling Optoma HD20 Cover: 1 단계, 이미지 2개 중 2개
      • Twist the focal cap clockwise until it is fully extended.

      • Remove the focal cap by pulling it straight out.

      댓글 쓰기

    2. Optoma HD20 Fan Replacement: 2 단계, 이미지 1개 중 1개
      • Use a Phillips #1 screwdriver to remove the three 7.5mm screws on the bottom of the device.

      댓글 쓰기

    3. Optoma HD20 Fan Replacement: 3 단계, 이미지 1개 중 1개
      • Use a plastic opening tool to gently pry the top cover off of the device.

      • It is easier to pry off the cover from the back side just above the HDMI ports.

      댓글 쓰기

    4. Optoma HD20 Fan Replacement: 4 단계, 이미지 1개 중 1개
      • When removing the cover, be cautious of the ribbon connecting the top buttons to the main circuit board. The ribbon must be disconnected before proceeding.

      • Remove the ribbon by disconnecting it from the main circuit board.

      • Lift up the clip holding it down and pull the ribbon out.

      댓글 쓰기

    1. Optoma HD20 Fan Replacement, Fan: 5 단계, 이미지 1개 중 1개
      • Peel off the tape that is holding the metal casing down.

      댓글 쓰기

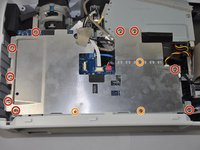
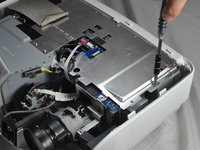
    2. Optoma HD20 Fan Replacement: 6 단계, 이미지 2개 중 1개 Optoma HD20 Fan Replacement: 6 단계, 이미지 2개 중 2개
      • Use a Phillips #1 screwdriver to unscrew the nine 4.5mm screws.

      • Use a Phillips #0 screwdriver to unscrew the three 2.5 mm screws. This will allow you to remove the metal casing.

      댓글 쓰기

    3. Optoma HD20 Fan Replacement: 7 단계, 이미지 1개 중 1개
      • Remove the metal casing by lifting it up off of the circuit board.

      댓글 쓰기

    4. Optoma HD20 Fan Replacement: 8 단계, 이미지 1개 중 1개
      • Unplug the six wires stemming from the circuit board.

      댓글 쓰기

    5. Optoma HD20 Fan Replacement: 9 단계, 이미지 1개 중 1개
      • Use a Philips #1 screwdriver to remove the four 4.5 mm screws

      댓글 쓰기

    6. Optoma HD20 Fan Replacement: 10 단계, 이미지 1개 중 1개
      • Remove the three 4.5 mm screws using the Philips #1 screwdriver.

      댓글 쓰기

    7. Optoma HD20 Fan Replacement: 11 단계, 이미지 1개 중 1개
      • Remove the two 4.5 mm screws located on either side of the VGA/SCART port using a 5 mm nut driver. This will further release the plastic backing from the motherboard.

      댓글 쓰기

    8. Optoma HD20 Fan Replacement: 12 단계, 이미지 1개 중 1개
      • Slightly rotate the motherboard clockwise. This will prevent ports from getting caught on the plastic backing.

      • Lift the plastic backing to remove it.

      댓글 쓰기

    9. Optoma HD20 Fan Replacement: 13 단계, 이미지 1개 중 1개
      • Ensure all screws are removed

      • Lift up the motherboard and take out the metal container beneath it.

      • Do this very carefully as there is still one cable attached.

      댓글 쓰기

    10. Optoma HD20 Fan Replacement: 14 단계, 이미지 1개 중 1개
      • Unplug the white connector underneath the right side of the circuit board.

      • To remove, pinch both sides of the connector and pull it away from the circuit board.

      댓글 쓰기

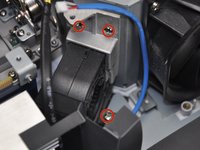
    11. Optoma HD20 Fan Replacement: 15 단계, 이미지 2개 중 1개 Optoma HD20 Fan Replacement: 15 단계, 이미지 2개 중 2개
      • Use a Phillips #1 screwdriver to remove four 5 mm screws. This will release the fan.

      댓글 쓰기

    12. Optoma HD20 Fan Replacement: 16 단계, 이미지 2개 중 1개 Optoma HD20 Fan Replacement: 16 단계, 이미지 2개 중 2개
      • Pull the fan away from the metal housing unit.

      • Gently lift the fan up and out of the device. The fan is now removed.

      댓글 쓰기

결론

To reassemble your device, follow these instructions in reverse order.

취소: 해당 안내서를 완성하지 않았습니다.

다른 6명이 해당 안내서를 완성하였습니다.

작성자

10다른 기여자 명과 함께

Trever

회원 가입일: 01/22/15

1,282 평판

안내서 6개를 작성함

Cal Poly, Team 21-23, Maness Winter 2015 Cal Poly, Team 21-23, Maness Winter 2015 회원

CPSU-MANESS-W15S21G23

4 회원들

안내서 13개를 작성함

6가이드 댓글

Very nice set of instructions! Excellent images and identification of items to remove. Thank you!

Graveyard Workshop - 답글 공유

Do you know where to get this fan for replacement? Having trouble finding a parts list.

Sterling Grogg - 답글 공유

Small fan is GB1245PKVX-8, large fan is KDE1285PTV1

Gyrovague - 답글 공유

I am trying to determine if the fan works or not. Should the fan come on when there is no bulb in the projector? I removed the bulb when it burned up and I am not sure whether it was due to a failed fan or simply the bulb.

merrill277 - 답글 공유

Amazing! Thank you!!! Took a bit of effort to get the fan but in the end it worked like a charm!! Thank you for saving money!!!!

Mike Popov - 답글 공유

댓글 쓰기

조회 통계:

지난 24시간: 1

지난 7일: 10

지난 30일: 88

전체 시간: 14,441