주요 콘텐츠로 건너뛰기

Palm Pilot Professional 3com Plastic Frame Replacement

필요한 것

  1. Palm Pilot Professional 3com Plastic Frame Replacement, Keypad: 1 단계, 이미지 1/1
    • Unscrew the three screws on the back of the Palm Pilot.

  2. Palm Pilot Professional 3com Plastic Frame Replacement: 2 단계, 이미지 1/2 Palm Pilot Professional 3com Plastic Frame Replacement: 2 단계, 이미지 2/2
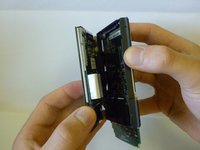
    • Pull the back cover from the bottom of the device and separate the interlocking tabs on the top to remove the back cover.

  3. Palm Pilot Professional 3com Plastic Frame Replacement: 3 단계, 이미지 1/1
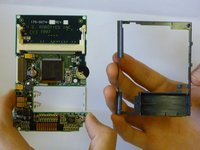
    • The front plastic cover is now free to be removed from the rest of the device.

  4. Palm Pilot Professional 3com Plastic Frame Replacement: 4 단계, 이미지 1/1
    • The keypad is now free to be removed from the rest of the device.

  5. Palm Pilot Professional 3com Plastic Frame Replacement, LCD Screen: 5 단계, 이미지 1/1
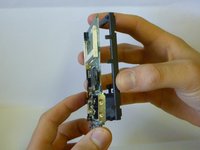
    • Looking at the back of the device hold one of the white tabs on the ribbon cable connector down and use tweezers to push in the other white tab toward the device at the same time.

  6. Palm Pilot Professional 3com Plastic Frame Replacement: 6 단계, 이미지 1/1
    • The ribbon cable is now loose. Use the tweezers to carefully slide the ribbon cable out of the connector.

  7. Palm Pilot Professional 3com Plastic Frame Replacement: 7 단계, 이미지 1/2 Palm Pilot Professional 3com Plastic Frame Replacement: 7 단계, 이미지 2/2
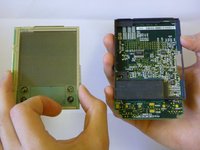
    • The screen is now disconnected from the rest of the device and can now be removed.

  8. Palm Pilot Professional 3com Plastic Frame Replacement, Plastic Frame: 8 단계, 이미지 1/2 Palm Pilot Professional 3com Plastic Frame Replacement, Plastic Frame: 8 단계, 이미지 2/2
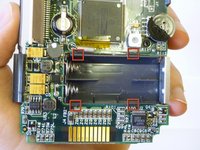
    • Depress the tabs around the battery casing so that the battery casing can slide through the rectangular slot on the motherboard - opposite of the metal plate.

  9. Palm Pilot Professional 3com Plastic Frame Replacement: 9 단계, 이미지 1/2 Palm Pilot Professional 3com Plastic Frame Replacement: 9 단계, 이미지 2/2
    • Pull/push the battery casing through the rectangular opening. The mother board should now separate from the plastic frame.

    • Note: The frame might have to be wiggled towards the left (when the springs are facing left) to become fully released.

결론

To reassemble your device, follow these instructions in reverse order.

Kevin Santos

회원 가입일: 03/09/12

1 평판

안내서 4개 작성하였습니다

Clemson, Team 2-4, Benson Spring 2012 Clemson, Team 2-4, Benson Spring 2012 회원

CLEM-BENSON-S12S2G4

3 회원들

안내서 5개 작성하였습니다

댓글 0개

댓글 쓰기

조회 통계:

24 시간 전: 0

7일 전: 0

30일 전: 1

전체 시간: 859