주요 콘텐츠로 건너뛰기
Palm Treo 650 Microphone Replacement

Palm Treo 650 Microphone Replacement

cgood

cgood9 다른 기여자

최종 수정일 January 5, 2024

40 분 - 1 시간
매우 쉬움
학생이 작성 중
일관성 없는 이미지
잘못된 도구

The guide will demonstrate how to remove and replace a Palm Treo 650 microphone successfully. The microphone may need to be removed if the person on the receiving end of the phone call is unable to hear your voice.

Only begin this repair once the phone is disconnected from a power source and turned off.

필요한 것

도구

  • Phillips #00 Screwdriver
    Phillips #00 Screwdriver
  • Spudger
    Spudger
  • T5 Torx Screwdriver
    T5 Torx Screwdriver
  • iFixit Opening Tool
    iFixit Opening Tool

더보기...

  1. Palm Treo 650 Microphone Replacement, Battery and Stylus: 1 단계, 이미지 1개 중 1개
    • Position the phone so the screen faces down.

    • Remove the stylus found on the back of the phone.

  2. Palm Treo 650 Microphone Replacement: 2 단계, 이미지 1개 중 1개
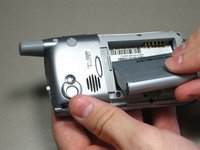
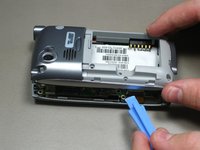
    • Hold the button in the middle of the phone's back to remove the battery cover.

    • Slide the cover down to remove it, and set the cover aside.

  3. Palm Treo 650 Microphone Replacement: 3 단계, 이미지 2개 중 1개 Palm Treo 650 Microphone Replacement: 3 단계, 이미지 2개 중 2개
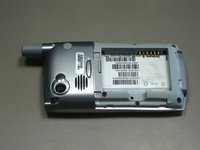
    • Lift the edge of the battery, separating contact points, and pull out as pictured.

  4. Palm Treo 650 Microphone Replacement, Case: 4 단계, 이미지 1개 중 1개
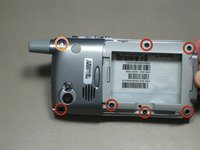
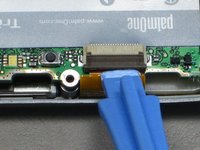
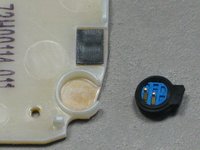
    • Remove the round, rubber cover to expose a screw that will be removed in the next step.

  5. Palm Treo 650 Microphone Replacement: 5 단계, 이미지 2개 중 1개 Palm Treo 650 Microphone Replacement: 5 단계, 이미지 2개 중 2개
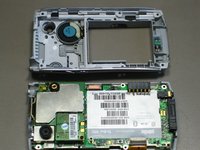
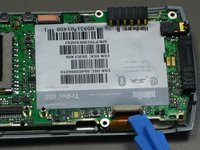
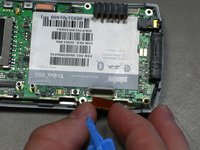
    • Remove the six 6.9 mm screws as pictured with a T5 Torx screwdriver.

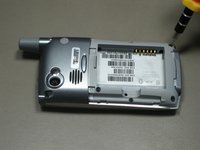
    • Remove the single 9.8 mm screw next to the antenna on the back plate, using a Phillips #00 screwdriver.

  6. Palm Treo 650 Microphone Replacement: 6 단계, 이미지 1개 중 1개
    • Pull the antenna outward to remove the antenna from the body of the phone.

  7. Palm Treo 650 Microphone Replacement: 7 단계, 이미지 2개 중 1개 Palm Treo 650 Microphone Replacement: 7 단계, 이미지 2개 중 2개
    • Pry the back cover off using an iFixit opening tool.

    • Several small clips on the inside attach to the back cover.

  8. Palm Treo 650 Microphone Replacement, Motherboard: 8 단계, 이미지 3개 중 1개 Palm Treo 650 Microphone Replacement, Motherboard: 8 단계, 이미지 3개 중 2개 Palm Treo 650 Microphone Replacement, Motherboard: 8 단계, 이미지 3개 중 3개
    • Disconnect the ribbon cable before removing the motherboard.

    • Unclip the gray tab.

    • Pull out the orange ribbon cable.

  9. Palm Treo 650 Microphone Replacement: 9 단계, 이미지 2개 중 1개 Palm Treo 650 Microphone Replacement: 9 단계, 이미지 2개 중 2개
    • Pull off the motherboard.

  10. Palm Treo 650 Microphone Replacement, Keyboard: 10 단계, 이미지 1개 중 1개
    • Unscrew the two 3.2 mm screws with a Phillips #00 screwdriver.

  11. Palm Treo 650 Microphone Replacement: 11 단계, 이미지 1개 중 1개
    • Pull off the circuit board.

  12. Palm Treo 650 Microphone Replacement: 12 단계, 이미지 1개 중 1개
    • Remove the keypad for cleaning or replacing.

  13. Palm Treo 650 Microphone Replacement, Microphone: 13 단계, 이미지 1개 중 1개
    • Place the circuit board with the microphone facing up.

  14. Palm Treo 650 Microphone Replacement: 14 단계, 이미지 2개 중 1개 Palm Treo 650 Microphone Replacement: 14 단계, 이미지 2개 중 2개
    • Pop the microphone off with your finger.

결론

To reassemble your device, follow these instructions in reverse order.

작성자

9다른 기여자 명과 함께

cgood

회원 가입일: 10/28/09

122 평판

안내서 7개를 작성함

Cal Poly, Team 19-3, Maness Fall 2009 Cal Poly, Team 19-3, Maness Fall 2009 회원

CPSU-MANESS-F09S19G3

4 회원들

안내서 18개를 작성함

댓글 0개

댓글 쓰기

조회 통계:

지난 24시간: 0

지난 7일: 0

지난 30일: 2

전체 시간: 4,559