주요 콘텐츠로 건너뛰기
수리 커뮤니티 가입 - 계정 만들기

Palm Treo 700P LCD Replacement

필요한 것

  1. Palm Treo 700P LCD Replacement, Battery: 1 단계, 이미지 3개 중 1개 Palm Treo 700P LCD Replacement, Battery: 1 단계, 이미지 3개 중 2개 Palm Treo 700P LCD Replacement, Battery: 1 단계, 이미지 3개 중 3개
    • Press the button located just above the Sprint™ logo and then slide the cover down.

  2. Palm Treo 700P LCD Replacement: 2 단계, 이미지 2개 중 1개 Palm Treo 700P LCD Replacement: 2 단계, 이미지 2개 중 2개
    • Use the small notch on the left hand side of the phone to remove the battery.

  3. Palm Treo 700P LCD Replacement, Back Case: 3 단계, 이미지 1개 중 1개
    • Remove the stylus from the phone.

  4. Palm Treo 700P LCD Replacement: 4 단계, 이미지 1개 중 1개
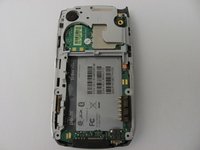
    • After removing the battery and stylus, unscrew the 5 Torx screws (using a T-5 Torx screw driver)

  5. Palm Treo 700P LCD Replacement: 5 단계, 이미지 1개 중 1개
    • Using the spudger, remove the small rubberized patch under the antenna.

  6. Palm Treo 700P LCD Replacement: 6 단계, 이미지 1개 중 1개
    • Unscrew the last two screws using the previous screw driver.

  7. Palm Treo 700P LCD Replacement: 7 단계, 이미지 2개 중 1개 Palm Treo 700P LCD Replacement: 7 단계, 이미지 2개 중 2개
    • Using the plastic opening tool, gently separate the back case from the phone body.

  8. Palm Treo 700P LCD Replacement, Motherboard: 8 단계, 이미지 3개 중 1개 Palm Treo 700P LCD Replacement, Motherboard: 8 단계, 이미지 3개 중 2개 Palm Treo 700P LCD Replacement, Motherboard: 8 단계, 이미지 3개 중 3개
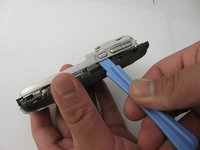
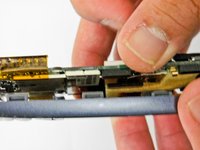
    • Using a plastic opening tool, gently edge your way between the back and border case (Picture 2) until they are completely separated (Picture 3).

  9. Palm Treo 700P LCD Replacement: 9 단계, 이미지 3개 중 1개 Palm Treo 700P LCD Replacement: 9 단계, 이미지 3개 중 2개 Palm Treo 700P LCD Replacement: 9 단계, 이미지 3개 중 3개
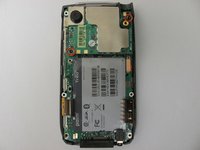
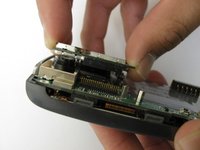
    • Remove the antenna chip by unscrewing the two screws with Torx T-5 screwdriver (Picture 1).

    • Once unscrewed, gently detach the antenna chip with your hands (Picture 2).

  10. Palm Treo 700P LCD Replacement: 10 단계, 이미지 2개 중 1개 Palm Treo 700P LCD Replacement: 10 단계, 이미지 2개 중 2개
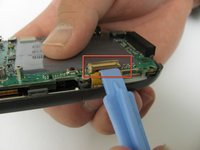
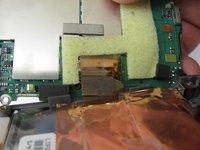
    • Use the plastic opening tool to unlock the tab holding the keyboard connection (Picture 1).

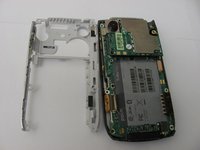
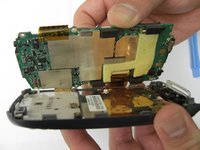
    • Once the keyboard connection is detached, use your hands to gently separate the motherboard from the back panel (Picture 2).

  11. Palm Treo 700P LCD Replacement: 11 단계, 이미지 3개 중 1개 Palm Treo 700P LCD Replacement: 11 단계, 이미지 3개 중 2개 Palm Treo 700P LCD Replacement: 11 단계, 이미지 3개 중 3개
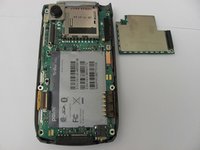
    • To completely detach the motherboard from the back panel, use the plastic opening tool to unlock the LCD connection from the motherboard (Picture 2).

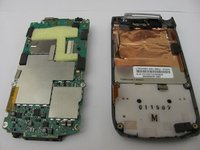
    • Once the LCD connection is unlocked, the motherboard should now be completely detached from the back panel, keyboard, and LCD (Picture 3).

  12. Palm Treo 700P LCD Replacement, LCD: 12 단계, 이미지 1개 중 1개
    • Once the motherboard is removed, the LCD should be resting on the front case of the phone.

결론

To reassemble your device, follow these instructions in reverse order.

작성자

4다른 기여자 명과 함께

Lucas

회원 가입일: 04/17/12

26 평판

안내서 1개를 작성함

Cal Poly, Team 12-37, Regan Spring 2012 Cal Poly, Team 12-37, Regan Spring 2012 회원

CPSU-REGAN-S12S12G37

4 회원들

안내서 14개를 작성함

0가이드 댓글

댓글 쓰기

조회 통계:

지난 24시간: 2

지난 7일: 9

지난 30일: 38

전체 시간: 981