주요 콘텐츠로 건너뛰기
수리 커뮤니티 가입 - 계정 만들기

Pentax PZ-10 Back Cover Locking Switch Spring Replacement

필요한 것

    1. Pentax PZ-10 Back Cover Locking Switch Spring Replacement, Removing the Bottom Cover: 1 단계, 이미지 1개 중 1개
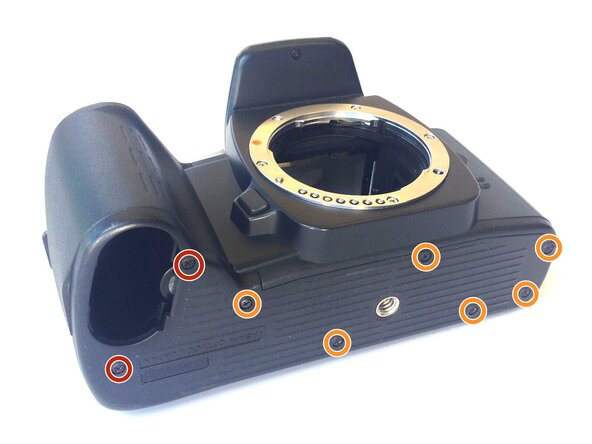
      • With the lens face up and the bottom panel of the camera facing you, remove the two 7mm screws on the left using the J0 screwdriver.

      • Remove the six 4.3mm screws in the middle and right of the panel using the J0 screwdriver.

      • Pull off the bottom casing to remove.

      댓글 쓰기

    2. Pentax PZ-10 Back Cover Locking Switch Spring Replacement, Removing Bottom Casing: 2 단계, 이미지 1개 중 1개
      • With the screws removed, the bottom casing should come off very easily by pulling on the casing.

      댓글 쓰기

    3. Pentax PZ-10 Back Cover Locking Switch Spring Replacement, Removing the Back Cover: 3 단계, 이미지 1개 중 1개
      • Place the camera on its side so the lens is facing left.

      • Press down on the locking switch on the side panel facing you.

      댓글 쓰기

    4. Pentax PZ-10 Back Cover Locking Switch Spring Replacement: 4 단계, 이미지 1개 중 1개
      • With the door unlocked, rotate the device to access the bottom.

      댓글 쓰기

    5. Pentax PZ-10 Back Cover Locking Switch Spring Replacement: 5 단계, 이미지 1개 중 1개
      이 단계에 사용된 도구:
      Tweezers
      $4.99
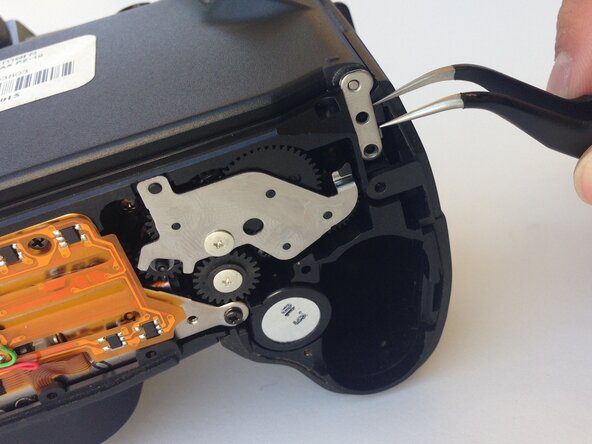
      • Using a pair of tweezers, gently remove the metal tab securing the back door axle.

      • The door will come loose at this point, watch for any loose parts that may also come out.

      댓글 쓰기

    6. Pentax PZ-10 Back Cover Locking Switch Spring Replacement, Removing the Side Panel: 6 단계, 이미지 1개 중 1개
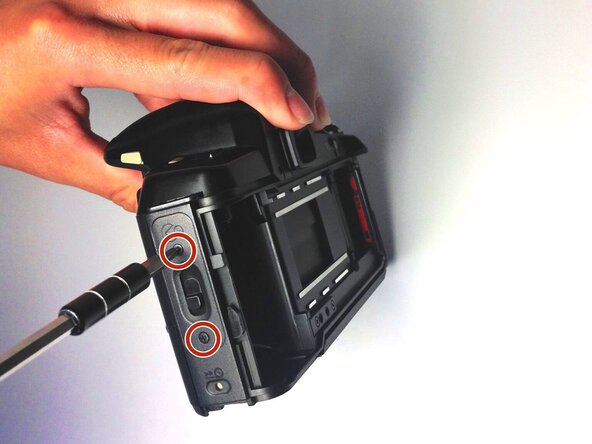
      • Once the back cover is fully removed, remove the two 4.35mm screws attaching the cover of the unlocking switch, and remove the plate.

      댓글 쓰기

    7. Pentax PZ-10 Back Cover Locking Switch Spring Replacement, Removing the Spring: 7 단계, 이미지 1개 중 1개
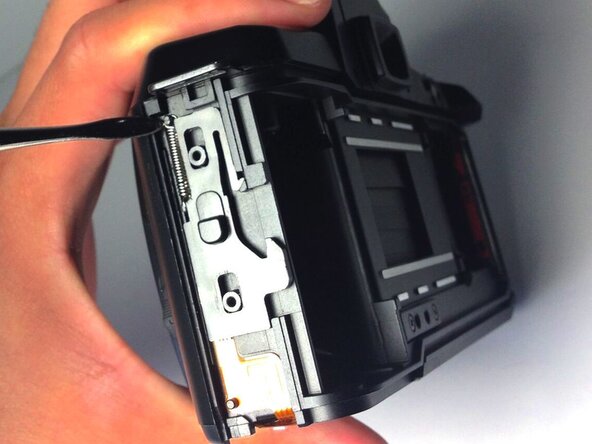
      • Locate the spring at the upper left corner of the face, and pull the rings of the spring off of the pins to remove it using plastic opening tools.

      • You are now ready to replace the spring.

      댓글 쓰기

결론

To reassemble your device, follow these instructions in reverse order.

취소: 해당 안내서를 완성하지 않았습니다.

다른 한 분이 해당 안내서를 완성하였습니다.

작성자

8다른 기여자 명과 함께

Ryan Su

회원 가입일: 04/20/15

107 평판

안내서 1개를 작성함

0가이드 댓글

댓글 쓰기

조회 통계:

지난 24시간: 0

지난 7일: 2

지난 30일: 17

전체 시간: 738