주요 콘텐츠로 건너뛰기
수리 커뮤니티 가입 - 계정 만들기

RIDGID R84015 X2 Case Removal

필요한 것

  1. RIDGID R84015 X2 Case Removal, RIDGID R84015 X2 Case Removal: 1 단계, 이미지 2개 중 1개 RIDGID R84015 X2 Case Removal, RIDGID R84015 X2 Case Removal: 1 단계, 이미지 2개 중 2개
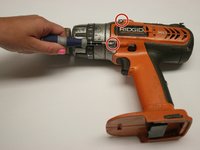
    • Remove the backplate.

    • Using a Torx T20 screwdriver, remove the four screws attaching the back plate.

  2. RIDGID R84015 X2 Case Removal: 2 단계, 이미지 1개 중 1개
    • Remove the drill handle.

    • Using the Phillips #2 screwdriver, remove the five screws attaching the drill handle to the body.

  3. RIDGID R84015 X2 Case Removal: 3 단계, 이미지 2개 중 1개 RIDGID R84015 X2 Case Removal: 3 단계, 이미지 2개 중 2개
    • Remove the gear casing from the body.

    • Using the Philips #2 screwdriver, remove the four screws attaching the gear casing to the body.

결론

To reassemble your device, follow these instructions in reverse order.

다른 2명이 해당 안내서를 완성하였습니다.

작성자

9다른 기여자 명과 함께

Evan Long

회원 가입일: 04/15/10

274 평판

안내서 4개를 작성함

Cal Poly, Team 15-48, Garner Spring 2010 Cal Poly, Team 15-48, Garner Spring 2010 회원

CPSU-GARNER-S10S15G48

6 회원들

안내서 10개를 작성함

0가이드 댓글

댓글 쓰기

조회 통계:

지난 24시간: 0

지난 7일: 9

지난 30일: 49

전체 시간: 4,340