주요 콘텐츠로 건너뛰기
수리 커뮤니티 가입 - 계정 만들기

Replacement Ram

필요한 것

  1. Replacement Ram, Ram: 1 단계, 이미지 1개 중 1개
    • Turn the laptop upside down. Locate a removable cover, that is screwed shut near the front right of the laptop which is upside down.

  2. Replacement Ram: 2 단계, 이미지 1개 중 1개
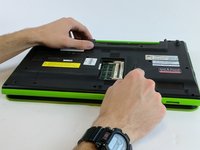
    • After removing the screw, using your finger slowly lift out and remove the cover.
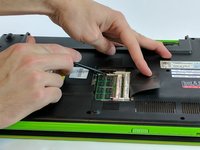
  3. Replacement Ram: 3 단계, 이미지 3개 중 1개 Replacement Ram: 3 단계, 이미지 3개 중 2개 Replacement Ram: 3 단계, 이미지 3개 중 3개
    • Lift the flap

    • Locate two connectors on both ends of the short end. This will release the ram, if properly done the long end should slightly lift.

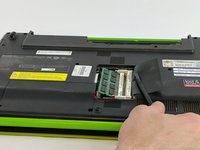
    • The ram is to be removed at a 45 degree angle.

  4. Replacement Ram: 4 단계, 이미지 1개 중 1개
    • Pull out cleanly and you have now successfully removed the ram.

결론

To reassemble your device, follow these instructions in reverse order.

다른 한 분이 해당 안내서를 완성하였습니다.

작성자

3다른 기여자 명과 함께

Eric Martinez

회원 가입일: 02/14/17

667 평판

안내서 6개를 작성함

USF Tampa, Team 20-5, Remmell Spring 2017 USF Tampa, Team 20-5, Remmell Spring 2017 회원

USFT-REMMELL-S17S20G5

3 회원들

안내서 12개를 작성함

0가이드 댓글

댓글 쓰기

조회 통계:

지난 24시간: 1

지난 7일: 13

지난 30일: 25

전체 시간: 552