주요 콘텐츠로 건너뛰기
수리 커뮤니티 가입 - 계정 만들기

Replacing Tungsten E screen. PAL5037

필요한 것

  1. Replacing Tungsten E screen. PAL5037, Tungsten E Disassembly: 1 단계, 이미지 2개 중 1개 Replacing Tungsten E screen. PAL5037, Tungsten E Disassembly: 1 단계, 이미지 2개 중 2개
    • Remove the stylus and SD card.

    • Using a T5 torx screwdriver, remove all 4 back panel screws.

    • The screws are small and can be lost easily. Be sure to place them in a secure area.

  2. Replacing Tungsten E screen. PAL5037: 2 단계, 이미지 3개 중 1개 Replacing Tungsten E screen. PAL5037: 2 단계, 이미지 3개 중 2개 Replacing Tungsten E screen. PAL5037: 2 단계, 이미지 3개 중 3개
    • Insert a plastic opening tool under the USB and power input slots.

    • Slide the plastic opener along the seam and gently pry the cover from the PDA body to remove the cover completely.

  3. Replacing Tungsten E screen. PAL5037: 3 단계, 이미지 2개 중 1개 Replacing Tungsten E screen. PAL5037: 3 단계, 이미지 2개 중 2개
    • Your device may not have a screen protector. If not, you can move on to step four.

    • Remove the screen protector by lifting the hinge out of the plastic housing.

    • Remove the top cover by gently pulling it away from the device with a plastic opening tool or your fingers.

  4. Replacing Tungsten E screen. PAL5037: 4 단계, 이미지 2개 중 1개 Replacing Tungsten E screen. PAL5037: 4 단계, 이미지 2개 중 2개
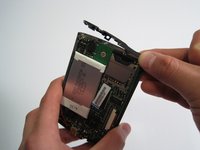
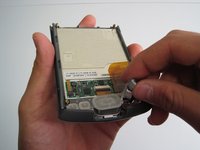
    • Carefully remove motherboard from the standoffs without damaging the LCD flex connector.

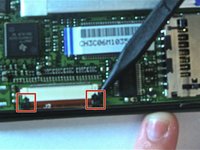
    • Using a spudger, unlock both sides of the flex connector block by pushing down.

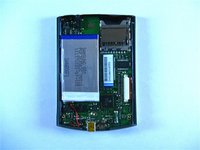
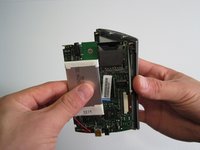
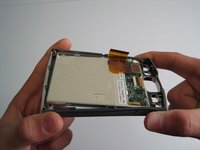
    • Remove motherboard completely.

    • Metal washers may pop out of the device during this step

  5. Replacing Tungsten E screen. PAL5037: 5 단계, 이미지 3개 중 1개 Replacing Tungsten E screen. PAL5037: 5 단계, 이미지 3개 중 2개 Replacing Tungsten E screen. PAL5037: 5 단계, 이미지 3개 중 3개
    • Remove buttons using fingers.

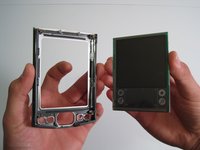
    • Gently flex frame to release screen from plastic frame.

    • Lift out screen.

  6. Replacing Tungsten E screen. PAL5037: 6 단계, 이미지 1개 중 1개
    • Congratulations! You have successfully taken apart a Palm Tungsten E.

  7. Replacing Tungsten E screen. PAL5037, Replacing Touch screen: 7 단계, 이미지 1개 중 1개
    • Reassemble the device in the reverse order of the tear down using the new screen in place of the old screen.

    • To reconnect the flex connector press up on the blocks with the spudger to ensure they click into place.

    • Be careful not to damage the flex connector.

결론

To reassemble your device, follow these instructions in reverse order.

다른 4명이 해당 안내서를 완성하였습니다.

작성자

6다른 기여자 명과 함께

Kevin Hom

회원 가입일: 01/21/10

118 평판

안내서 2개를 작성함

Cal Poly, Team 13-22, Maness Winter 2010 Cal Poly, Team 13-22, Maness Winter 2010 회원

CPSU-MANESS-W10S13G22

4 회원들

안내서 4개를 작성함

0가이드 댓글

댓글 쓰기

조회 통계:

지난 24시간: 1

지난 7일: 15

지난 30일: 29

전체 시간: 5,727