주요 콘텐츠로 건너뛰기

Samsung CLP-300 Imaging Unit Replacement

  1. Samsung CLP-300 Imaging Unit Replacement, Imaging Unit: 1 단계, 이미지 1/1
    • Turn the printer off and wait a few minutes for it to cool.

  2. Samsung CLP-300 Imaging Unit Replacement: 2 단계, 이미지 1/2 Samsung CLP-300 Imaging Unit Replacement: 2 단계, 이미지 2/2
    • Open the front cover

  3. Samsung CLP-300 Imaging Unit Replacement: 3 단계, 이미지 1/1
    • Remove waste toner container from the printer.

  4. Samsung CLP-300 Imaging Unit Replacement: 4 단계, 이미지 1/3 Samsung CLP-300 Imaging Unit Replacement: 4 단계, 이미지 2/3 Samsung CLP-300 Imaging Unit Replacement: 4 단계, 이미지 3/3
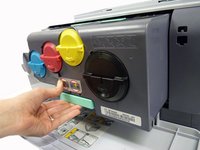
    • Pull the imaging unit out of the printer using bottom handle.

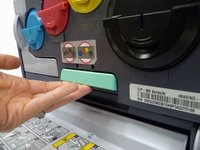
    • Use green handle on top of imaging unit to steady unit as you pull it out.

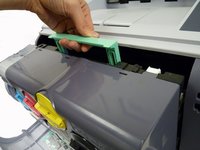
    • Holding the top and bottom handles on the new imaging unit, slide the unit in the printer until you hear a “click.”

    • Remove new imaging unit from its packaging making sure to remove protective paper and devices from unit

    • Do not expose new imaging unit to light for more than a few minutes. Covering unit with a piece of paper is sufficient protection while you complete repair.

    • If you hear a crackling sound once the printer turns on the imaging unit is not installed correctly. Take out and reinsert the unit.

결론

To reassemble your device, follow these instructions in reverse order.

다른 2명이 해당 안내서를 완성하였습니다.

Heather Howard

회원 가입일: 10/15/14

586 평판

안내서 4개 작성하였습니다

University of Maine, Team 1-1, Diaz Fall 2014 University of Maine, Team 1-1, Diaz Fall 2014 회원

UMAINE-DIAZ-F14S1G1

3 회원들

안내서 8개 작성하였습니다

댓글 0개

댓글 쓰기

조회 통계:

24 시간 전: 3

7일 전: 8

30일 전: 27

전체 시간: 13,147