소개
Use this guide to replace the charging assembly in the event of an inability to charge.
필요한 것
-
이 단계에 사용된 도구:Tweezers$4.99
-
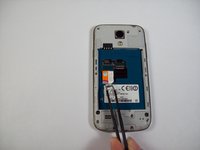
Using tweezers, remove the SIM card by sliding it towards the bottom of the device.
-
-
-
-
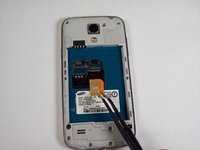
Using a nylon spudger, push through the hole at the top of the memory card holder to slide it out.
-
-
이 단계에 사용된 도구:Tweezers$4.99
-
Remove the 10 4.0 mm Phillips screws on the back of the phone using the #00 Phillips screwdriver.
-
Not needed, but Tweezers can be helpful in removing the screws from their holes, as their size makes removal a tad difficult.
-
-
-
Starting at the USB port, slide a plastic tool around the perimeter of the phone between the rear housing and frame. As you work your way around the edge you will feel the clips release.
-
-
-
Carefully separate the rear housing and the mid-frame to reveal the inside of the phone.
-
-
-
Remove the 2 flex cables shown that attach to the USB board, Tweezers can be especially helpful here.
-
-
-
Gently pry underneath the charging port using the plastic opening tool to separate it from the double sided tape below.
-
-
-
Once its released, gently lift the main board and remove the USB board containing the charging port.
-


To reassemble your device, follow these instructions in reverse order.
다른 35명이 해당 안내서를 완성하였습니다.
팀

USF Tampa, Team 9-2, Blackwell Fall 2014 USF Tampa, Team 9-2, Blackwell Fall 2014 회원
USFT-BLACKWELL-F14S9G2
5 회원들
안내서 11개를 작성함
4가이드 댓글
if i open the device like this, can i solder cables on the usb port to connect a wireless charging reciever?
Getriebesand - 답글 공유
I was looking for the same solution, and I think it is possible, a closer look at the USB port from various spare parts suppliers, I was in doubt if mine would look the same as the one displayed here, after disassembling my phone, it turned out to be this one: http://bit.ly/1GR4SzP
And it is possible, when messuring connection points, it turns out CN2 on the bord is the +, and - you can fit onto the side of the USB connector itself.
I have created a Guide describing the addition of wireless charging, it is in no way affecting the phones stability.
Works great with the S4 mini I9195 LTE version, but mind the different spare part (as linked above: http://bit.ly/1GR4SzP).