이 번역은 원본 안내서의 최신 업데이트를 반영하지 않을 수 있습니다. 번역 업데이트를 돕거나 아니면 원본 안내서 보기를 참조하세요.
소개
Hier findest du die offizielle iFixit Anleitung zur Reparatur des Samsung Galaxy S7 Displays. Diese Anleitung ist ein Duplikat, das nur aus historischen Gründen noch existiert, aber archiviert wurde.
필요한 것
-
-
Erhitze die Rückseite des Telefons, um den Kleber, der die Rückseite mit dem Gerät verbindet, zu schmelzen.
-
-
-
Benutze einen Saugnapf auf der unteren Hälfte der Rückplatte, um die untere Kante der Platte hochzuheben. Achte darauf, nicht zu viel Druck anzuwenden.
-
Sobald Du genug von der hinteren Platte angehoben hast, schiebe ein Plektrum zwischen Gerät und Rückplatte. Ziehe dann das Plektrum den kompletten Rand des Geräts entlang, um den Kleber aufzubrechen.
-
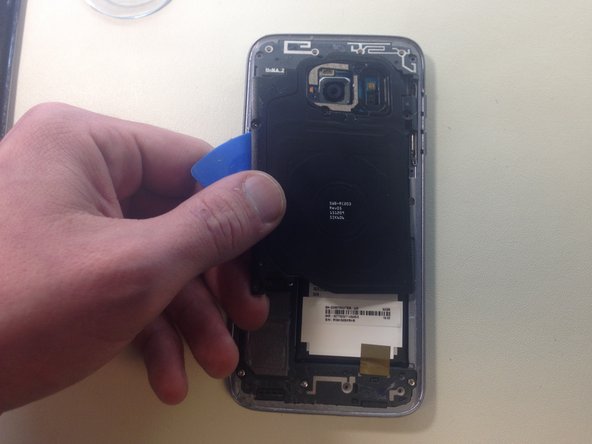
Entferne die Rückplatte.
-
-
-
Entferne mit einem Kreuzschlitzschraubendreher # 00 die 11 Schrauben, mit denen die Plastikabdeckungen, der Lautsprecher und die NFC-Antenne befestigt sind.
-
Brich den leichten Kleber mit einem Plektrum / Opening Pick auf und entferne die oberen beiden Plastikplättchen, sowie die NFC-Antenne.
-
HINWEIS: Wenn der Kleber zu stark ist, versuche ihn noch stärker zu erwärmen.
-
Entferne die Lautsprechereinheit. Möglicherweise musst Du ein kleines Stück Gold/Kupfer-Tape abschälen, welches die Einheit mit der Batterie verbindet.
-
-
-
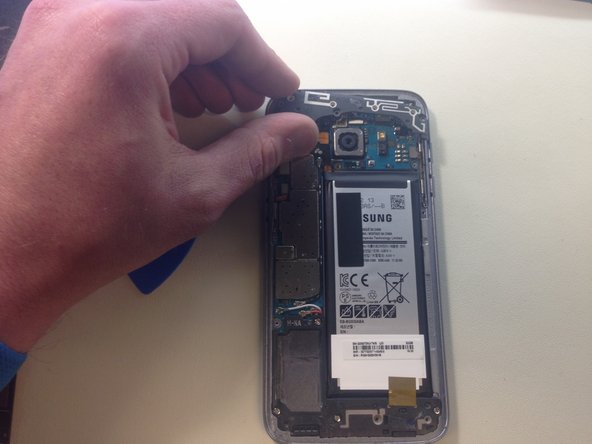
Nutze das flache Ende eines Spudgers, um den Akku vom Logic Board zu trennen.
-
-
-
-
Trenne mit dem flachen Ende eines Kunststoff-Spudgers alle anderen Flexkabel, die an der Oberseite des Logic Boards angeschlossen sind.
-
-
-
Benutze das spitze Ende eines Kunststoff-Spudgers, um die weißen und roten Antennenkabel vom Logic Board zu entfernen.
-
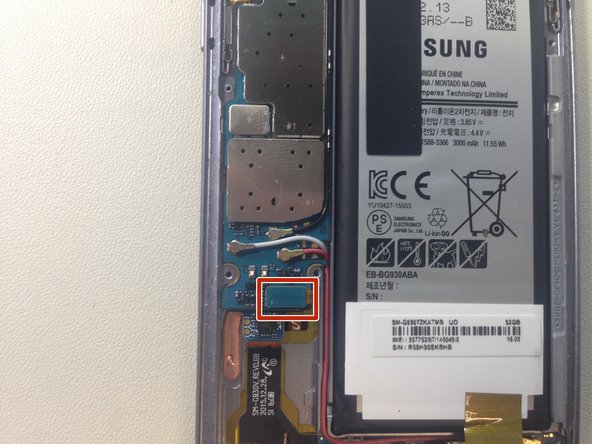
Entferne das SIM-Karten- / SD-Kartenfach mithilfe eines SIM-Karten-Auswurfwerkzeugs (Bild 2. Das Fach befindet sich an der Rückseite des Logic Boards. Der Versuch, das Logic Board vorher zu entfernen könnte es beschädigen).
-
-
-
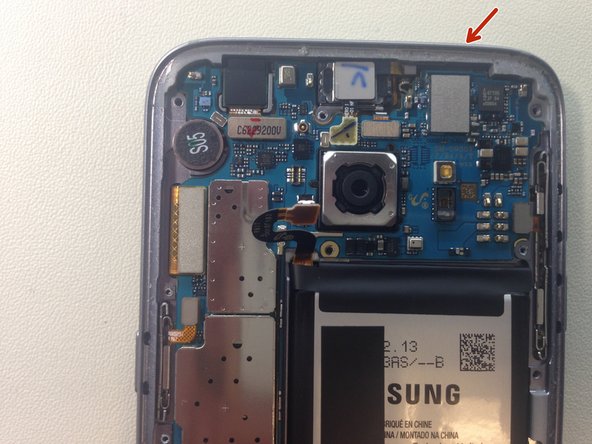
Hebe das Logic Board vorsichtig von der Oberseite des Telefons in Richtung Batterie. Entferne das Logic Board noch nicht vollständig.
-
HINWEIS: Wenn Du das Logic Board heraushebst, kann die Frontkamera aus dem Telefon fallen. Sollte das passieren, lege die Kamera zur Seite (am besten auf eine Antistatik-Matte).
-
Verwende das flache Ende eines Spudgers, um den USB-Anschluss des Daughter-Boards von der Rückseite des Logic Boards zu trennen.
-
Entferne das Logic Board und lege es zur Seite (am besten auf eine Antistatik-Matte).
-
-
-
Führe ein Plektrum zwischen das Display und die Dichtung des Telefons ein. Möglicherweise musst Du die Stelle zunächst erwärmen, um den Kleber lösen zu können.
-
Verwende einen kleinen Saugnapf wenn nötig, um das Display leicht anzuheben, damit Du das Plektrum einführen kannst.
-
Ziehe das Plektrum vorsichtig an der Außenseite entlang, um den Kleber aufzubrechen, der das Display mit dem Gerät verbindet.
-
Sei sehr vorsichtig an den Seiten und der Unterseite des Telefons. Wenn bei diesem Schritt etwas schief geht, können sowohl das Flachbandkabel des Displays als auch die Flachbandkabel der Funktionstasten beschädigt werden.
-
Sei auch vorsichtig mit dem LCD. Achte darauf, dass sich das Plektrum HINTER dem LCD befindet, nicht davor, und dass du das Plektrum so flach wie möglich hälst.
-
Entferne das Display.
-
-
-
Du kannst auch zuerst ganz vorsichtig mit einer Rasierklinge anfangen, so dass du danach eine Kreditkarte oder eine andere Plastikkarte benutzen kannst, ohne etwas zu beschädigen.
-
-
-
Stecke die Karte zwischen das Gehäuse und den LCD-Bildschirm.
-
Bewege sie dann langsam weiter am Rand entlang nach unten.
Is it still water resistant after repair
depends on ur adhesive
-
-
-
Nun entferne das Display und reinige das Gehäuse.
-
Nachdem du das Display entfernt hast und dem ganzen Rand entlang geputzt hast, achte bitte darauf, dass sich nirgendwo Glassplitter befinden, denn wenn du später ein neues Display einbaust, können sich auf diesem bereits durch kleine Glassplitter Risse bilden.
-
-
-
Fertig. Stelle sicher, dass alles funktioniert, bevor du die hintere Abdeckung wieder anbringst. Dann bist du fertig!
-


Arbeite die Schritte in umgekehrter Reihenfolge ab, um dein Gerät wieder zusammenzubauen.
Arbeite die Schritte in umgekehrter Reihenfolge ab, um dein Gerät wieder zusammenzubauen.
다른 50명이 해당 안내서를 완성하였습니다.
다음 번역가들에게 특별히 감사 드립니다:
88%


이 번역자 분들은 저희가 세상을 수리하는데 동참해 주시는 분입니다! 기여하시겠습니까?
번역 시작하기 ›

댓글 36개
Can just the glass be replaced do is it fused together somehow?
it could if you get the lcd out with broken glass out one piece then using heat plate separate the glass very thin so it be hard to save lcd
Brian -
The Eternal question: is it still waterproof after screen replacement?
no it wont because you will break the seal that originally came from samsung
Brian -
Is it still water resistant
no it wont be water resistance any more
Brian -
Appreciate the effort, but this guide is severely lacking. There is little to no guidance about it.
sorry this my first guide and i did it so other repair people get idea because ifixit at the time had no guides at all so that is why i did a quick one as i was repairing the phone
Brian -
Samsung Galaxy does not use an LCD its an OLED
thank you for sharing your info oled but if you on ebay or anywhere they sell as lcd but thank you again for correcting me but you should correct the other people too 1 million sellers that referred as lcd
Brian -
I accidently cut the ribbon cable to the digitizer. ...ouch. Do you sell the digitizer assembly for the Galaxy S7 edge as well as the sealant for the back of the phone like you do above for the regular Galaxy S7 for 169.95 as well as the rear cover adhesive for the S7 edge...probably same adhesive. I read many article and if I had followed your article I would not have cut the ribbon cable....Good article. Thank you, rexblisard@yahoo.com
rexblisard - 답글
you welcome and sorry i dont sell parts i just do repairs
Brian -
Did it work fine after that?
yes it did no complaints from the customer
Brian -
Omg. just say thx for the effort and the guide...he wasted hes time..if this guide doesn't help you..then take ur phone to a repair shop..if u already repaired ANY waterproof mobiles..u would know how to open it and deal with it..and this guide would only help to identify components and avoid posible mistakes like cutting a ribbon or damaging something inside...
I really thank you for your time....i just got mad when i saw ppls coments...
thank you for understanding
Brian -
Why take the back all apart if only wanting to change the screen???? Can't I just take the screen off an put new one on??? Really don't see the point of taking back off and a few boards as well ?
because the cable connects in the back so if you don't open the back you can not plug the lcd cable with the motherboard
Brian -
Lol the one guide on iFixit where OP doesn't completely hold your hand and everyone gets all upset.
I think it was a dope guide. Helped me catch all the tiny ribbon cable connections - I totally would've missed one without this.
Although, yeah, it seems like you really only need to disconnect the display cable from the daughterboard to get the display off.
thank you i hope it was some help
Brian -
i apologize for asking a repeat question but I do not see answers - Is it possible to replace just the glass for this phone? i have cracked glass and a working digitizer. another electronics outlet sold me a glass replacement kit but no instructions. All the vieos i’ve been watching and the forums/guides I’ve read all discuss replacing the entire front(digitizer/glass).
is it possible to replace just the glass? if so, can it be done without removing all the parts from the back? since technically I won't need to plug in to the motherboard?
Its possible but very hard to do i tried few times just changing the glass i end up breaking the screen but on youtube you have some people that are able remove just the glass with bussiness cards.. chances are 20% can get just the glass out withought breaking lcd unless you have freezing mashine thats a different story..good luck
I’m not sure what everyone is complaining about… this seems like a great tutorial and you show exactly what to remove. My first time taking a phone apart and this is incredibly helpful Thank-you for taking time to post!
thank you appreciate your feedback
Brian -