주요 콘텐츠로 건너뛰기
수리 커뮤니티 가입 - 계정 만들기

Samsung NP-R540-JA09US Front Panel Replacement

필요한 것

  1. Samsung NP-R540-JA09US Front Panel Replacement, Battery: 1 단계, 이미지 1개 중 1개
    • Turn off laptop before starting.

    • Remove power cable before starting.

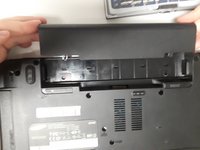
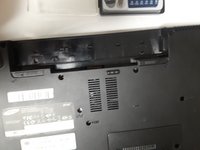
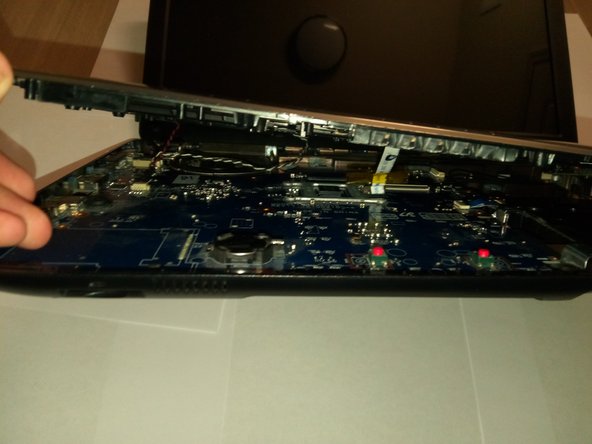
    • Flip the laptop over so that the bottom of the laptop is facing upwards.

  2. Samsung NP-R540-JA09US Front Panel Replacement: 2 단계, 이미지 1개 중 1개
    • Pull the two latches outward.

  3. Samsung NP-R540-JA09US Front Panel Replacement: 3 단계, 이미지 2개 중 1개 Samsung NP-R540-JA09US Front Panel Replacement: 3 단계, 이미지 2개 중 2개
    • Slide the battery out of the laptop.

  4. Samsung NP-R540-JA09US Front Panel Replacement, Optical Drive: 4 단계, 이미지 1개 중 1개
    • Remove securing screw with the PH0 head.

  5. Samsung NP-R540-JA09US Front Panel Replacement: 5 단계, 이미지 1개 중 1개
    • Slide the optical drive out and remove it from the device.

  6. Samsung NP-R540-JA09US Front Panel Replacement, Keyboard: 6 단계, 이미지 1개 중 1개
    • Remove the two Phillips #0 screws labeled KBD.

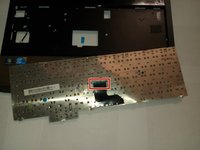
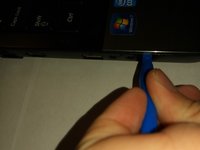
    • There are 5 clips along the top of the keyboard. Insert a thin opener tool (iSessamo tool or similar) between each clip and the keyboard tray to release it.

    • Make sure to pry the metal keyboard base and not the keycaps.

  7. Samsung NP-R540-JA09US Front Panel Replacement: 8 단계, 이미지 1개 중 1개
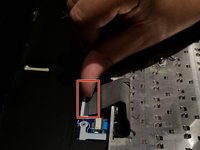
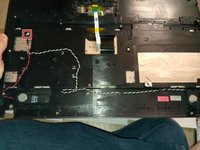
    • Do not bend your keyboard as shown in this picture.

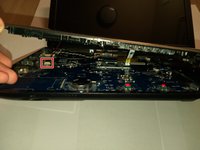
    • Lift the keyboard up to release catches on the sides, then slide the keyboard towards the screen to slide tabs out of the slots at the bottom.

  8. Samsung NP-R540-JA09US Front Panel Replacement: 9 단계, 이미지 2개 중 1개 Samsung NP-R540-JA09US Front Panel Replacement: 9 단계, 이미지 2개 중 2개
    • Disconnect the keyboard cable from the motherboard.

  9. Samsung NP-R540-JA09US Front Panel Replacement, Front Panel: 10 단계, 이미지 1개 중 1개
    • Remove the two screws with a Phillips #00 screwdriver.

  10. Samsung NP-R540-JA09US Front Panel Replacement: 11 단계, 이미지 1개 중 1개
    • Remove the highlighted screws with a Phillips #0 Screwdriver.

  11. Samsung NP-R540-JA09US Front Panel Replacement: 12 단계, 이미지 3개 중 1개 Samsung NP-R540-JA09US Front Panel Replacement: 12 단계, 이미지 3개 중 2개 Samsung NP-R540-JA09US Front Panel Replacement: 12 단계, 이미지 3개 중 3개
    • Pry the front panel away from the base with an Opening Tool.

  12. Samsung NP-R540-JA09US Front Panel Replacement: 13 단계, 이미지 2개 중 1개 Samsung NP-R540-JA09US Front Panel Replacement: 13 단계, 이미지 2개 중 2개
    • Disconnect the speaker wire from the motherboard.

결론

To reassemble your device, follow these instructions in reverse order.

작성자

3다른 기여자 명과 함께

Daylyn Bourland

회원 가입일: 09/21/18

297 평판

안내서 2개를 작성함

0가이드 댓글

댓글 쓰기

조회 통계:

지난 24시간: 0

지난 7일: 9

지난 30일: 64

전체 시간: 804