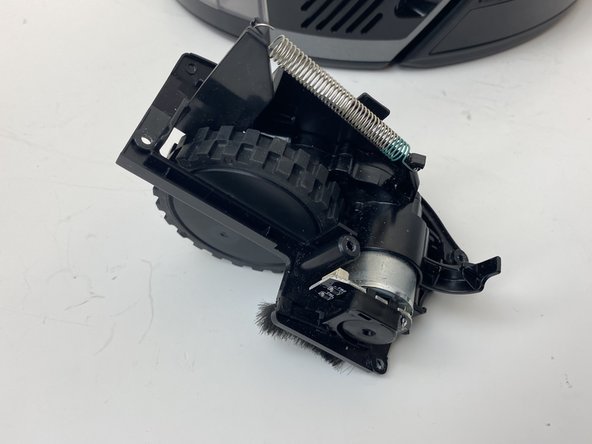
주요 콘텐츠로 건너뛰기

Shark ION Robot R75 Drive Wheel Assembly Replacement

필요한 것

  1. Shark ION Robot R75 Drive Wheel Assembly Replacement, Battery: 1 단계, 이미지 3개 중 1개 Shark ION Robot R75 Drive Wheel Assembly Replacement, Battery: 1 단계, 이미지 3개 중 2개 Shark ION Robot R75 Drive Wheel Assembly Replacement, Battery: 1 단계, 이미지 3개 중 3개
    • Make sure the robot is shut off by pressing the power button on top.

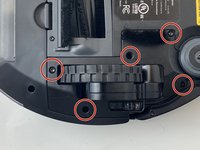
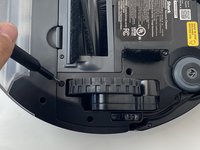
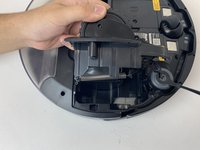
    • Flip the R75 over so that the underside is facing up.

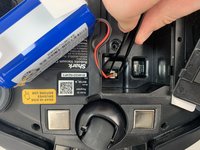
    • Using a Phillips #1 screwdriver, remove the 4mm screw in the battery cover.

    • Remove the battery cover.

  2. Shark ION Robot R75 Drive Wheel Assembly Replacement: 2 단계, 이미지 3개 중 1개 Shark ION Robot R75 Drive Wheel Assembly Replacement: 2 단계, 이미지 3개 중 2개 Shark ION Robot R75 Drive Wheel Assembly Replacement: 2 단계, 이미지 3개 중 3개
    • Be careful when removing the battery, as it will still be connected to a wire.

    • Slowly pull the white tabs outward to remove the battery.

  3. Shark ION Robot R75 Drive Wheel Assembly Replacement: 3 단계, 이미지 2개 중 1개 Shark ION Robot R75 Drive Wheel Assembly Replacement: 3 단계, 이미지 2개 중 2개
    이 단계에 사용된 도구:
    Tweezers
    $4.99
    • Be careful when removing the connector, as the part can break if too much force is used.

    • Push down on the tab of the battery connector using a set of tweezers and pull the connector away from the robot to free the wire.

    • Remove the battery from the device.

  4. Shark ION Robot R75 Drive Wheel Assembly Replacement, Drive Wheel Assembly: 4 단계, 이미지 1개 중 1개
    • Flip the R75 to its underside.

    • Make sure the R75 is shut off.

    • For extra security, disconnect the battery by following the prerequisite guide.

  5. Shark ION Robot R75 Drive Wheel Assembly Replacement: 5 단계, 이미지 3개 중 1개 Shark ION Robot R75 Drive Wheel Assembly Replacement: 5 단계, 이미지 3개 중 2개 Shark ION Robot R75 Drive Wheel Assembly Replacement: 5 단계, 이미지 3개 중 3개
    • Using a Torx T15 screwdriver, remove the five screws from the drive wheel assembly.

    • Carefully lift the drive wheel assembly from the wheel well by gently pulling up on the wheel.

    • The assembly will still be connected to the motherboard via a cable, so be sure not to pull so hard that the cable rips.

  6. Shark ION Robot R75 Drive Wheel Assembly Replacement: 6 단계, 이미지 3개 중 1개 Shark ION Robot R75 Drive Wheel Assembly Replacement: 6 단계, 이미지 3개 중 2개 Shark ION Robot R75 Drive Wheel Assembly Replacement: 6 단계, 이미지 3개 중 3개
    • Flip the wheel assembly over and disconnect the cable connector on its underside.

    • Remove the drive wheel assembly.

    • Repeat this process for the other side if necessary.

결론

To reassemble your device, follow these instructions in reverse order.

다른 3명이 해당 안내서를 완성하였습니다.

작성자

3다른 기여자 명과 함께

Andrew Lowy

회원 가입일: 01/25/20

599 평판

안내서 4개를 작성함

6가이드 댓글

Where I can buy the Shark ION Robot R75 Drive Wheel Assembly Replacement?

Thanks for your help!

xoxolo - 답글

Do you know what the drive wheel motor cable is (see Step 6)? It's a 6 pin to 5 pin and the grooves are on the thin side and pitch of ~1.4mm. Possible a JST ZH?

Seth T - 답글

I appreciate the step-by-step instructions with pictures... this was very helpful. However, my rv750 doesn't have the screws by the wheel assembly.

I've removed the screws, but it appears that I will need to separate the bottom from the top to access the wheel assemblies. Do you have a step=by step for the rv750 that has the wheel assembly enclosed?

RandiB - 답글

The right wheel ass has a small gear striped inside, can you buy the small gears to repair the wheel drive?

Jerry Rotenberry - 답글

댓글 쓰기

조회 통계:

지난 24시간: 1

지난 7일: 5

지난 30일: 56

전체 시간: 10,475