주요 콘텐츠로 건너뛰기
수리 커뮤니티 가입 - 계정 만들기

Sony Alpha A3000 Motherboard Replacement

필요한 것

  1. Sony Alpha A3000 Motherboard Replacement, Rear Case: 1 단계, 이미지 3개 중 1개 Sony Alpha A3000 Motherboard Replacement, Rear Case: 1 단계, 이미지 3개 중 2개 Sony Alpha A3000 Motherboard Replacement, Rear Case: 1 단계, 이미지 3개 중 3개
    • Remove the seven highlighted screws shown here.

    • Screws are teeny tiny, don't lose them!

  2. Sony Alpha A3000 Motherboard Replacement: 2 단계, 이미지 2개 중 1개 Sony Alpha A3000 Motherboard Replacement: 2 단계, 이미지 2개 중 2개
    • Remove this final screw from the memory card compartment.

    • Remove the chassis by pulling the back cover away from the camera.

    • Be careful not to damage any of the delicate ribbon cables when removing the chassis.

  3. Sony Alpha A3000 Motherboard Replacement: 3 단계, 이미지 2개 중 1개 Sony Alpha A3000 Motherboard Replacement: 3 단계, 이미지 2개 중 2개
    • Gently but forcefully lift up on the parallel cable connecting the two halves of the camera.

  4. Sony Alpha A3000 Motherboard Replacement, Motherboard: 4 단계, 이미지 2개 중 1개 Sony Alpha A3000 Motherboard Replacement, Motherboard: 4 단계, 이미지 2개 중 2개
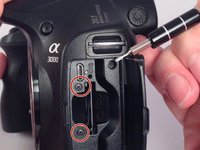
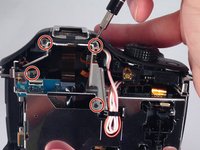
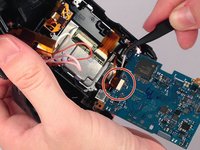
    • After removing the backing from the camera. Remove the two final screws in the memory compartment area.

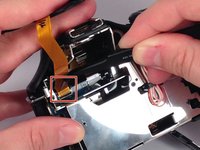
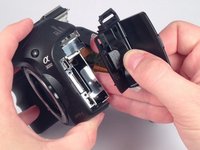
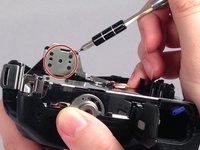
    • Detach the facing for the memory dock.

  5. Sony Alpha A3000 Motherboard Replacement: 5 단계, 이미지 2개 중 1개 Sony Alpha A3000 Motherboard Replacement: 5 단계, 이미지 2개 중 2개
    • Remove the eight screws securing the mount for the flash device.

  6. Sony Alpha A3000 Motherboard Replacement: 6 단계, 이미지 2개 중 1개 Sony Alpha A3000 Motherboard Replacement: 6 단계, 이미지 2개 중 2개
    • Remove the three remaining screws holding in the protective metal casing.

  7. Sony Alpha A3000 Motherboard Replacement: 7 단계, 이미지 1개 중 1개
    • Remove the metal casing.

  8. Sony Alpha A3000 Motherboard Replacement: 8 단계, 이미지 1개 중 1개
    • Remove three screws holding down the motherboard .

  9. Sony Alpha A3000 Motherboard Replacement: 9 단계, 이미지 2개 중 1개 Sony Alpha A3000 Motherboard Replacement: 9 단계, 이미지 2개 중 2개
    • Detach the nine serial cables connecting it to the camera body.

  10. Sony Alpha A3000 Motherboard Replacement: 10 단계, 이미지 1개 중 1개
    • Finally remove the motherboard from the casing.

결론

To reassemble your device, follow these instructions in reverse order.

다른 8명이 해당 안내서를 완성하였습니다.

작성자

4다른 기여자 명과 함께

Leonard Holloman

회원 가입일: 08/31/15

662 평판

안내서 4개를 작성함

USF Tampa, Team 4-4, Meier Fall 2015 USF Tampa, Team 4-4, Meier Fall 2015 회원

USFT-MEIER-F15S4G4

4 회원들

안내서 10개를 작성함

1가이드 댓글

Then loose the plug all the motherboard?

kongre172 - 답글 공유

댓글 쓰기

조회 통계:

지난 24시간: 5

지난 7일: 20

지난 30일: 57

전체 시간: 3,090