주요 콘텐츠로 건너뛰기
수리 커뮤니티 가입 - 계정 만들기

Sony DVP-SR200P DVD Drive Replacement

필요한 것

  1. Sony DVP-SR200P DVD Drive Replacement, Top Cover: 1 단계, 이미지 2개 중 1개 Sony DVP-SR200P DVD Drive Replacement, Top Cover: 1 단계, 이미지 2개 중 2개
    • Remove the five #1 Phillips screws (black, 3/16") attaching the cover to the DVD player.

    • One 3/16" screw on the right side of the DVD player.

    • One 3/16" screw on the left side of the DVD player (directly opposite of other screw).

    • Three 3/16" screws on the back of the DVD player.

  2. Sony DVP-SR200P DVD Drive Replacement: 2 단계, 이미지 2개 중 1개 Sony DVP-SR200P DVD Drive Replacement: 2 단계, 이미지 2개 중 2개
    • Slide the cover away from the front of the DVD player until it is off.

  3. Sony DVP-SR200P DVD Drive Replacement, Processing Board: 3 단계, 이미지 1개 중 1개
    • Remove the blue tape from the processing board by gently pulling upward.

  4. Sony DVP-SR200P DVD Drive Replacement: 4 단계, 이미지 2개 중 1개 Sony DVP-SR200P DVD Drive Replacement: 4 단계, 이미지 2개 중 2개
    이 단계에 사용된 도구:
    Tweezers
    $4.99
    • Use the tweezers to remove the four sets of wires connected to the processing board. Start with the cord located in front of the row of three cords.

    • The wires may be difficult to remove. Wiggling them while lifting them up may help remove them.

  5. Sony DVP-SR200P DVD Drive Replacement: 5 단계, 이미지 1개 중 1개
    • Handle the processing board with care. It is fragile.

    • Unscrew the two #1 Phillips screws (silver, 3/16") located on the two edge corners of the processing board.

  6. Sony DVP-SR200P DVD Drive Replacement: 6 단계, 이미지 1개 중 1개
    • Orient the DVD player so that you are facing the video and audio jacks.

    • Unscrew the two #1 Phillips screws (silver, 3/16") located on the outside of the DVD player

    • The processing board is now free to be removed and replaced.

  7. Sony DVP-SR200P DVD Drive Replacement, DVD Drive: 7 단계, 이미지 1개 중 1개
    • Orient the DVD player so the front of the DVD player is opposite of you.

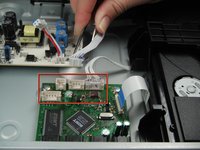
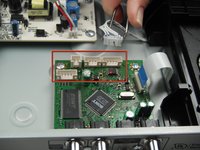
    • Remove the two #1 Phillips screws (silver, 3/16") that attach the DVD drive to the bottom of the DVD player.

  8. Sony DVP-SR200P DVD Drive Replacement: 8 단계, 이미지 1개 중 1개
    • Remove the DVD drive by pulling it backward and upward while ensuring that it is free of any braces.

결론

To reassemble your device, follow these instructions in reverse order.

작성자

5다른 기여자 명과 함께

Kaitlyn Reilly

회원 가입일: 01/11/13

54 평판

안내서 1개를 작성함

Cal Poly, Team 5-17, Forte Winter 2013 Cal Poly, Team 5-17, Forte Winter 2013 회원

CPSU-FORTE-W13S5G17

5 회원들

안내서 6개를 작성함

0가이드 댓글

댓글 쓰기

조회 통계:

지난 24시간: 3

지난 7일: 26

지난 30일: 84

전체 시간: 4,365