주요 콘텐츠로 건너뛰기

Sony Ericsson W580i LCD Replacement

필요한 것

  1. Sony Ericsson W580i LCD Replacement, Front Cover: 1 단계, 이미지 2개 중 1개 Sony Ericsson W580i LCD Replacement, Front Cover: 1 단계, 이미지 2개 중 2개
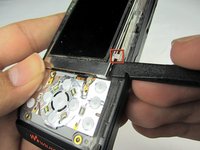
    • Insert the edge of an opening tool between the front cover and the phone.

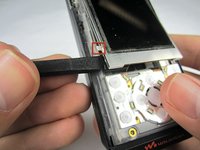
    • Gently pry off the front cover working your way around the edges.

  2. Sony Ericsson W580i LCD Replacement: 2 단계, 이미지 2개 중 1개 Sony Ericsson W580i LCD Replacement: 2 단계, 이미지 2개 중 2개
    • Pull the front cover down and away from the phone.

    • The front keypads might come off with the front cover. Do not lose these.

  3. Sony Ericsson W580i LCD Replacement: 3 단계, 이미지 1개 중 1개
    • Gently peel the keypad away from the phone.

  4. Sony Ericsson W580i LCD Replacement, LCD: 4 단계, 이미지 2개 중 1개 Sony Ericsson W580i LCD Replacement, LCD: 4 단계, 이미지 2개 중 2개
    • Insert a spudger between the lower edge of the screen and the phone.

    • Pry the screen up to disconnect the tabs on each side holding the screen in.

    • Do not remove the screen yet. There is a ribbon connecting the screen to the motherboard.

  5. Sony Ericsson W580i LCD Replacement: 5 단계, 이미지 2개 중 1개 Sony Ericsson W580i LCD Replacement: 5 단계, 이미지 2개 중 2개
    • Use a spudger to remove the ribbon cable from the motherboard.

    • Lift the screen away from the phone

결론

To reassemble your device, follow these instructions in reverse order.

다른 6명이 해당 안내서를 완성하였습니다.

작성자

5다른 기여자 명과 함께

Diego

회원 가입일: 10/09/11

397 평판

안내서 4개를 작성함

Cal Poly, Team 5-31, Amido Fall 2011 Cal Poly, Team 5-31, Amido Fall 2011 회원

CPSU-AMIDO-F11S5G31

4 회원들

안내서 12개를 작성함

0가이드 댓글

댓글 쓰기

조회 통계:

지난 24시간: 1

지난 7일: 3

지난 30일: 10

전체 시간: 5,901