소개
With this guide, you will be taking the screen off of the device to locate the camera module. The following steps will explain how to remove the necessary parts in order to remove the camera module located on your screen.
필요한 것
-
-
Begin by opening the HDMI/USB port cover on the left edge.
-
Remove the three #000 headed, 3 mm long screws located underneath the port cover.
 FixBot에 문의하기
-
-
-
Locate and open the Micro SD slot on the top side of the device.
-
Remove the two screws located beneath the cover.
-
-
-
-
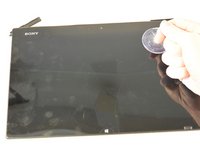
Attach the suction cup to the top right area of the screen.
-
Pull to separate the screen from the rest of the device.
-
Detach the display ribbon cable.
-
-
-
Flip device upward carefully like you are turning the page of a book.
-
-
-
Remove the single 3 mm Phillips #000 screw on the left side of the module.
-
Remove the module from the front panel assembly.
-


To reassemble your device, follow these instructions in reverse order.
다른 한 분이 해당 안내서를 완성하였습니다.
팀

IUPUI, Team 1-2, Harley Fall 2015 IUPUI, Team 1-2, Harley Fall 2015 회원
IUPUI-HARLEY-F15S1G2
4 회원들
안내서 20개를 작성함
1가이드 댓글
Is it possible to replace the camera module with a different one? I think that it is a usb camera. I would like to replace it a newer sony model.