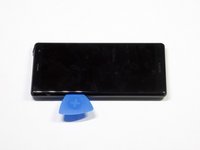
주요 콘텐츠로 건너뛰기
수리 커뮤니티 가입 - 계정 만들기

Sony Xperia XZ2 Battery Replacement

필요한 것

  1. Sony Xperia XZ2 Battery Replacement, LCD Screen: 1 단계, 이미지 3개 중 1개 Sony Xperia XZ2 Battery Replacement, LCD Screen: 1 단계, 이미지 3개 중 2개 Sony Xperia XZ2 Battery Replacement, LCD Screen: 1 단계, 이미지 3개 중 3개
    • Weaken the glue that is keeping the screen in place by heating up the edges of the phone with a hair dryer or heat gun.

    • The phone gets very hot and can hurt the user handling it.

    댓글 쓰기

  2. Sony Xperia XZ2 Battery Replacement: 2 단계, 이미지 3개 중 1개 Sony Xperia XZ2 Battery Replacement: 2 단계, 이미지 3개 중 2개 Sony Xperia XZ2 Battery Replacement: 2 단계, 이미지 3개 중 3개
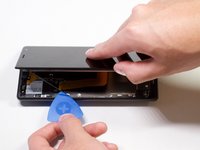
    • Scrape all the glue from the inside edges by inserting opening picks into the bottom edge of the phone and working your way around the edges.

    • If the glue hardens and becomes difficult to move the plastic around the edges, reheat the phone.

    댓글 쓰기

  3. Sony Xperia XZ2 Battery Replacement: 3 단계, 이미지 2개 중 1개 Sony Xperia XZ2 Battery Replacement: 3 단계, 이미지 2개 중 2개
    • Pry open the phone by inserting an opening pick under one of the edges and removing the screen.

    • The screen is still attached by a connector, so do not pull the pieces apart.

    댓글 쓰기

  4. Sony Xperia XZ2 Battery Replacement: 4 단계, 이미지 1개 중 1개
    이 단계에 사용된 도구:
    Tweezers
    $3.99
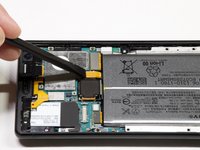
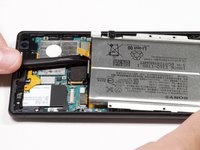
    • Remove the bracket covering the connector by grabbing one side of the bracket with angled tweezers and gently pulling it off.

    댓글 쓰기

  5. Sony Xperia XZ2 Battery Replacement: 5 단계, 이미지 1개 중 1개
    • Gently remove the connector by using a spudger to pop it off.

    댓글 쓰기

  6. Sony Xperia XZ2 Battery Replacement, Battery: 6 단계, 이미지 1개 중 1개
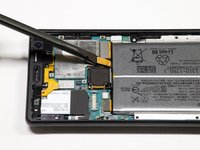
    • Take out the twelve 3.5mm screws using the Phillips #00 screwdriver.

    • Remove the one 3 mm Phillips #00 screws.

    • Remove the two 1mm Phillips #00 screws.

    • Fifteen screws should be removed in total in this step. (Not all the screws are visible in the picture.)

    댓글 쓰기

  7. Sony Xperia XZ2 Battery Replacement: 7 단계, 이미지 1개 중 1개
    • Lift the metal screen shield out of the phone.

    댓글 쓰기

  8. Sony Xperia XZ2 Battery Replacement: 8 단계, 이미지 3개 중 1개 Sony Xperia XZ2 Battery Replacement: 8 단계, 이미지 3개 중 2개 Sony Xperia XZ2 Battery Replacement: 8 단계, 이미지 3개 중 3개
    • Use the spudger to pry up the battery flex connector to pop the battery out.

    댓글 쓰기

  9. Sony Xperia XZ2 Battery Replacement: 9 단계, 이미지 1개 중 1개
    • Lift the battery out of the phone.

    댓글 쓰기

결론

To reassemble your device, follow these instructions in reverse order.

취소: 해당 안내서를 완성하지 않았습니다.

다른 6명이 해당 안내서를 완성하였습니다.

작성자

3다른 기여자 명과 함께

Arti Jain

회원 가입일: 01/24/19

261 평판

안내서 1개를 작성함

Cal Poly, Team S19-G5, White Winter 2019 Cal Poly, Team S19-G5, White Winter 2019 회원

CPSU-WHITE-W19S19G5

4 회원들

안내서 12개를 작성함

1가이드 댓글

لقد كان العمل على هذا الهاتف مريحا جدا و جميل

Mouad Driouch - 답글 공유

댓글 쓰기

조회 통계:

지난 24시간: 9

지난 7일: 97

지난 30일: 350

전체 시간: 32,829