주요 콘텐츠로 건너뛰기

Sony a7 Rear Disassembly Replacement

필요한 것

  1. Sony a7 Rear Disassembly  Replacement, Rear Disassembly: 1 단계, 이미지 1/1
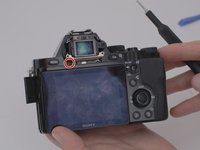
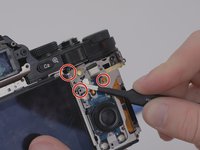
    • Remove the eyepiece cover by removing the four M1.5x4mm screws with a PH00 Phillips screwdriver.

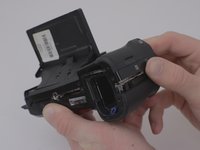
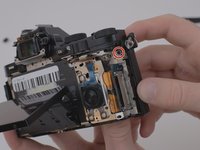
    • Remove the M1.5x4mm screw that retains the adjustment wheel with a PH00 Phillips screwdriver.

  2. Sony a7 Rear Disassembly  Replacement: 2 단계, 이미지 1/3 Sony a7 Rear Disassembly  Replacement: 2 단계, 이미지 2/3 Sony a7 Rear Disassembly  Replacement: 2 단계, 이미지 3/3
    • Remove the six M1.5x4mm screws with a PH00 Phillips screwdriver.

  3. Sony a7 Rear Disassembly  Replacement: 3 단계, 이미지 1/1
    • Remove one M1.5x4mm screw with a PH00 Phillips screwdriver.

  4. Sony a7 Rear Disassembly  Replacement: 4 단계, 이미지 1/2 Sony a7 Rear Disassembly  Replacement: 4 단계, 이미지 2/2
    • Remove the four M 1.5x2mm screws.

  5. Sony a7 Rear Disassembly  Replacement: 5 단계, 이미지 1/3 Sony a7 Rear Disassembly  Replacement: 5 단계, 이미지 2/3 Sony a7 Rear Disassembly  Replacement: 5 단계, 이미지 3/3
    • Once the screws have been removed, unsnap and lift the rear plastic cover off of the camera.

  6. Sony a7 Rear Disassembly  Replacement: 6 단계, 이미지 1/1
    • Using the blunt tweezers, remove the blue ribbon cable.

    • For additional guidance and tips on how to properly attach and detach connector cables, please reference iFixit's guide to connector cables here.

  7. Sony a7 Rear Disassembly  Replacement: 7 단계, 이미지 1/2 Sony a7 Rear Disassembly  Replacement: 7 단계, 이미지 2/2
    • Place the tweezers on the side of the circuit board and lift it from underneath so as to free it from the three retaining tabs.

  8. Sony a7 Rear Disassembly  Replacement: 8 단계, 이미지 1/3 Sony a7 Rear Disassembly  Replacement: 8 단계, 이미지 2/3 Sony a7 Rear Disassembly  Replacement: 8 단계, 이미지 3/3
    • Remove four M1.5x4mm screws using a PH00 Phillips screwdriver.

  9. Sony a7 Rear Disassembly  Replacement: 9 단계, 이미지 1/1
    • Lift the metal plate and LCD screen away from the camera body.

  10. Sony a7 Rear Disassembly  Replacement: 10 단계, 이미지 1/1
    • Detach the amber ribbon cable from the motherboard.

    • For additional guidance and tips on how to properly attach and detach connector cables, please reference iFixit's guide to connector cables here.

결론

To reassemble your device, follow these instructions in reverse order.

다른 9명이 해당 안내서를 완성하였습니다.

Jeffrey Coleman

회원 가입일: 01/14/20

1,328 평판

안내서 6개 작성하였습니다

댓글 0개

댓글 쓰기

조회 통계:

24 시간 전: 6

7일 전: 35

30일 전: 128

전체 시간: 5,820