소개
To replace other components in the Swagtron T3, you will need to first remove the outer shell by removing the screws. Make sure to take note of where each type of screw goes to streamline the process of putting it back together. To avoid electric shock, discharge the capacitors using the capacitor discharge tool before making any changes to your Swagtron. Click here to learn how to safely discharge a capacitor.
필요한 것
-
-
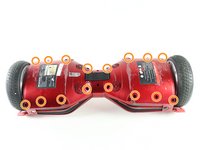
Flip the Swagtron so that the footpads are facing the ground.
-
Unscrew the sixteen 9.4 mm Phillips #1 machine screws on the side of the Swagtron that is now facing upwards.
 FixBot에 문의하기
-
-
-
-
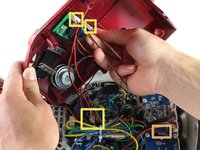
Slowly lift the backside cover.
-
Detach the four cables connected to the cover by pinching the connector clips and pulling the cables out:
-
Three cables on the motherboard side.
-
Two red cables with white connectors and one white cable with a white connector.
-
One yellow cable with a black connector on the battery side.
-


To reassemble your device, follow these instructions in reverse order.
팀

Cal Poly, Team S13-G3, Forte Spring 2017 Cal Poly, Team S13-G3, Forte Spring 2017 회원
CPSU-FORTE-S17S13G3
4 회원들
안내서 4개를 작성함