소개
If your Hyper Tough HT 12 foot tape measure is not reeling back in properly or is getting stuck, use this guide to replace the clock spring. This guide can also be used on most other models of tape measures as they all function with the same basic design.
Tape measures function by wrapping the yellow measurement tape around a clock spring, which is a coiled piece of metal. The natural tendency of this spring should be to keep the tape coiled and inside the tape measure outer shell. If the tape measure will not reel back in it could be because the clock spring is broken or damaged.
This guide shows how to easily open up the tape measure shell and the spring housing to replace a faulty spring. Careful consideration must be taken with the spring as to not damage your eyes as it can unwind rapidly.
필요한 것
-
-
Remove all three screws from the clip side of the cover with a Phillips #1 screwdriver.
-
One 9.525 mm Phillips screw.
-
One 15.875 mm Phillips screw.
-
One 12.7 mm Phillips screw.
-
Remove the metal clip and open the red and black shell by pulling it apart.
 FixBot에 문의하기
-
-
-
Pull the half shell off and remove the black spring housing from the plastic axle by pulling upward.
-
-
-
Unravel the yellow tape from the spring housing and remove the end from the metal tab.
-
-
-
Open the spring housing by pulling the top plate cap apart from the rest of the housing.
-
-
-
-
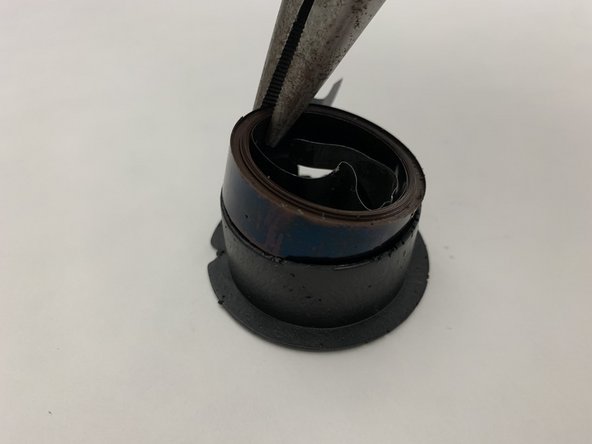
Remove the old clock spring by using the needle nose pliers to pry from the housing.
-
Place the new spring in the housing using the same technique in reverse order.
-
-
-
Line up the plate so that the end of the spring lines up between the teeth, and press down until the plate clicks in.
-
-
-
Feed the end of the spring through the hole in the tape sideways and twist the housing and tape so that the tape lines up with the slot.
-
-
-
Carefully wrap the tape around the housing while maintaining enough tension to keep the tape tight.
-
-
-
Hold the housing and tape above the plastic axle so that the axle is concentric to the hole. Pinch the middle of the spring and slide the creased end through the gap in the middle of the axle. Push the whole mechanism down into the shell of the tape measure until it is flat against the plastic.
-
Place the black brake button into the bottom of the shell before closing it.
-
-
-
Place the other half of the shell back on and squeeze until it clicks. Put the metal clip on top over the middle hole and screw in the fasteners with a Phillips #1 screwdriver.
-
One 9.525 mm Phillips screw
-
One 15.875 mm Phillips screw
-
One 12.7 mm Phillips screw
-


다른 6명이 해당 안내서를 완성하였습니다.

팀

Embry-Riddle Aeronautical University, Team S10-G4, Salas Spring 2020 Embry-Riddle Aeronautical University, Team S10-G4, Salas Spring 2020 회원
ERAU-SALAS-S20S10G4
2 회원들
안내서 3개를 작성함