주요 콘텐츠로 건너뛰기

Texas Instruments TI-30 XS Multiview Solar Panel Replacement

필요한 것

  1. Texas Instruments TI-30 XS Multiview Solar Panel Replacement, Open the device: 1 단계, 이미지 1/2 Texas Instruments TI-30 XS Multiview Solar Panel Replacement, Open the device: 1 단계, 이미지 2/2
    • If the screw is not turning, do not force it. This can strip the screw. See the How to Remove a Stripped Screw guide if the screw is already stripped.

    • Using the #00 screwdriver, unscrew the six, 6mm Phillips screws.

    • Use the spudger to pry into the space between the blue back cover and the white body to take off the back cover.

  2. Texas Instruments TI-30 XS Multiview Solar Panel Replacement, Open the battery compartiment: 2 단계, 이미지 1/1
    • Using the #00 Phillips screwdriver unscrew the two, 3mm Phillips screws located near the top of the calculator.

    • Lift the metal plate from the battery and set it to the side.

  3. Texas Instruments TI-30 XS Multiview Solar Panel Replacement, Eject the battery: 3 단계, 이미지 1/1
    • Use the spudger to lift the battery up from the black holder.

    • Put the new CR2032 battery in. Never insert a different type of battery!

    • Reverse the steps 2 and 1.

  4. Texas Instruments TI-30 XS Multiview Solar Panel Replacement, Free the solar panel: 5 단계, 이미지 1/1
    • Use the #00 Phillips screwdriver to remove the one 3mm Phillips screw holding the solar panel in place.

  5. Texas Instruments TI-30 XS Multiview Solar Panel Replacement, Carefully pull the panel out: 6 단계, 이미지 1/1
    • Be careful not to pull the solar panel too far out, as the wires connecting it to the calculator are fragile and could be ripped off.

    • Carefully pull the solar panel away from the calculator, as shown to the left.

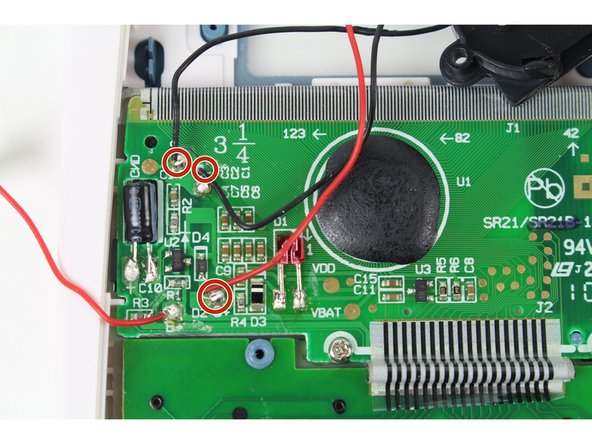
  6. Texas Instruments TI-30 XS Multiview Solar Panel Replacement, Unsolder the wires: 7 단계, 이미지 1/1
    • The capacitor might not be discharged. Proceed with caution.

    • Unsolder the three wires from the motherboard.

    • Unsoldering help can be found here.

    • To re-solder the wires from the new solar panel to the calculator motherboard take notice of the color and placement of the wires.

결론

To reassemble your device, follow these instructions in reverse order.

Aaron Feinstein

회원 가입일: 10/01/15

301 평판

안내서 1개 작성함

Cal Poly, Team 11-2, Forte Fall 2015 Cal Poly, Team 11-2, Forte Fall 2015 회원

CPSU-FORTE-F15S11G2

4 회원들

안내서 9개 작성하였습니다

댓글 한 개

Do you know where I could get a replacement solar panel for the calculator?

Josh - 답글

댓글 쓰기

조회 통계:

24 시간 전: 2

7일 전: 5

30일 전: 24

전체 시간: 2,243