주요 콘텐츠로 건너뛰기
수리 커뮤니티 가입 - 계정 만들기

Trio AXS 3G Screen Replacement

필요한 것

  1. Trio AXS 3G Screen Replacement, Back Case: 1 단계, 이미지 1개 중 1개
    • On the back of the device there is a white SD card case that shelters the screws that attach the back panel to the tablet.

    • Use your thumbs to slide up and off the small SD card case.

    댓글 쓰기

  2. Trio AXS 3G Screen Replacement: 2 단계, 이미지 2개 중 1개 Trio AXS 3G Screen Replacement: 2 단계, 이미지 2개 중 2개
    • Using the Phillips Head #000, unscrew the 5 4mm and 3mm screws at the top.

    댓글 쓰기

  3. Trio AXS 3G Screen Replacement: 3 단계, 이미지 1개 중 1개
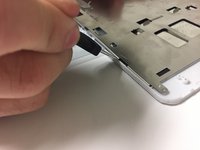
    • Insert a plastic opening tool between the back panel and the front of the tablet, and gently pry it away from the tablet.

    • Do not pry too hard as the screen is fragile and might crack.

    • It is best to start at the bottom of the tablet when prying the back panel off.

    • The volume piece will also dislodge when the back panel is removed.

    댓글 쓰기

  4. Trio AXS 3G Screen Replacement, Screen: 4 단계, 이미지 1개 중 1개
    • The motherboard and battery will have to be removed to expose the metal panel underneath.

    댓글 쓰기

  5. Trio AXS 3G Screen Replacement: 5 단계, 이미지 1개 중 1개
    이 단계에 사용된 도구:
    Plastic Cards
    $2.99
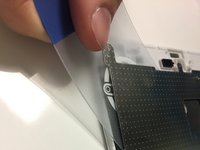
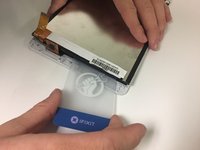
    • Use the plastic card to pry the battery away from the device.

    • The battery is attached to the tablet by glue.

    댓글 쓰기

  6. Trio AXS 3G Screen Replacement: 6 단계, 이미지 1개 중 1개
    • Peel off the battery from the device and set aside.

    • The battery is connected to the motherboard by two wires. Be careful not to sever the connection.

    댓글 쓰기

  7. Trio AXS 3G Screen Replacement: 7 단계, 이미지 1개 중 1개
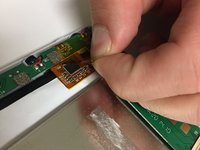
    • Using a #000 screwdriver, unscrew the five 4mm and 3 mm screws connecting the top portion of the motherboard to the device.

    댓글 쓰기

  8. Trio AXS 3G Screen Replacement: 8 단계, 이미지 1개 중 1개
    • Disconnect the silver tape that attaches the motherboard to the metal panel.

    댓글 쓰기

  9. Trio AXS 3G Screen Replacement: 9 단계, 이미지 1개 중 1개
    • Disconnect the ribbon from the bottom portion of the motherboard.

    댓글 쓰기

  10. Trio AXS 3G Screen Replacement: 10 단계, 이미지 1개 중 1개
    • Remove the motherboard and set aside.

    댓글 쓰기

  11. Trio AXS 3G Screen Replacement: 11 단계, 이미지 1개 중 1개
    • The smaller portion of the motherboard is located at the bottom with the speaker.

    • Using a #000 screwdriver, unscrew the three 3 mm screws that fasten the smaller segment of the motherboard to the tablet.

    댓글 쓰기

  12. Trio AXS 3G Screen Replacement: 12 단계, 이미지 2개 중 1개 Trio AXS 3G Screen Replacement: 12 단계, 이미지 2개 중 2개
    • Located towards the bottom, carefully remove the yellow film.

    댓글 쓰기

  13. Trio AXS 3G Screen Replacement: 13 단계, 이미지 1개 중 1개
    • Gently disconnect the small ribbon found underneath the film.

    댓글 쓰기

  14. Trio AXS 3G Screen Replacement: 14 단계, 이미지 1개 중 1개
    • There is another connection found underneath this portion of the motherboard.

    • Lifting up the motherboard, disconnect the second ribbon found underneath.

    댓글 쓰기

  15. Trio AXS 3G Screen Replacement: 15 단계, 이미지 1개 중 1개
    • Unscrew the two 4 mm #000 screws.

    댓글 쓰기

  16. Trio AXS 3G Screen Replacement: 16 단계, 이미지 1개 중 1개
    • Remove the speaker and bottom portion of the motherboard.

    댓글 쓰기

  17. Trio AXS 3G Screen Replacement: 17 단계, 이미지 1개 중 1개
    • At this stage, almost all inside components should be removed (as shown).

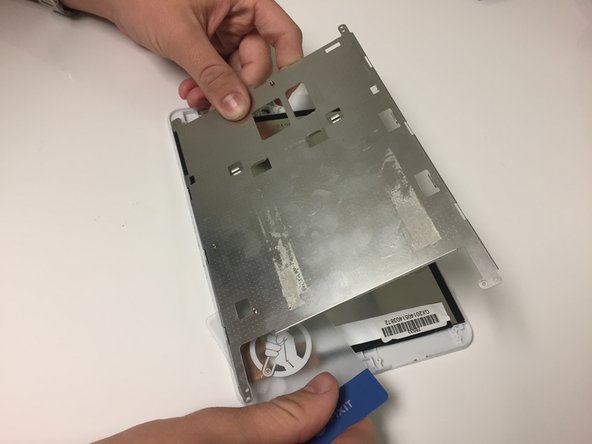
    • Using a screwdriver size #000, remove the four 4 mm screws found at each corner of the metal panel if you haven't gotten them already.

    댓글 쓰기

  18. Trio AXS 3G Screen Replacement: 18 단계, 이미지 3개 중 1개 Trio AXS 3G Screen Replacement: 18 단계, 이미지 3개 중 2개 Trio AXS 3G Screen Replacement: 18 단계, 이미지 3개 중 3개
    • Use the plastic card to separate the metal panel from the screen component.

    댓글 쓰기

  19. Trio AXS 3G Screen Replacement: 19 단계, 이미지 1개 중 1개
    • Separate memory card from screen.

    댓글 쓰기

  20. Trio AXS 3G Screen Replacement: 20 단계, 이미지 2개 중 1개 Trio AXS 3G Screen Replacement: 20 단계, 이미지 2개 중 2개
    • Use the plastic card to separate screen component from front panel.

    댓글 쓰기

  21. Trio AXS 3G Screen Replacement: 21 단계, 이미지 1개 중 1개
    • Use the plastic card to separate the glass from the front panel.

    • Once the glass is removed, the new glass can be fitted to the front panel.

    댓글 쓰기

결론

To reassemble your device, follow these instructions in reverse order.

취소: 해당 안내서를 완성하지 않았습니다.

작성자

3다른 기여자 명과 함께

Michaela Causey

회원 가입일: 09/20/17

328 평판

안내서 3개를 작성함

0가이드 댓글

댓글 쓰기

조회 통계:

지난 24시간: 2

지난 7일: 10

지난 30일: 41

전체 시간: 1,286