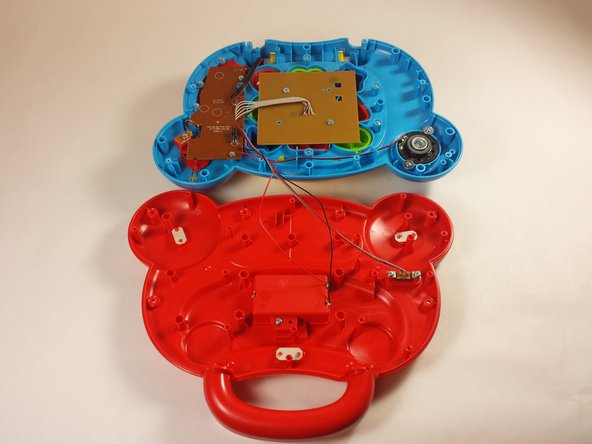
주요 콘텐츠로 건너뛰기

VTech Baby's Learning Laptop Volume Switch Replacement

필요한 것

  1. VTech Baby's Learning Laptop Volume Switch  Replacement, Battery and Rear Panel: 1 단계, 이미지 1개 중 1개
    • To remove the battery door, loosen the screw shown using a Phillips #2 screwdriver.

    • A coin can also be used to loosen the screw.

  2. VTech Baby's Learning Laptop Volume Switch  Replacement: 2 단계, 이미지 1개 중 1개
    • Remove the battery door.

    • Take out the batteries.

  3. VTech Baby's Learning Laptop Volume Switch  Replacement: 3 단계, 이미지 1개 중 1개
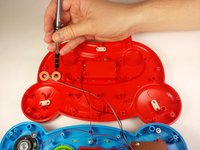
    • Remove the rear panel screws using a Phillips #2 screwdriver.

    • Two 21.6mm (Long)

    • One 9.8mm (Short)

    • Five 13.8mm (Medium)

  4. VTech Baby's Learning Laptop Volume Switch  Replacement: 4 단계, 이미지 2개 중 1개 VTech Baby's Learning Laptop Volume Switch  Replacement: 4 단계, 이미지 2개 중 2개
    • Gently pull up on the rear panel.

    • Be careful not to pull on the wire connections.

    • Rest the laptop open on the table.

  5. VTech Baby's Learning Laptop Volume Switch  Replacement, Volume Switch: 5 단계, 이미지 1개 중 1개
    • Flip your device so the bottom panel is facing up.

  6. VTech Baby's Learning Laptop Volume Switch  Replacement: 6 단계, 이미지 2개 중 1개 VTech Baby's Learning Laptop Volume Switch  Replacement: 6 단계, 이미지 2개 중 2개
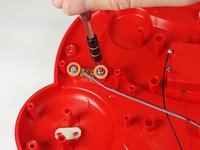
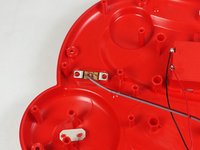
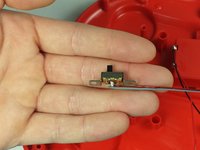
    • Use a Phillips #2 screwdriver to remove the two 7.7mm screws on the volume switch.

  7. VTech Baby's Learning Laptop Volume Switch  Replacement: 7 단계, 이미지 2개 중 1개 VTech Baby's Learning Laptop Volume Switch  Replacement: 7 단계, 이미지 2개 중 2개
    • Remove the volume switch.

    • Be careful not damage the wiring.

결론

To reassemble your device, follow these instructions in reverse order.

작성자

4다른 기여자 명과 함께

Jordan Smith

회원 가입일: 09/03/15

210 평판

안내서 2개를 작성함

USF Tampa, Team 12-2, Blackwell Fall 2015 USF Tampa, Team 12-2, Blackwell Fall 2015 회원

USFT-BLACKWELL-F15S12G2

4 회원들

안내서 14개를 작성함

0가이드 댓글

댓글 쓰기

조회 통계:

지난 24시간: 0

지난 7일: 1

지난 30일: 28

전체 시간: 962