주요 콘텐츠로 건너뛰기

Wii U GamePad LCD Display Replacement

보관된 가이드
해당 안내서는 단지 역사적인 목적으로 보관됩니다. 최신 버전 안내서를 사용하여 수리 하십시오.

필요한 것

동영상 개요

  1. Wii U GamePad LCD Display Replacement, Battery: 1 단계, 이미지 1개 중 1개
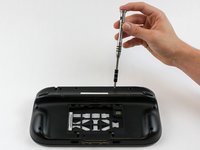
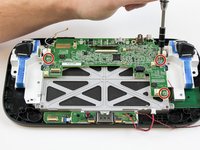
    • Place Gamepad face down and remove the two 4.7 mm screws with a Phillips size #00 screwdriver.

  2. Wii U GamePad LCD Display Replacement: 2 단계, 이미지 1개 중 1개
    • Lift and remove the battery plate.

  3. Wii U GamePad LCD Display Replacement: 3 단계, 이미지 3개 중 1개 Wii U GamePad LCD Display Replacement: 3 단계, 이미지 3개 중 2개 Wii U GamePad LCD Display Replacement: 3 단계, 이미지 3개 중 3개
    • With your finger, press down and pull back on the battery connector plug.

    • Remove the battery from the battery case.

  4. Wii U GamePad LCD Display Replacement, Outer Case: 4 단계, 이미지 3개 중 1개 Wii U GamePad LCD Display Replacement, Outer Case: 4 단계, 이미지 3개 중 2개 Wii U GamePad LCD Display Replacement, Outer Case: 4 단계, 이미지 3개 중 3개
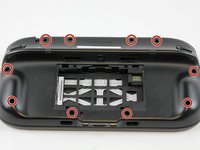
    • Remove 10 9mm screws with Tri-Wing size Y1 screwdriver around the outer case.

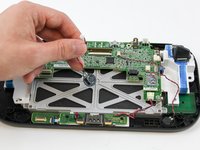
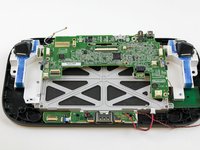
    • Lift up on the back of case.

    • Lift gently because the rumble motor in the back of the case is still connected by a cable to the motherboard.

  5. Wii U GamePad LCD Display Replacement: 5 단계, 이미지 1개 중 1개
    • Unplug outer case rumble motor connector from the motherboard with your fingers.

    • Do not pull on the wires as shown in this picture, they will likely break off. Pull directly on the plug (NOT the receptacle)

  6. Wii U GamePad LCD Display Replacement, Speakers: 6 단계, 이미지 2개 중 1개 Wii U GamePad LCD Display Replacement, Speakers: 6 단계, 이미지 2개 중 2개
    • With your fingers, unplug the left speaker cable from the motherboard.

  7. Wii U GamePad LCD Display Replacement: 7 단계, 이미지 2개 중 1개 Wii U GamePad LCD Display Replacement: 7 단계, 이미지 2개 중 2개
    이 단계에 사용된 도구:
    Tweezers
    $4.99
    • Remove the right speaker cable that's connected to the motherboard with the tweezers.

  8. Wii U GamePad LCD Display Replacement, Wi-Fi Board: 8 단계, 이미지 3개 중 1개 Wii U GamePad LCD Display Replacement, Wi-Fi Board: 8 단계, 이미지 3개 중 2개 Wii U GamePad LCD Display Replacement, Wi-Fi Board: 8 단계, 이미지 3개 중 3개
    이 단계에 사용된 도구:
    Tweezers
    $4.99
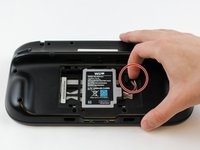
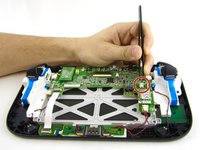
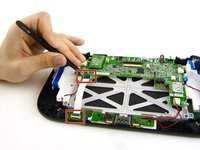
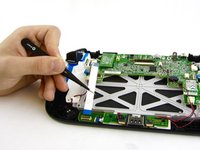
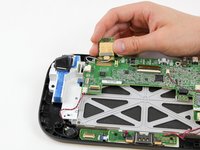
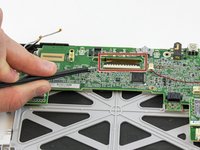
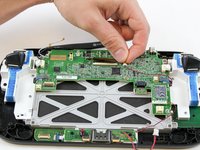
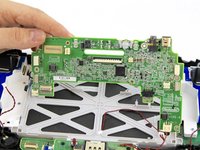
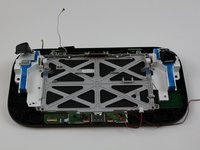
    • Open the top and bottom clasp that connects the white flex cable to the motherboard with the tweezer.

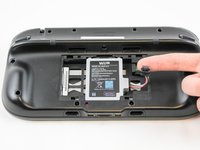
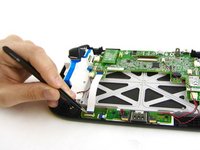
    • Remove the white flex cable with the tweezers.

  9. Wii U GamePad LCD Display Replacement: 9 단계, 이미지 2개 중 1개 Wii U GamePad LCD Display Replacement: 9 단계, 이미지 2개 중 2개
    • With your fingers, lift and remove Wi-Fi board.

    • Remove the board carefully as there are still two wires attached.

  10. Wii U GamePad LCD Display Replacement: 10 단계, 이미지 2개 중 1개 Wii U GamePad LCD Display Replacement: 10 단계, 이미지 2개 중 2개
    • Disconnect the black and white wires off of the back of the Wi-Fi module.

  11. Wii U GamePad LCD Display Replacement: 11 단계, 이미지 1개 중 1개
    • Lift and remove the Wi-Fi module.

  12. Wii U GamePad LCD Display Replacement, Motherboard: 12 단계, 이미지 1개 중 1개
    이 단계에 사용된 도구:
    Tweezers
    $4.99
    • Disconnect the analog connector with tweezers.

  13. Wii U GamePad LCD Display Replacement: 13 단계, 이미지 2개 중 1개 Wii U GamePad LCD Display Replacement: 13 단계, 이미지 2개 중 2개
    • Remove the blue connector using tweezers.

  14. Wii U GamePad LCD Display Replacement: 14 단계, 이미지 2개 중 1개 Wii U GamePad LCD Display Replacement: 14 단계, 이미지 2개 중 2개
    • Carefully lift the black clasp. It is prone to breaking if only lifted from one point. Remove the brown ribbon by using the tweezers.

    • Unclasp and release the small digitizer ribbon cable to the left of the brown ribbon.

    • Be careful, the small clasp breaks easily.

  15. Wii U GamePad LCD Display Replacement: 15 단계, 이미지 1개 중 1개
    • Remove the small orange ribbon with the tweezers.

  16. Wii U GamePad LCD Display Replacement: 16 단계, 이미지 3개 중 1개 Wii U GamePad LCD Display Replacement: 16 단계, 이미지 3개 중 2개 Wii U GamePad LCD Display Replacement: 16 단계, 이미지 3개 중 3개
    • Remove these two connectors to the motherboard with your fingers.

  17. Wii U GamePad LCD Display Replacement: 17 단계, 이미지 2개 중 1개 Wii U GamePad LCD Display Replacement: 17 단계, 이미지 2개 중 2개
    • Remove the NFC communicator.

    • When removing the NFC communicator, be careful with the small connector on the back side.

    • Remove the small connector plug-in on the back.

  18. Wii U GamePad LCD Display Replacement: 18 단계, 이미지 3개 중 1개 Wii U GamePad LCD Display Replacement: 18 단계, 이미지 3개 중 2개 Wii U GamePad LCD Display Replacement: 18 단계, 이미지 3개 중 3개
    • Remove the remaining three 5.1 mm screws using the Phillips size #0 screwdriver.

    • Lift and remove the mother board.

  19. Wii U GamePad LCD Display Replacement, LCD Display: 19 단계, 이미지 2개 중 1개 Wii U GamePad LCD Display Replacement, LCD Display: 19 단계, 이미지 2개 중 2개
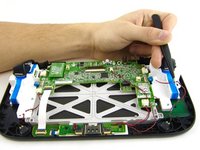
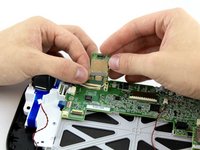
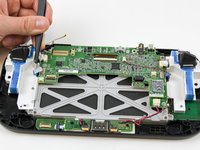
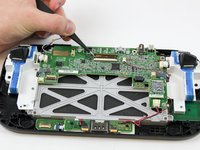
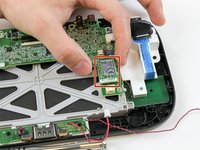
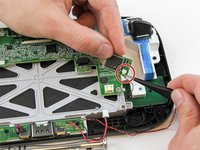
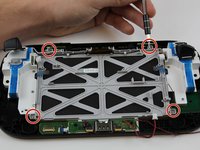
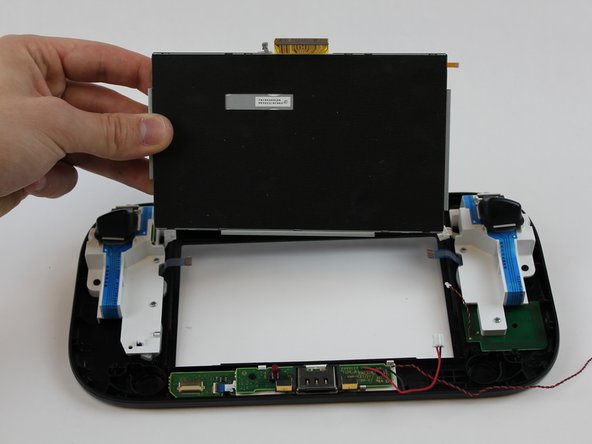
    • Remove the four 5.1mm screws using Phillips size #0 screwdriver.

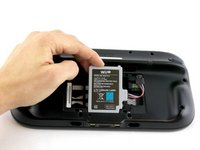
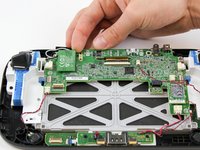
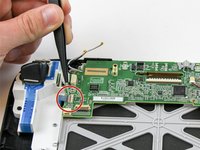
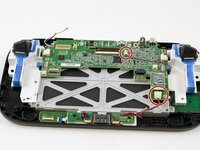
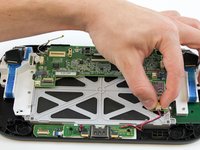
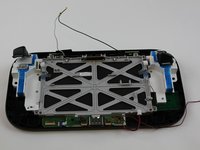
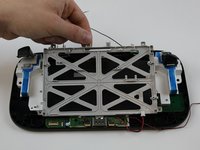
    • Pull the white and black cables away from the display case.

  20. Wii U GamePad LCD Display Replacement: 20 단계, 이미지 2개 중 1개 Wii U GamePad LCD Display Replacement: 20 단계, 이미지 2개 중 2개
    • Lift and remove the grey display case with your fingers.

  21. Wii U GamePad LCD Display Replacement: 21 단계, 이미지 2개 중 1개 Wii U GamePad LCD Display Replacement: 21 단계, 이미지 2개 중 2개
    • Gently with your fingers, press on the front of the display and it will lift up.

    • Remove the display with your fingers.

결론

To reassemble your device, follow these instructions in reverse order.

다른 86명이 해당 안내서를 완성하였습니다.

작성자

8다른 기여자 명과 함께

Valentina Cerruty

회원 가입일: 02/10/16

3,500 평판

안내서 7개를 작성함

USF Tampa, Team 1-6, Sullivan Spring 2016 USF Tampa, Team 1-6, Sullivan Spring 2016 회원

USFT-SULLIVAN-S16S1G6

4 회원들

안내서 40개를 작성함

20가이드 댓글

was really perfect to repair my device. Thank you very much for this help

Bernd Dietrich - 답글

In step 14 - what does the small gray ribbon do? The replacement LCD display that I got in the mail did not have it.

Stacey Hoggard - 답글

Its the touch screen cable. The screen I ordered did not come with one. I had to carefully remove it from my broken display and put it on the new one. Thankfully the touchscreen still works for me.

Terry Moenkhaus -

Very happy with your manual! I've fixed it.

Paulus 68 - 답글

Mine did not come with the touch screen either.

Edwin Kahn - 답글

댓글 쓰기

조회 통계:

지난 24시간: 28

지난 7일: 229

지난 30일: 1,163

전체 시간: 108,485