소개
Use this guide to remove the fingerprint sensor on your Redmi Note 7.
You’ll need replacement adhesive to reattach components them when reassembling the device.
필요한 것
-
-
Apply a heated iOpener to the rear glass to loosen the adhesive underneath. Apply the iOpener for at least two minutes.
-
-
-
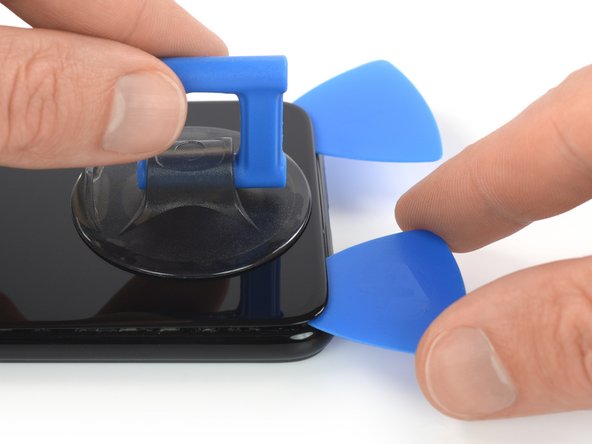
Secure a suction handle to the bottom edge of the rear glass, as close to the edge as possible.
-
Lift the rear glass with the suction handle to create a small gap between the glass and the frame.
-
Insert an opening pick into the gap.
-
Slide the opening pick to the bottom right corner to slice the adhesive.
-
-
-
Insert a second opening pick and slide it to the bottom left corner to slice the adhesive.
-
Leave the opening picks in place to prevent the adhesive from resealing.
-
-
-
Insert a third opening pick at the bottom left corner.
-
Slide the opening pick along the left edge of the phone to slice the rear glass adhesive.
-
Leave the opening pick in its place at the top left corner to prevent the adhesive from resealing.
-
-
-
Insert a fourth opening pick under the top left corner of the rear glass.
-
Slide the opening pick along the top edge of the phone to slice the rear glass adhesive.
-
Leave the opening pick in the top right corner to prevent the adhesive from resealing.
-
-
-
Insert a fifth opening pick at the top right corner of the phone.
-
Slide the opening pick along the right edge to slice the remaining adhesive.
-
-
-
Carefully fold the rear glass to the left side of the phone assembly like you'd open the front cover of a book.
-
-
-
-
Use a Phillips screw driver to remove the three 3.3 mm-long screws securing the connector cover to the midframe.
-
-
-
Use the flat end of a spudger to pry up and disconnect the battery flex cable from the motherboard.
-
-
-
Use a Phillips screw driver to remove the seven 3.4 mm-long screws securing the motherboard cover.
-
-
-
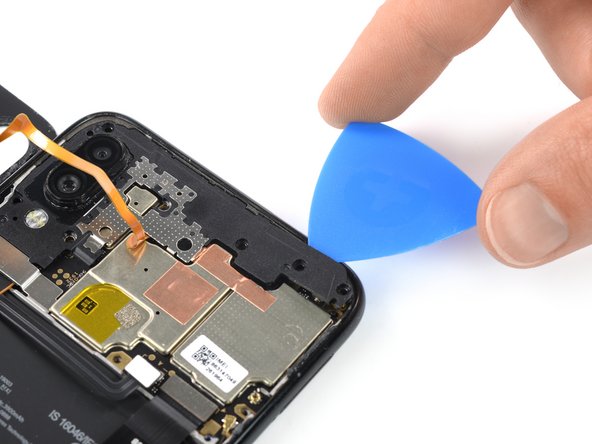
Insert an opening pick into the gap between the top right corner of the motherboard cover and the midframe.
-
Use the opening pick to unhinge the plastic clips of the motherboard cover and pry it up.
-
-
-
Insert an opening pick in the gap between the top edge of motherboard cover and the midframe.
-
Use the opening pick to unhinge the remaining plastic clips at the top edge of the motherboard cover.
-
Pry up the motherboard cover.
-
-
-
Remove the motherboard cover by pulling it in the direction of the top edge of the phone.
-
-
-
Use the flat end of a spudger to pry up and disconnect the fingerprint sensor flex cable.
-
-
-
Heat an iOpener and apply it to the rear glass where the finger print sensor is located to soften the adhesive. Apply the iOpener for at least two minutes.
-
-
-
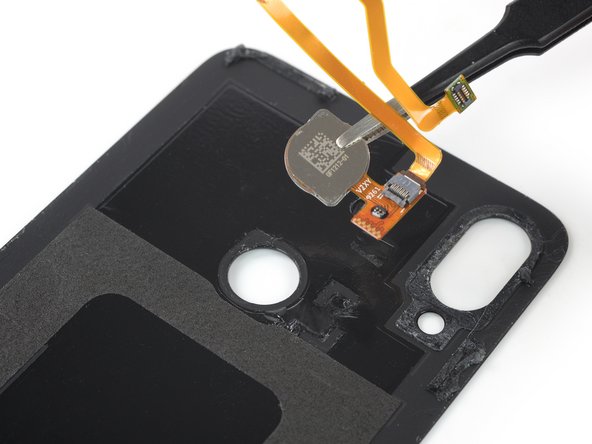
Carefully slide an opening pick underneath the short orange flex cable with the ZIF connector on top to separate it from the rear glass.
-
-
-
Use a pair of tweezers to remove the fingerprint sensor assembly.
-


To reassemble your device, follow these instructions in reverse order. Apply new adhesive where necessary after cleaning the relevant areas with isopropyl alcohol (>90%).
Secure the rear glass and the fingerprint sensor with pre-cut adhesive or double-sided adhesive tape during reassembly.
Take your e-waste to an R2 or e-Stewards certified recycler.
Removal didn’t go as planned? Try some basic troubleshooting, or ask our Answers community for help.
다른 한 분이 해당 안내서를 완성하였습니다.

