주요 콘텐츠로 건너뛰기
수리 커뮤니티 가입 - 계정 만들기

ZD-N Plus Wireless Controller Repair D-Pad Replacement

필요한 것

  1. ZD-N Plus Wireless Controller Repair D-Pad Replacement, Back Panel: 1 단계, 이미지 1개 중 1개
    • Remove the seven 12mm JIS #00 screws that hold the back panel in place.

  2. ZD-N Plus Wireless Controller Repair D-Pad Replacement: 2 단계, 이미지 2개 중 1개 ZD-N Plus Wireless Controller Repair D-Pad Replacement: 2 단계, 이미지 2개 중 2개
    • Lift up on the back panel of the ZD-N Plus to remove it from the rest of the controller.

  3. ZD-N Plus Wireless Controller Repair D-Pad Replacement, Battery: 3 단계, 이미지 1개 중 1개
    • Use an opening tool to pry the battery from its original position.

    • The battery is glued on, so this may take some effort.

  4. ZD-N Plus Wireless Controller Repair D-Pad Replacement: 4 단계, 이미지 2개 중 1개 ZD-N Plus Wireless Controller Repair D-Pad Replacement: 4 단계, 이미지 2개 중 2개
    • Use an opening tool to pry the connector away from the two metallic prongs.

    • The parts are built to stay together, so this may take some effort.

    • Be careful to not warp the prongs in the process.

  5. ZD-N Plus Wireless Controller Repair D-Pad Replacement: 5 단계, 이미지 2개 중 1개 ZD-N Plus Wireless Controller Repair D-Pad Replacement: 5 단계, 이미지 2개 중 2개
    • Remove the battery from the controller.

  6. ZD-N Plus Wireless Controller Repair D-Pad Replacement, Rumble Motor: 6 단계, 이미지 2개 중 1개 ZD-N Plus Wireless Controller Repair D-Pad Replacement, Rumble Motor: 6 단계, 이미지 2개 중 2개
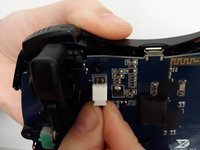
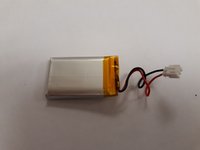
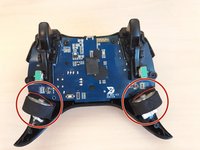
    • Remove the electrical connector attaching each rumble motor to the controller.

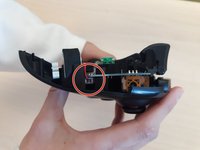
    • Lift up on the circular section of the rumble to remove it from the controller.

  7. ZD-N Plus Wireless Controller Repair D-Pad Replacement, Motherboard: 7 단계, 이미지 2개 중 1개 ZD-N Plus Wireless Controller Repair D-Pad Replacement, Motherboard: 7 단계, 이미지 2개 중 2개
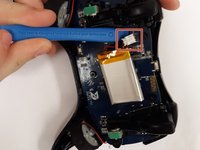
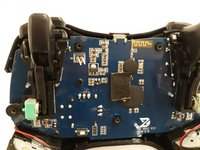
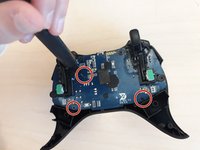
    • Remove the three 1.2mm JIS #00 screws that hold the motherboard in place.

  8. ZD-N Plus Wireless Controller Repair D-Pad Replacement: 8 단계, 이미지 1개 중 1개
    • Lift the motherboard out of the controller.

  9. ZD-N Plus Wireless Controller Repair D-Pad Replacement, D-Pad: 9 단계, 이미지 2개 중 1개 ZD-N Plus Wireless Controller Repair D-Pad Replacement, D-Pad: 9 단계, 이미지 2개 중 2개
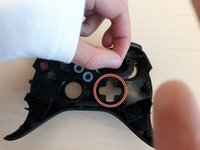
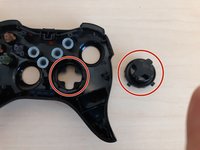
    • Simply remove the plastic piece of the directional pad. It is not glued in so it should come out easily.

결론

To reassemble your device, follow these instructions in reverse order.

작성자

3다른 기여자 명과 함께

Devin Matos

회원 가입일: 10/15/19

184 평판

안내서 2개를 작성함

0가이드 댓글

댓글 쓰기

조회 통계:

지난 24시간: 0

지난 7일: 17

지난 30일: 64

전체 시간: 466