주요 콘텐츠로 건너뛰기

ZTE Axon 7 Battery Replacement

필요한 것

  1. ZTE Axon 7 Battery Replacement, Back Case: 1 단계, 이미지 1/2 ZTE Axon 7 Battery Replacement, Back Case: 1 단계, 이미지 2/2
    • Make sure the device is powered off.

    • Using the SIM Tray Removal Tool, press the pin into the hole on the SIM Tray (located on the top left of the device) to eject the tray.

  2. ZTE Axon 7 Battery Replacement: 2 단계, 이미지 1/2 ZTE Axon 7 Battery Replacement: 2 단계, 이미지 2/2
    • Heat the iOpener in the microwave for 15-30 seconds.

    • iOpener will be HOT! Use oven mitts if necessary.

    • Place the iOpener on top of the top and bottom speaker grills to loosen up the adhesive underneath.

  3. ZTE Axon 7 Battery Replacement: 3 단계, 이미지 1/3 ZTE Axon 7 Battery Replacement: 3 단계, 이미지 2/3 ZTE Axon 7 Battery Replacement: 3 단계, 이미지 3/3
    • Use a Jimmy to pry off the top and bottom speaker grills.

    • Remove the speaker grills gently so they don't crack or break off.

  4. ZTE Axon 7 Battery Replacement: 4 단계, 이미지 1/2 ZTE Axon 7 Battery Replacement: 4 단계, 이미지 2/2
    • Use a Phillips #00 screwdriver to remove the six 3 mm screws located under the speaker grills.

    • There may be remaining adhesive covering some screws. Take time to gently scrape away the adhesive using a spudger or opening tool.

  5. ZTE Axon 7 Battery Replacement: 5 단계, 이미지 1/2 ZTE Axon 7 Battery Replacement: 5 단계, 이미지 2/2
    • Carefully wedge the Jimmy between the screen and aluminum back plate of the device.

    • Begin near the bottom right of the device and carefully work under the screen and slide the Jimmy up the edge of the device to remove the back case.

    • Use plastic picks to keep the display and back aluminum casing from closing as you pry along the perimeter of the phone with the Jimmy.

  6. ZTE Axon 7 Battery Replacement: 6 단계, 이미지 1/3 ZTE Axon 7 Battery Replacement: 6 단계, 이미지 2/3 ZTE Axon 7 Battery Replacement: 6 단계, 이미지 3/3
    • Separate the front and back of the phone, (like a book) to open and gain access to the internal components.

    • Careful to not damage the fingerprint sensor cable attached to the motherboard from the back casing.

    • Place the tip of your opening tool under the edge of the connector, and pry the connector straight up from its socket.

    • Be very careful to pry only under the edge of the connector, and not under the socket itself. If you pry under the socket, you will separate it from the circuit board, which requires specialized microsoldering skills and equipment to repair.

    • To reconnect, align the connector carefully over its socket and press down with your fingertip—first at one side, then the other—until it clicks into place. Don't press down on the middle of the connector until it's fully aligned and seated. If misaligned the connector can be permanently damaged.

  7. ZTE Axon 7 Battery Replacement: 7 단계, 이미지 1/1
    • The back is now completely removed.

  8. ZTE Axon 7 Battery Replacement, Battery: 8 단계, 이미지 1/3 ZTE Axon 7 Battery Replacement, Battery: 8 단계, 이미지 2/3 ZTE Axon 7 Battery Replacement, Battery: 8 단계, 이미지 3/3
    • Use a Phillips #00 screwdriver to remove three 2.0 mm screw securing brackets on the top and bottom of the battery.

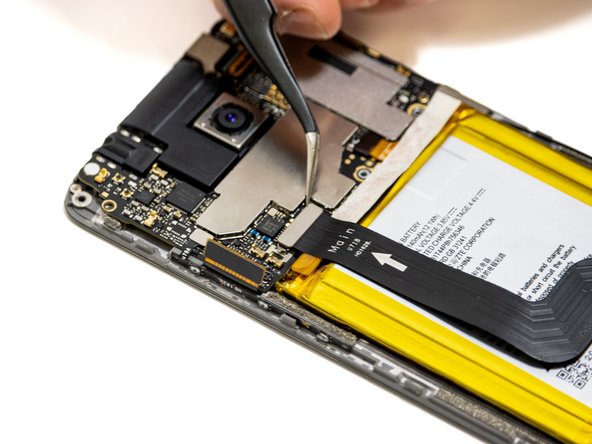
    • Use the angled tweezers and lift the bottom bracket up and off the phone.

    • Use the angled tweezers to slide the top bracket up and off the phone.

  9. ZTE Axon 7 Battery Replacement: 9 단계, 이미지 1/2 ZTE Axon 7 Battery Replacement: 9 단계, 이미지 2/2
    • Disconnect both ends of the cable covering the battery by placing the tip of your opening tool or spudger under the edge of the connector and prying the connector straight up from its socket.

    • Be very careful to pry only under the edge of the connector, and not under the socket itself. If you pry under the socket, you will separate it from the circuit board, which requires specialized microsoldering skills and equipment to repair.

    • Remove the press fit cable.

    • To reconnect, align the connector carefully over its socket and press down with your fingertip—first at one side, then the other—until it clicks into place.

    • Do not press down on the middle of wider connectors until they're fully seated—if misaligned, the connector or the pins underneath can bend or break, causing permanent damage.

  10. ZTE Axon 7 Battery Replacement: 10 단계, 이미지 1/2 ZTE Axon 7 Battery Replacement: 10 단계, 이미지 2/2
    • Place the tip of your opening tool or spudger under the edge of the battery connector, and pry the connector straight up from its socket to disconnect from the motherboard.

  11. ZTE Axon 7 Battery Replacement: 11 단계, 이미지 1/1
    • To remove the battery, use a spudger to carefully pry and slide along the edges of the battery in small increments to release the adhesive.

    • The adhesive under the battery is strong. Be sure to avoid puncturing and bending the battery.

    • Under the battery, on the left side, is a display cable. Be careful not to damage this cable if future intentions are to reuse the display for any purpose.

  12. ZTE Axon 7 Battery Replacement: 12 단계, 이미지 1/2 ZTE Axon 7 Battery Replacement: 12 단계, 이미지 2/2
    • Gently apply force and lift the battery out.

    • If you're having trouble lifting the battery, use the opening pick to slide further under the battery. This will help separate it from the adhesive.

    • Remove the battery, and replace with a new battery. Recycle old batteries as stated by your local regulations.

결론

To reassemble your device, follow these instructions in reverse order.

다른 한 분이 해당 안내서를 완성하였습니다.

Laney Rodriguez

회원 가입일: 01/23/23

295 평판

안내서 2개 작성하였습니다

댓글 0개

댓글 쓰기

조회 통계:

24 시간 전: 0

7일 전: 5

30일 전: 29

전체 시간: 396