주요 콘텐츠로 건너뛰기

ZTE Blade Spark Rear-Facing Camera

  1. ZTE Blade Spark Rear-Facing Camera, ZTE Blade Spark Rear-Facing Camera: 1 단계, 이미지 1/1
    • First, apply heat evenly on the back cover using a heat sack to soften the adhesive.
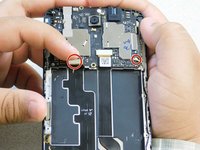
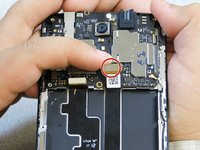
  2. ZTE Blade Spark Rear-Facing Camera: 2 단계, 이미지 1/1
    • Now, carefully remove the back cover.

  3. ZTE Blade Spark Rear-Facing Camera: 3 단계, 이미지 1/1
    • Once opened, Locate and remove all exposed screws using a Phillips-Head screwdriver and set them aside.

  4. ZTE Blade Spark Rear-Facing Camera: 4 단계, 이미지 1/1
    • To remove the inner white panel/cover, use a plastic opening tool to loosen from each side.

  5. ZTE Blade Spark Rear-Facing Camera: 5 단계, 이미지 1/1
    • After removing the white plastic panel, you should see a black metal battery cover.

    • To remove the metal battery cover, remove the screws from the panel using a Phillips screwdriver if you have not yet done so.

  6. ZTE Blade Spark Rear-Facing Camera: 6 단계, 이미지 1/1
    • Then, simple lift to remove the metal battery cover.

  7. ZTE Blade Spark Rear-Facing Camera: 7 단계, 이미지 1/1
    • You have reached the Fingerprint Scanner, the device Battery, and Front Facing Camera.

  8. ZTE Blade Spark Rear-Facing Camera: 8 단계, 이미지 1/3 ZTE Blade Spark Rear-Facing Camera: 8 단계, 이미지 2/3 ZTE Blade Spark Rear-Facing Camera: 8 단계, 이미지 3/3
    • Proceeding with disassembly, next up is the top chipset which the Rear Facing Camera is attached to.

    • To detach the chipset and reach the Rear Camera, locate and disconnect five power connectors surrounding the top chipset (as shown in images).

  9. ZTE Blade Spark Rear-Facing Camera: 9 단계, 이미지 1/1
    • Once you have the power connectors disconnected from the top chipset, use a Phillips screwdriver to remove the final screw located at the very top of the chipset (as shown in image).

  10. ZTE Blade Spark Rear-Facing Camera: 10 단계, 이미지 1/1
    • Then, simply lift chipset from top and detach from the device frame.

  11. ZTE Blade Spark Rear-Facing Camera: 11 단계, 이미지 1/1
    • You have now reached the final replacement component of the device, the Rear Facing Camera!

    • For step-by-step instructions on replacing any of the device components covered throughout the disassembly process, check out our ZTE Blade Spark Replacement guides.

결론

To reassemble your device, follow these instructions in reverse order.

다른 2명이 해당 안내서를 완성하였습니다.

Hung Vu

회원 가입일: 01/24/18

632 평판

안내서 1개 작성함

Gateway, Team S1-G6, Johnson Spring 2018 Gateway, Team S1-G6, Johnson Spring 2018 회원

GCC-JOHNSON-S18S1G6

2 회원들

안내서 2개 작성하였습니다

댓글 0개

댓글 쓰기

조회 통계:

24 시간 전: 0

7일 전: 8

30일 전: 21

전체 시간: 2,254