소개
Connects the iPhone to a computer or charger via iPhone cable.
필요한 것
동영상 개요
-
-
If your display glass is cracked, keep further breakage contained and prevent bodily harm during your repair by taping the glass.
-
Lay overlapping strips of clear packing tape over the iPhone's display until the whole face is covered.
 FixBot에 문의하기
-
-
-
Remove the two Phillips #00 screws from the dock-connector end of the iPhone.
-
-
-
Remove the metal handle from the suction cup. It's easier and safer to grip the suction cup's base instead of the metal handle.
-
Use a small suction cup near the Home button to gently pull up the bottom portion of the iPhone's display assembly.
-
-
-
Rotate the display assembly up until it is at an angle of approximately 45 degrees.
-
-
-
Continue to hold the display assembly with one hand, and use your other hand and a spudger to disconnect the black ribbon cable labeled "1."
-
Start from the ribbon and work your way towards the outside edge of the case.
-
-
-
Rotate the display assembly up until it is roughly vertical. This will allow easier access for disconnecting the remaining cables.
-
Use a spudger to disconnect the black ribbon cable labeled "2."
-
-
-
-
Use a spudger to flip up the white plastic tab holding the remaining ribbon cable in place. The white tab will rotate up 90 degrees, releasing the ribbon cable.
-
Slide the black ribbon cable out of its connector, and remove the display assembly from the iPhone.
-
-
-
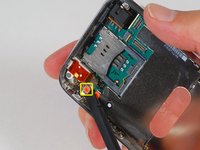
Insert your SIM eject tool or a paper clip into the hole next to the headphone jack.
-
Press down on the tool until the SIM card tray pops out.
-
Grasp the SIM card tray and slide it out of the iPhone.
-
-
-
Remove the following 8 screws:
-
Five 2.3 mm Phillips #00 screws with partial threads securing the logic board to the rear panel.
-
Two 2.3 mm Phillips #00 screws with full threads securing the logic board and camera.
-
One 2.9 mm Phillips #00 screw from beneath the "Do not remove" sticker.
-
-
-
Use a spudger to gently remove the camera retaining clip, (formerly secured by the removed screw) and gently pry the camera up and out of its housing in the rear panel. The camera cannot be removed entirely yet because it's connected to the bottom of the logic board.
-
-
-
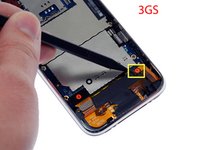
Use a spudger to gently pry up the end of the logic board closest to the dock connector.
-
-
-
Remove the following 3 screws:
-
Two 1.5 mm Phillips #00 screws, one on either side of the dock connector.
-
One 2.4 mm Phillips #00 screw near the ribbon cable labeled "4."
-


To reassemble your device, follow these instructions in reverse order.
다른 298명이 해당 안내서를 완성하였습니다.

11가이드 댓글
When closing the phone (Step 3 - but when going backwards) it is important to be aware of the the contact for the HOME button. They are two little gold contacts that have to hit against two solder points on the dock assembly. I managed to bend them a bit out of alignment, so when I closed up the iPhone the home button was no longer working. Easily fixed, but worth noting.
When replacing the connector you will have to desolder 4 small solder points, 2 per ribbon cable. They are easily desoldered by gently pressing the soldering iron tip to the top of the cable and gently peeling it away.
They can they be resoldered onto the new connector.
The solder points can be seen in step 16 just above the two 1.5mm screws.
scottreschke - 답글 공유
Hi, I followed the instructions and all went well, except for now I have very bad reception problems. I keep getting 'No Service' and cant really make calls. :-(
Could I have damaged the antenna somehow? I have found the antenna stickers online for sale but havent found any instructions as to how to install it...
Any help would be much appreciated.
Thanks
the sample phone looks like a 3G nto a 3Gs. I have an extra wire connection on top of the dock connector in my 3Gs.
mlstrykher - 답글 공유
If you're purchasing a Phillips screwdriver for this I'd highly recommend getting one that has a magnetic tip. I bought the cheaper screwdriver from iFixit but wish I would've sprung for the "professional" version (which I assume does have a magnetic tip). It can be done without it (I did it) but it took much longer than it would have otherwise.