주요 콘텐츠로 건너뛰기

이 버전에는 잘못된 편집 사항이 있을 수 있습니다. 최신 확인된 스냅샷으로 전환하십시오.

필요한 것

  1. 이 단계는 번역되지 않았습니다. 번역을 도와주십시오

    : 1 단계, 이미지 1/1
    • Before you begin, discharge your iPhone battery below 25%. A charged lithium-ion battery can catch fire and/or explode if accidentally punctured.

    • Power off your iPhone before beginning disassembly.

    • Remove the two 3.6 mm Pentalobe P2 screws next to the dock connector.

    • Be sure the driver is well-seated when removing Pentalobe screws—they are easy to strip.

  2. 이 단계는 번역되지 않았습니다. 번역을 도와주십시오

    : 2 단계, 이미지 1/2 : 2 단계, 이미지 2/2
    • Push the rear panel toward the top edge of the iPhone.

    • The panel will move about 2 mm.

  3. 이 단계는 번역되지 않았습니다. 번역을 도와주십시오

    : 3 단계, 이미지 1/1
    • Pull the rear panel away from the back of the iPhone, being careful not to damage the plastic clips attached to the rear panel.

    • Remove the rear panel from the iPhone.

  4. , 배터리: 4 단계, 이미지 1/2 , 배터리: 4 단계, 이미지 2/2
    • 배터리 커넥터를 로직 보드에 고정하는 다음 나사들을 풀어주세요:

    • 1.7mm 나사 한 개

    • 1.5mm 나사 한 개

  5. : 5 단계, 이미지 1/3 : 5 단계, 이미지 2/3 : 5 단계, 이미지 3/3
    • 압력 접점이 제 위치에서 빠질 때까지 배터리 커넥터에서 조심히 밀어내세요.

    • 압력 접점을 분리하세요.

  6. : 6 단계, 이미지 1/3 : 6 단계, 이미지 2/3 : 6 단계, 이미지 3/3
    • 플라스틱 여는 도구를 사용하여 로직 보드 소켓에서 배터리 커넥터를 살살 들어 올리세요.

    • 여는 도구 끝을 라우드스피커 인클로저와 커넥터의 금속 커버 사이에 여는 도구 끝을 놓고 커넥터의 하단 가장자리를 먼저 들어 올리세요.

    • 배터리 커넥터는 로직 보드에서 수직으로 분리됩니다. 옆으로 힘을 가하지 마세요.

    • 배터리 커넥터 소켓 자체를 들어내지 않도록 주의하세요. 아니면 로직 보드에서 분리될 수 있습니다. 아주 작은 납땜 지점 네 곳이 이 실수를 기다리고 있습니다!

  7. , 재조립 팁: 7 단계, 이미지 1/2 , 재조립 팁: 7 단계, 이미지 2/2
    • 재조립하는 동안 압력 접점을 제자리에 조심히 배치해야 합니다. 접점은 사진에 표시된 Philips/십자 나사 기둥 위에 놓여야 하며 금색 접점이 배터리 커넥터를 향해야 합니다.

    • 윈덱스나 이소프로필 알코올과 같은 탈지제를 사용하여 압력 접점을 청소해야 합니다. 손가락에 묻은 기름은 무선 간섭을 일으킬 수 있습니다.

  8. : 8 단계, 이미지 1/2 : 8 단계, 이미지 2/2
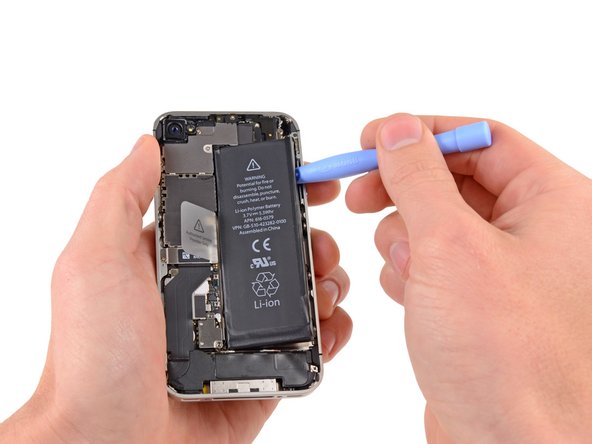
    • 배터리와 iPhone 하단 근처 외부 케이스 사이에 플라스틱 여는 도구 가장자리를 끼우세요.

    • 플라스틱 여는 도구를 배터리 오른편 가장자리를 따라 밀며 올려서 외부 케이스에 고정하는 여러 지점의 접착제를 완전히 분리하세요.

    • 접착제가 너무 강하면 배터리 가장자리 아래에 고농도 (90% 이상) 이소프로필 알코올 몇 방울을 떨어뜨리세요.

    • 알코올 용액이 접착제를 약화시킬 때까지 약 1분 동안 기다리세요.

    • 플라스틱 여는 도구의 평평한 끝을 사용하여 배터리를 살살 들어 올리세요.

    • 배터리를 강제로 빼려고 하지 마세요. 필요하다면 알코올을 몇 방울 더 떨어뜨려 접착제를 더 약화시키세요. 절대로 들어올리는 도구로 배터리를 변형하거나 구멍을 내지 마세요.

    • 휴대폰에 알코올 용액이 남아 있는 경우 새 배터리를 설치하기 전에 조심히 닦아내거나 자연 건조하세요.

  9. : 9 단계, 이미지 1/2 : 9 단계, 이미지 2/2
    • 노출된 투명 플라스틱 당김 탭을 사용하여 배터리를 iPhone에 고정하는 접착제를 벗기세요.

    • 플라스틱 당김 탭은 매우 쉽게 찢어질 수 있으므로 너무 세게 당기지 않도록 주의하세요.

    • 배터리를 분리하세요.

    • 교체용 배터리가 플라스틱 슬리브에 들어 있는 경우, 설치하기 전에 리본 케이블에서 분리하세요.

    • 교체용 배터리가 접힘 없는 케이블과 함께 제공된 경우 배터리를 휴대폰에 설치하기 전에 케이블을 적절한 모양으로 조심히 접어주세요.

    • 교체 배터리를 설치하는 동안 배터리 커넥터를 휴대폰에 임시로 연결하여 제대로 정렬되었는지 확인하세요. 일단 배터리가 접착제로 고정되면 배터리 커넥터를 분리하세요.

    • 재조립하고 나서 강제 재시작하세요. 이렇게 하면 여러 문제를 예방하고 문제 해결을 간소화할 수 있습니다.

  10. 이 단계는 번역되지 않았습니다. 번역을 도와주십시오

    : 10 단계, 이미지 1/2 : 10 단계, 이미지 2/2
    • Remove the following screws securing the dock connector cable cover to the logic board:

    • One 1.5 mm Phillips screw

    • One 1.2 mm Phillips screw

    • Remove the metal dock connector cable cover.

  11. 이 단계는 번역되지 않았습니다. 번역을 도와주십시오

    : 11 단계, 이미지 1/1
    • Use the edge of a plastic opening tool to pry the dock cable up from its socket on the logic board.

  12. 이 단계는 번역되지 않았습니다. 번역을 도와주십시오

    : 12 단계, 이미지 1/1
    • Peel the dock connector cable off the adhesive securing it to the logic board and the side of the speaker enclosure.

  13. 이 단계는 번역되지 않았습니다. 번역을 도와주십시오

    : 13 단계, 이미지 1/2 : 13 단계, 이미지 2/2
    • Use the edge of a plastic opening tool to pry the cellular antenna cable up from its socket on the logic board.

    • De-route the cellular antenna cable out from under the metal fingers attached to the logic board.

  14. 이 단계는 번역되지 않았습니다. 번역을 도와주십시오

    : 14 단계, 이미지 1/1
    • Remove the two 2.4 mm Phillips screws securing the speaker enclosure assembly to the outer case.

  15. 이 단계는 번역되지 않았습니다. 번역을 도와주십시오

    : 15 단계, 이미지 1/1
    • Remove the small black spacer that was under the Phillips screw near the vibrator.

  16. 이 단계는 번역되지 않았습니다. 번역을 도와주십시오

    : 16 단계, 이미지 1/3 : 16 단계, 이미지 2/3 : 16 단계, 이미지 3/3
    • Use a plastic opening tool to lift the speaker enclosure assembly out of the case, being sure not to damage the EMI fingers on the attached Wi-Fi antenna.

    • Remove the speaker enclosure assembly.

    • Before reinstalling the speaker enclosure assembly's screws, be sure the Wi-Fi grounding fingers are installed below the lip in the iPhone's metal case as seen in the third picture.

    • Before reassembly, be sure to clean all metal-to-metal contact points between the grounding fingers of the Wi-Fi antenna and the case of the iPhone with a de-greaser such as windex or isopropyl alcohol. The oils on your fingers have the potential to cause wireless interference issues.

  17. 이 단계는 번역되지 않았습니다. 번역을 도와주십시오

    : 17 단계, 이미지 1/1
    • If present, remove the small strip of tape covering one of the dock connector screws.

  18. 이 단계는 번역되지 않았습니다. 번역을 도와주십시오

    : 18 단계, 이미지 1/2 : 18 단계, 이미지 2/2
    • Use a plastic opening tool to flip up the retaining flap on the home button ribbon cable ZIF socket.

    • Be sure you are prying up on the hinged retaining flap, not the socket itself.

  19. 이 단계는 번역되지 않았습니다. 번역을 도와주십시오

    : 19 단계, 이미지 1/1
    • Use a pair of tweezers to pull the home button ribbon cable out of its socket.

    • There are tiny components on the back side of the ribbon, so be careful not to damage them upon ribbon removal.

  20. 이 단계는 번역되지 않았습니다. 번역을 도와주십시오

    : 20 단계, 이미지 1/1
    • Carefully pull the rubber microphone holder out of its tube in the bottom edge of the iPhone.

  21. 이 단계는 번역되지 않았습니다. 번역을 도와주십시오

    : 21 단계, 이미지 1/1
    • Remove the two 1.3 mm Phillips screws securing the dock connector to the case of the iPhone.

  22. 이 단계는 번역되지 않았습니다. 번역을 도와주십시오

    : 22 단계, 이미지 1/1
    • Remove the tiny rubber spacer near the dock connector.

  23. 이 단계는 번역되지 않았습니다. 번역을 도와주십시오

    : 23 단계, 이미지 1/2 : 23 단계, 이미지 2/2
    • Use the edge of a plastic opening tool to peel the dock connector and its cable off the black plastic case of the iPhone.

    • If you are replacing the dock connector with a new part, make sure to transfer the rubber casing around the microphone. You can do this using a spudger.

  24. 이 단계는 번역되지 않았습니다. 번역을 도와주십시오

    : 24 단계, 이미지 1/2 : 24 단계, 이미지 2/2
    • Pry the dock connector away from its opening at the bottom of the iPhone.

    • Remove the dock connector.

결승점

다른 683명이 해당 안내서를 완성하였습니다.

Walter Galan

694,787 평판

안내서 1,203개 작성하였습니다

댓글 37개

After re-assembling the phone I get searching or very low signal, and the signal that i get is not 3G.

Does anyone have any suggestions?

I have cleaned the connectors and made sure that all connections were tight.

qnc - 답글

THe #00 screw driver does not work for all screws in the 4S so a smaller one is needed. Wasted my money on that one.

karl - 답글

When I had changed the dock connector, my iPhone was not able to get a carrier signal. I found an helpful answer in the forum which worked perfectly for me. Make sure you set the correct date and time (after you remove the battery, it will most probably show you 1970) remove the sim card and plug it in again. That worked for me.

corgold - 답글

I bought the pro tech toolkit and liberation kit and set my work area to the longest one hour of my life. Everything inside the 4s is so tiny and fragile, I was in constant fear of breaking something, but the teardown videos and the comments on this page really help me to get through the entire process.

Thank you everybody and let us continue tinkering our way through all the adversities in this life! Peace!

kinen - 답글

This guide was perfect! Very detailed and explained everything very well. Only thing I found confusing was step 17, but besides that it went perfectly smooth!

Mason Hollis - 답글

댓글 쓰기

조회 통계:

24 시간 전: 4

7일 전: 39

30일 전: 125

전체 시간: 317,579