이 버전에는 잘못된 편집 사항이 있을 수 있습니다. 최신 확인된 스냅샷으로 전환하십시오.
필요한 것
-
이 단계는 번역되지 않았습니다. 번역을 도와주십시오
-
Power off your iPhone before beginning disassembly.
-
Remove the two 3.6 mm Pentalobe P2 screws next to the dock connector.
-
-
이 단계는 번역되지 않았습니다. 번역을 도와주십시오
-
Pull the rear panel away from the back of the iPhone, being careful not to damage the plastic clips attached to the rear panel.
-
Remove the rear panel from the iPhone.
-
-
이 단계는 번역되지 않았습니다. 번역을 도와주십시오
-
Remove the following screws securing the dock connector cable cover to the logic board:
-
One 1.5 mm Phillips screw
-
One 1.2 mm Phillips screw
-
Remove the metal dock connector cable cover.
-
-
이 단계는 번역되지 않았습니다. 번역을 도와주십시오
-
Use the edge of a plastic opening tool to pry the dock cable up from its socket on the logic board.
-
-
이 단계는 번역되지 않았습니다. 번역을 도와주십시오
-
Peel the dock connector cable off the adhesive securing it to the logic board and the side of the speaker enclosure.
-
-
이 단계는 번역되지 않았습니다. 번역을 도와주십시오
-
Use the edge of a plastic opening tool to pry the cellular antenna cable up from its socket on the logic board.
-
De-route the cellular antenna cable out from under the metal fingers attached to the logic board.
-
-
-
이 단계는 번역되지 않았습니다. 번역을 도와주십시오
-
Remove the following four screws securing the cable cover to the logic board:
-
One 2.7 mm Phillips screw
-
One 2.6 mm Phillips screw
-
One 1.3 mm Phillips screw
-
One 1.2 mm Phillips screw
-
-
이 단계는 번역되지 않았습니다. 번역을 도와주십시오
-
Use the edge of a plastic opening tool to pry the cable cover tabs out of their slots cut into the EMI shield on the logic board.
-
Lift the cable cover from its edge nearest the top and remove it from the iPhone.
-
-
이 단계는 번역되지 않았습니다. 번역을 도와주십시오
-
Use the edge of a plastic opening tool to pry the rear camera connector up from its socket on the logic board.
-
Remove the rear camera from the iPhone.
-
-
이 단계는 번역되지 않았습니다. 번역을 도와주십시오
-
Use a SIM eject tool or a paperclip to eject the SIM and its tray.
-
Remove the SIM and its tray.
-
-
이 단계는 번역되지 않았습니다. 번역을 도와주십시오
-
Remove the five cables near the top of the logic board in the following order:
-
Headphone jack/volume button cable
-
Front facing camera cable
-
Digitizer cable
-
Display data cable
-
Power button cable (located underneath the headphone jack/volume button cable as shown in the second picture.)
-
-
이 단계는 번역되지 않았습니다. 번역을 도와주십시오
-
Remove the 1.5 mm Phillips screw securing the grounding clip to the logic board near the headphone jack.
-
-
이 단계는 번역되지 않았습니다. 번역을 도와주십시오
-
Use the tip of a spudger to pry the small grounding clip up off the logic board.
-
Carefully grasp the grounding clip and remove it from the iPhone.
-
-
이 단계는 번역되지 않았습니다. 번역을 도와주십시오
-
Use the edge of a plastic opening tool to disconnect the Wi-Fi antenna from the logic board.
-
-
이 단계는 번역되지 않았습니다. 번역을 도와주십시오
-
If present, peel the piece of black tape covering the hidden screw near the power button.
-
Remove the 2.6 mm Phillips screw securing the logic board near the power button.
-
-
이 단계는 번역되지 않았습니다. 번역을 도와주십시오
-
Remove the following screws securing the logic board to the case:
-
One 2.5 mm Phillips screw near the vibrator motor
-
One 2.4 mm Phillips screw
-
One 3.6 mm standoff along the side of the logic board nearest the battery opening.
-
-
이 단계는 번역되지 않았습니다. 번역을 도와주십시오
-
Carefully lift the logic board from the end closest to the speaker enclosure and slide it away from the top edge of the iPhone.
-
Remove the logic board.
-
-
이 단계는 번역되지 않았습니다. 번역을 도와주십시오
-
Use the edge of a plastic opening tool to carefully pry the metal front facing camera retainer away from the case of your iPhone.
-
Remove the front facing camera retainer.
-
-
이 단계는 번역되지 않았습니다. 번역을 도와주십시오
-
Remove the two 1.6 mm Phillips screws securing the power button bracket to the outer case.
-
Slightly pull the power button bracket away from the outer case.
-
-
이 단계는 번역되지 않았습니다. 번역을 도와주십시오
-
이 단계는 번역되지 않았습니다. 번역을 도와주십시오
-
Use the edge of a plastic opening tool to pry the earpiece speaker off the adhesive securing it to the outer case. Note that the power button cable is glued to the the case as well, and will need to be pried up.
-
Use a pair of tweezers to unfold the earpiece speaker from its recess in the outer case.
-
-
이 단계는 번역되지 않았습니다. 번역을 도와주십시오
-
Use the edge of plastic opening tool to gently move the top sensor assembly away from the outer case.
-
Gently pry the top sensor assembly off the outer case.
-
-
이 단계는 번역되지 않았습니다. 번역을 도와주십시오
-
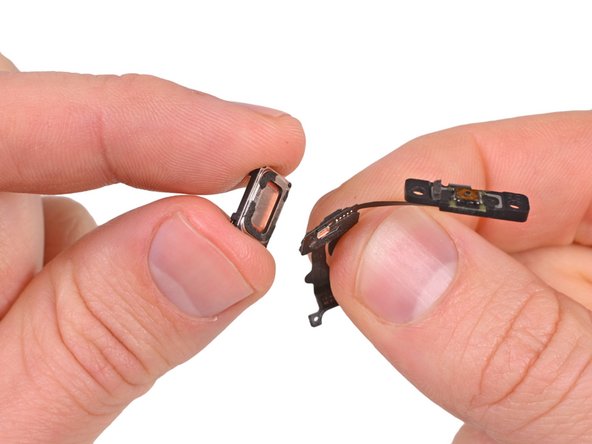
Use the edge of a plastic opening tool to peel the earpiece speaker off the foam adhesive securing it to the iPhone.
-
Remove the earpiece speaker.
-
-
이 단계는 번역되지 않았습니다. 번역을 도와주십시오
-
Use the edge of a plastic opening tool to separate the power button contact from its plastic bracket.
-


다른 532명이 해당 안내서를 완성하였습니다.

댓글 20개
The #00 Phillips and 2.5 mm flat head screwdrivers that are suggested tools are too big. I needed to use a #000 Phillips and 5/64 in flat head screwdrivers.
This repair will destroy your soul. I would not recommend even attempting it without even more specialized tools (eye loupe, headlamp, preternatural patience) as it is extraordinarily easy to ruin your phone with one quick misstep. I've thrown in the towel after weeks of attempting the job. After ripping the screen cable for the second and final time, I'm selling for parts.