이 버전에는 잘못된 편집 사항이 있을 수 있습니다. 최신 확인된 스냅샷으로 전환하십시오.
필요한 것
-
이 단계는 번역되지 않았습니다. 번역을 도와주십시오
-
If your display glass is cracked, keep further breakage contained and prevent bodily harm during your repair by taping the glass.
-
Lay overlapping strips of clear packing tape over the iPhone's display until the whole face is covered.
-
-
이 단계는 번역되지 않았습니다. 번역을 도와주십시오
-
Power off your iPhone before beginning disassembly.
-
Remove the two 3.8 mm P2 Pentalobe screws on either side of the Lightning connector.
-
-
이 단계는 번역되지 않았습니다. 번역을 도와주십시오
-
Close the handle on the iSclack, opening the suction-cup jaws.
-
Place the bottom of your iPhone in between the suction cups, against the plastic depth gauge.
-
The top suction cup should rest just above the home button.
-
Open the handles to close the jaws of the iSclack. Center the suction cups and press them firmly onto the top and bottom of the iPhone.
-
-
이 단계는 번역되지 않았습니다. 번역을 도와주십시오
-
Hold onto your iPhone securely and close the handle of the iSclack to separate the suction cups, pulling the front panel up from the rear case.
-
The iSclack is designed to safely open your iPhone just enough to separate the pieces, but not enough to damage any cables.
-
Skip the next three steps and continue on to Step 8.
-
-
이 단계는 번역되지 않았습니다. 번역을 도와주십시오
-
While holding the iPhone down with one hand, pull up on the suction cup to slightly separate the front panel assembly from the rear case.
-
With a plastic opening tool, begin to gently pry the rear case down, away from the display assembly, while you pull up with the suction cup.
-
-
이 단계는 번역되지 않았습니다. 번역을 도와주십시오
-
Pull the plastic nub to release the vacuum seal on the suction cup.
-
Remove the suction cup from the display assembly.
-
-
이 단계는 번역되지 않았습니다. 번역을 도와주십시오
-
Lift the home button end of the front panel up to gain access to the connectors near the top of the phone.
-
Open the display to about a 90º angle, and lean it against something to keep it propped up while you're working on the phone.
-
In a pinch, you can use an unopened canned beverage to hold the display.
-
Add a rubber band to keep the display securely in place while you work. This prevents undue strain on the display cables.
-
-
이 단계는 번역되지 않았습니다. 번역을 도와주십시오
-
Remove the two 1.6 mm Phillips #000 screws securing the metal battery connector bracket to the logic board.
-
-
이 단계는 번역되지 않았습니다. 번역을 도와주십시오
-
Use a spudger or a clean fingernail to gently pry the battery connector up from its socket on the logic board.
-
-
-
이 단계는 번역되지 않았습니다. 번역을 도와주십시오
-
Remove the following Phillips #000 screws securing the front panel assembly cable bracket to the logic board:
-
Two 1.3 mm screws
-
One 1.7 mm screw
-
One 3.25 mm screw
-
-
이 단계는 번역되지 않았습니다. 번역을 도와주십시오
-
Use a plastic opening tool or a fingernail to disconnect the front-facing camera and sensor cable connector.
-
-
이 단계는 번역되지 않았습니다. 번역을 도와주십시오
-
Use a plastic opening tool or a fingernail to disconnect the LCD cable connector.
-
-
이 단계는 번역되지 않았습니다. 번역을 도와주십시오
-
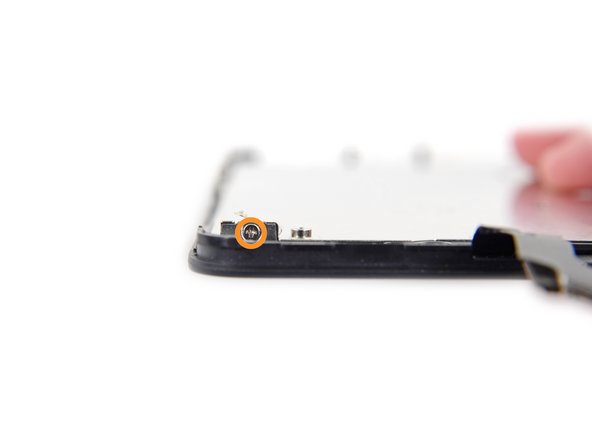
Remove the two 1.3 mm Phillips #000 screws securing the home button bracket to the display assembly.
-
-
이 단계는 번역되지 않았습니다. 번역을 도와주십시오
-
Use a plastic opening tool to pry the edge of the home button ribbon cable up from the display assembly.
-
Start under the contact points on the right and work to the left.
-
-
이 단계는 번역되지 않았습니다. 번역을 도와주십시오
-
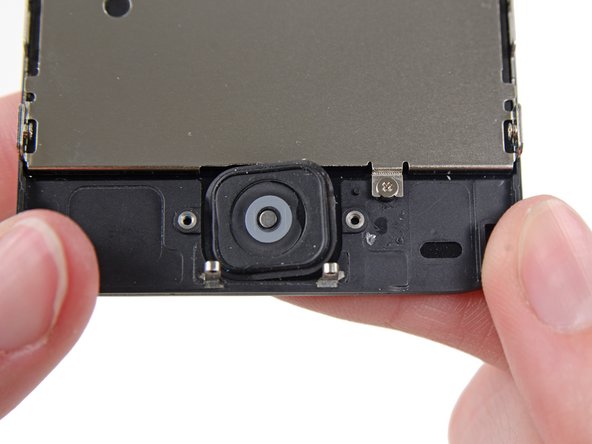
Gently push the top right corner of the home button up away from the front panel.
-
-
이 단계는 번역되지 않았습니다. 번역을 도와주십시오
-
Peel the home button the rest of the way off of the display by prying gently with a spudger.
-
-
이 단계는 번역되지 않았습니다. 번역을 도와주십시오
-
Remove two Phillips #000 screws securing the upper component bracket to the display assembly.
-
One 4.2 mm screw
-
One 2.3 mm screw
-
-
이 단계는 번역되지 않았습니다. 번역을 도와주십시오
-
Use the flat edge of a spudger to push the earpiece speaker bracket off the display assembly.
-
-
이 단계는 번역되지 않았습니다. 번역을 도와주십시오
-
The front-facing camera and sensor cable is adhered to the display assembly with mild adhesive.
-
While this step is not required, it will decrease the chances of damaging the delicate cable assembly.
-
-
이 단계는 번역되지 않았습니다. 번역을 도와주십시오
-
Using the pointed end of a spudger, gently pry the earpiece speaker contact cable up, to separate this portion of the camera and sensor cable from the adhesive below.
-
-
이 단계는 번역되지 않았습니다. 번역을 도와주십시오
-
Slide the point of a spudger under the microphone to lift it out of its recess in the display assembly.
-
-
이 단계는 번역되지 않았습니다. 번역을 도와주십시오
-
Remove two 1.2 mm Phillips #000 screws from each side of the LCD frame (four total).
-
-
이 단계는 번역되지 않았습니다. 번역을 도와주십시오
-
Remove the 1.6 mm Phillips #000 screws from the LCD shield plate.
-
One at bottom of the display assembly near the home button opening
-
One at the top of the display near the cables
-


다른 737명이 해당 안내서를 완성하였습니다.


댓글 43개
I found that I also needed some very fine pointed tweezers for handling those tiny screws.
Yes,but be careful,if you squeeze too hard that tiny screw will launch itself god knows where and you may not find it.
John P -